Wednesday, March 30, 2011

Refinishing an End Table...


When I visited my oldest daughter in February, she and I searched thrift stores in her area trying to find an end table for her to refinish for her living room. Try as we might there were none to be had. However, a couple of weeks ago I was out with a friend when we passed a garage sale. On our way back home we stopped at the sale and there stood the end table of my {daughter's} dreams...


Ok, this wasn't exactly the end table that dreams are made of, but it showed great promise, and the best part was...


Because this daughter has a little bun in the oven  -- yes, both my daughter's are expecting -- I was designated as the official furniture refinisher beautician for this project.

In her time I'm sure this little table was stylin' and the epitome of fashion, but she had become a bit outdated and {dare I say} dowdy. I started by treating this deteriorating diva to an exfoliating facial with my new orbital sander. In no time at all I erased years from her life...


Before I began the makeover I asked my daughter to go to Home Depot and pick out the color of paint that she wanted me to use. That girl is not afraid of color! She chose "Behr Aquatic Green" -- a gorgeous dark turquoise! For the entire project I used less than a quart of Behr Premium Plus Ultra Paint and Primer in One. {Love it!} Here's what it looked like after the first coat. It's amazing what the right foundation will do...


Botox has nothin' on a great can of paint. It can take years off the face of a piece of furniture! Here she is with two coats of paint applied...

We decided to give her a light coating of bronzer glaze. Glaze will modify and slightly tone down the color of a piece and add dimension and depth to details in furniture. Below is an example of how to glaze. #1 - The painted furniture ready to be glazed. #2 - Paint your glaze on paying close attention to areas of detail where you want the features highlighted. #3 - Use a soft rag to wipe away excess glaze. If you wipe away too much, just add a little more. Glazing is a very inexact science. For this piece I did a very light coating of glaze and concentrated on the detailed areas.


I use Ralph Lauren Faux Technique Glaze found at Home Depot. Here's the recipe...


Here's the front of the table after the glaze had dried...


Well, she's ready for the big reveal. What a difference an exfoliating facial, some new makeup and a little TLC can do...


Originally I was going to buy some new door pulls, but I decided instead to spray paint the original ones silver and glaze them a little. I actually love the shape of these knobs. A can of spray paint can change something from drab to fab. Here's the proof...


I like to think of myself as a generous person, but it's going to take every once of willpower to send this table off to my daughter. ;o)  I adore it, but it will look fabulous in her home!


I take comfort in the fact that some things don't get older, they just get better.


Cost:
Table: $5
Paint: $12
Total: $17


Linked to:
SNS @ Funky Junk Interiors
Furniture Feature Friday @ Miss Mustard Seed
SAS @ Just A Girl
Frugal Friday @ The Shabby Nest
Feature Your Sites @ Sassy Sites
Favorite Things Friday @ The Speckled Dog
Frugalicious Friday @ Finding Fabulous
Catch as Can Party @ My Repurposed Life
Hookin' Up w/House of Hepworths
Transformation Thursday @ The Shabby Chic Cottage
Strut Your Stuff @ Somewhat Simple
Show Off Your Stuff @ Fireflies & Jellybeans
20 Below @ Christina's Adventures
All Things Inspired @ All Things Heart & Home
Show & Tell @ Blue Cricket Design
Power of Paint Party @ Domestically Speaking
Nifty Thrifty Tuesday @ Coastal Charm

Tuesday, March 29, 2011

From Slightly Used to Almost New ...

You might remember that my youngest daughter is having a baby in June. {so excited!} A sweet friend of mine offered my daughter and her husband a rocking chair that they had used for the last seven years for their three children. It was such a generous gesture! My daughter was thrilled when she found out the rocker was white -- as she had been looking for a second-hand {white!} rocker for some time. This is what it looked like when it was dropped off at our home.


The painted wood was in wonderful condition, but we knew a little reupholstering was in its future. My daughter went to work looking for some fabric that would suit their needs. She finally decided on this fun, swirly canvas fabric found at Hobby Lobby. I've used this fabric for several other projects. It's a great medium weight canvas. Here's what became of that little ol' denim rocker. {I'm hoping this wild and crazy fabric won't keep the baby up at night, but that is not something I'm willing to guarantee.}

Love it! 


To recover cushions, just trace around the existing cushion to make a pattern. Then measure the sides and add enough to the edge of the pattern for the sides. Include a seam allowance and you're set!

Something I "fixed" on the rocker were a number of "holes" (like the one below) where screws were placed but not covered with any kind of plug.


I bought a package of 1/2" wood plugs at Hobby Lobby and painted them white. Then I tightened up the screws, put a dollop of wood glue in the holes and plopped a plug into each hole. It gave the chair a more finished look...


My daughter is going to place this rocker in her little boy's nursery that will be decorated in yellow and white -- with a dash of swirly orange. She is planning on incorporating a "robot" theme, so I'll be coming up with a pillow later this week that features R2D2's cousin...  ;o)

Cost:
Chair & Ottoman: Free {Thank you!}
Fabric: 3 yards @ $27
Additional foam cushion for footstool: $3
Wood plugs: $1.50
Velcro: $1.50
Thread
Total: $33


Linked to:
Friday Flair @ Whipperberry
Frugal Friday @ The Shabby Nest
Show Off Your Stuff Party @ Fireflies & Jellybeans
Show & Tell @ Blue Cricket Design
All Things Inspired @ All Things Heart & Home
Get Your Craft On @ Today's Creative Blog
Trash to Treasure @ Sassy Sites
Anything Related @ All Things Related
Nifty Thrifty Tuesday @ Coastal Charm

Monday, March 28, 2011

Nesting...


I usually hang a spring wreath on my front door, but this year I decided to do something a little different...


I found this flat wicker basket and filled it with a luscious spring bouquet. I love it ... and so does a certain expectant bird in the neighborhood. Don't get me wrong. I understand the nesting thing. I've never hatched an egg but in my younger days I had giving birth down to a fine art, so I understand wanting to feather one's nest and create a comfortable little home for a new arrival. I just don't think a flower arrangement on a front door is the place to create such a home. However, I can't blame my little feathered friend for wanting to surround herself and her little ones with flowers. In that way we are very much alike. 

A couple of days ago a birdie of another variety, made its way to our home. Do you see her there in the branches?


I was visiting my favorite blogs the other day when I came upon a post at the DIY Dish.  The post highlighted a video where Kim and Kris were hosting fabric designer Joel Dewberry. I was hooked from the get-go. I happen to love Joel Dewberry's fabric collections, so I watched the entire video.


On the video they demonstrated how to make these cute little birdies and offered a free downloadable PDF pattern that is found in Joel Dewberry's new book! {Thank you!} 


I made a feathered friend that night.


This is one kind of nesting bird I don't mind in the least...


Tuesday, March 22, 2011

A rice-filled cooling pad for children...


Introducing
{drumroll please...} 

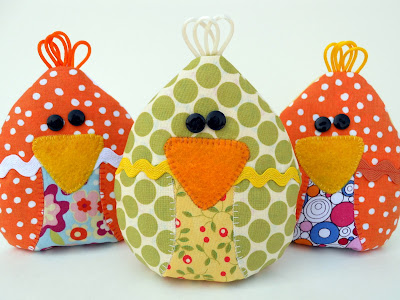
The Chick-sicle!


{A rice-filled Cooling Pad for children}

As a mother of seven and grandmother to eight, I have learned a thing or two over the years. One thing I discovered early on is a Scooby-Doo band-aide or a baggie of ice can make all the difference in "healing" a child's scratched knee or bruised arm. The acknowledgment of pain goes a long way in the soothing of it.

A couple of months ago I designed and shared this pattern.  I called them "Love Birds." They are owl inspired rice-filled heating pads for children...


Because they were so successful, I started thinking about creating a smaller version of the heating pad -- one that could be used as an ice pack. As a result these Chick-sicles were hatched...


I've never liked the idea of using a baggie -- filled with freezing, hard pieces of ice -- as a cold pack on a little one's boo-boos! It seems too abrasive and uncomfortable to me, but kids love the attention they receive when they are given a cold pack to soothe a hurt. 


I discovered in the process of creating this pattern, that it's much more difficult to create a pattern for something that is small, than a larger item. Trying to put enough detail to make it unique in a smaller space, takes talent -- quite possibly more than I possess! Never-the-less, these little chicks were born...


Chick-sicles can be stored in the freezer until just the right moment. When taken out and applied to a skinned knee, the frozen rice will cool and soothe the hurt {both physically and mentally}...


The front of the Chick-sicle is made from scraps of cotton. The back is covered with soft flannel...


They are approximately 5 1/2 inches tall which is a manageable size for a little one. {Plus, this egg-shaped chick might work as an item in an Easter basket.}


 I've decided to make this pattern
and some brief instructions on how to make my
Chick-sicle Cooling Pad 
 available to all!
  

Click here
to be transported to my Etsy store to purchase my
 Chick-sicle pattern and instructions!


Enjoy!


Linked to:
Blogger of the Month Party @ Today's Top 20
Saturday Night Special @ Funky Junk Interiors
Show & Tell Saturday @ Be Different Act Normal
Free for All Friday @ Sassy Sites
For the Kids Friday @ Sun Scholars
All Things Domestic @ Crazy Domestic
Show Off Your Stuff @ Fireflies & Jellybeans
Kids Corner @ Sassy Sites
Linky Party @ Somewhat Simple
20 Below @ Christina's Adventures
Tutorial Tuesday @ The Little Birdie Blog
Show & Tell @ Blue Cricket Design
All Things Inspired @ All Things Heart & Home
Anything Related @ All Thingz Related
Get Your Craft On @ Today's Creative Blog
Handmade Tuesdays @ Ladybug Blessings
Take a Look Tuesdays @ Sugar Bee Crafts
t2t Tuesday @ Your Sassy Sites
Visit thecsiproject.com

Monday, March 21, 2011

April's Plaque Attack is here...

Oh my goodness! If you read the earlier announcement on my sidebar about the "Email Fiasco" last month in regard to my email problems you'll know why I am changing things up a bit this month! Last month over 50 emails requesting March's Plaque Attack were sent to my "spam" box instead of my email "inbox." I discovered this last week -- exactly one day before St. Patrick's Day. To say I felt bad for those who had requested the "St. Patty's Day inspired" Plaque Attack is to put it mildly. {Sorry ladies.} For this reason -- and possibly because I am receiving several hundred email requests each month for the plaque -- I am changing the method of how you will receive Plaque Attacks from now on!


To receive the Plaque Attack document for April,
please follow the instructions below...

I love spring! April ushers in blue skies, green grass, flowering trees, daffodils and jelly beans! April's plaque certainly reflects the onset of spring and a favorite holiday of mine {{Easter}} !!!


Instead of asking you to send me an email requesting the Plaque Attack document as I have done in the past, I am offering the Plaque Attack in a downloadable PDF document. As always it is free of charge. If possible, before you download the doc would you consider becoming a "follower" and be so kind as to leave a comment below? I always love hearing from you!  If, for some reason, you would rather email me to request your Plaque Attack, feel free to do so. My email address is located on my sidebar. Please be forwarned: The PDF version is 1/4" smaller than the emailed Word version. After downloading the PDF, print it off on plain paper to determine the size. If you'd like it a little bigger, then request the Word document through email.

By downloading this copyrighted document you agree not to sell the document or sell any item that uses this document. It is for personal use only. You may make as many copies for yourself or to use as gifts as you would like!


Click here to download the April Plaque Attack
PDF document!
{To print go to "file" to the left of the document, then "Print PDF."}

If you are new to my blog, go to this post to find the supply list and a simple tutorial on how to make a Plaque Attack!

Update!  
I received this information in an email today from a reader. It might help those who are having trouble printing the document:

"Thank you so much for your recent plaque attack and the chick-sicle!  It's adorable. I just thought I would let you know that I had trouble printing it.  I used Internet Explorer and brought up both documents (the plaque attack yesterday and the chick today) and they came up fine, but when I chose print pdf, a blank screen would come up.  I tried to download it, tried saving it, and nothing worked.  I decided to try another browser and so used Firefox, and both documents came up and printed fine.  So, if others are having trouble like I was, you might suggest to them they use another browser (I suspect Safari would also work).  For some reason, IE did not work for me (I'm on a pc)."

Enjoy!
Linked to:
Show & Tell @ Blue Cricket Design
All Things Inspired @ All Things Heart & Home
Anything Related @ All Thingz Related
Handmade Tuesdays @ Ladybug Blessings
Get Your Craft On @ Today's Creative Blog
t2t Tuesday @ Your Sassy Sites
Take a Look Tuesday @ Sugar Bee Crafts
Visit thecsiproject.com

Did you notice the cute fonts I used? These free fonts can easily be downloaded to your computer by going to {Kevin&Amanda.com}. They have hundreds of fabulous fonts for the taking. So kind of them to share their talents so freely!

Sunday, March 20, 2011

Thankful Thoughts...

Who inspired me this week?
The answer to this question is simple -- the Japanese people -- specifically those struggling from the after-affects and devastation of the earthquake and tsunami. There were many reports of heroism and quiet tenacity that inspired me this week. One such report was of the emergency workers who volunteered to help prevent the full meltdown of one nuclear facility. Certainly Japan is known as being a culture that values self-sacrifice, but these extraordinary individuals could conceivably be making the ultimate sacrifice for their fellow citizens well-being. Their example is humbling and inspiring.

What surprised me this week?
Answer: Insight given me. For several days this week I had feelings of guilt as I relished in the gradual appearance of spring in Colorado. Realizing there was so much suffering going on across the sea, made me wonder if I was being selfish as I enjoyed the warmth of the sun, emerging crocuses, and the appearance of a few blades of spring-green grass. As I pondered these thoughts, I came to the realization that gratitude should never illicit feelings of guilt. While there are many things wrong in the world today, there are many more reasons to give thanks. I realized by cultivating a spirit of gratitude I can better lift myself and others when trials and difficulties do arise. With that thought in mind -- I am grateful for crystal-clear blue skies, white puffy clouds, daffodils, chirping birds and budding trees. Happy 1st day of spring!