Friday, August 30, 2013

Wednesday, August 28, 2013

Garage Renovation... Cabinets


Here's the last post on our garage renovation...

Last weekend we took advantage of a 20% off in-stock cabinet sale at Home Depot and purchased some Hampton Bay cabinets for our garage redo.  I wouldn't use these less-expensive, lower grade cabinets inside our home, but for the garage they were perfect. With the 20% off, we only spent $610 for a corner cabinet, three 36x30x12 cabinets, and one 30x30x12 cabinet.

My husband and I installed the cabinets ourselves. We'd found years ago when we installed some cabinets in our utility room that installing cabinets isn't difficult. (Here's a good tutorial on how to do-it-yourself.)

The hubs is very picky much more meticulous than I am when it comes to doing projects like this. It used to drive me crazy, but I've learned it's something to be admired. When all is said and done I can count on him to do it right, and over the years we've learned how to work well as a team. That wasn't always the case. The first time we hung wallpaper together it almost cost us our marriage. We made a joint decision after that, for the sake of our marriage and our little ones, that we would never wallpaper together again. It was a wise decision. A couple of years later, we added "tile installation" to that list.  Fortunately, "cabinet installation" never made the list. Here's a few photos of our cabinet installation and some tips...

1. Take the cabinet doors off the cabinets. This will make them much lighter as you install them. Especially if you have to rely on someone like me (whimpy) to hold them up while the other person is securing them to the wall.


2. Install a ledger board underneath the cabinets before you start. This board will help keep the cabinets straight and make it much easier for one person to hold the cabinets in place as the other person screws them to the studs in the wall. Once you have one screw in place you won't even need to have someone hold the cabinet up if you've used a ledger board...


3. If you're like my husband you'll use a level to check every conceivable angle on the cabinets. If you're like me you'll stand back, eyeball it and say "it's good." Experts recommend using a level.


We're really looking forward to the storage space that these cabinets will provide. My husband is going to resurface his existing work benches and fit them underneath the cabinets to form an "L" shape.


The rest of the organization of the garage is up to my husband. I'll gladly help him if he needs it, but this is his domain, and he's looking forward to working out the specifics for the storage of all our "essentials." I'm happy to be done with my part.

Monday, August 26, 2013

Garage Renovation Continued...


I didn't realize when we started this project that it would end up being as extensive as it has become. Among the many things I've learned, the most obvious is that a garage is a very large "room." Painting the ceiling and walls has taken me almost two weeks. I usually paint rooms in a fraction of that time, but with one coat of primer on the never-been-painted drywalls and two coats of paint it was a bit of an ordeal. The fact that we had to move all the items in the garage from one side of the garage to the other side two times to facilitate easier painting also added to the longer paint schedule. Last week I finished the painting though, so I am one happy camper. We've gone from unfinished walls that we insulated and ceilings that I primed...


...to drywalled and primed walls...


...to fully primed and painted ceiling and walls.


We chose to paint the ceiling with an eggshell finish rather than a flat finish like I use on the ceilings in our home. I wanted to be able to wipe cobwebs from the ceiling with a broom, and I knew if I did that on a ceiling that was painted with a flat finish it would leave marks. I chose Kilz Pro-X 330 Interior Paint Eggshell in white for the ceiling. For the walls I chose a silver gray color. I wanted something that wouldn't show dirt and scuffs, and I think I chose the perfect color -- Behr Premium Plus Ultra Eggshell in "Classic Silver." 


This color is perfect for a garage because the silver-gray has an "industrial" feel to it. Here's a photo that shows the difference between the white ceiling and the silver gray walls better...


The next order of business is to trim the door going out to our backyard and put in upper cabinets on the other side of the garage. 


We really lucked out one evening when we were searching for upper cabinets for the garage. We were at Lowe's and they had two floor model multi-purpose cabinets that had just been marked down. We bought them both. This one is normally $80 -- we got it for $20...


And, this one is a little larger and normally $120. We got it for $30...


Amazing deals! Plus, they were already assembled. {Yay} I've designated the smaller one to use for all my spray paint and painting supplies.

All this garage stuff has been great, but the big news at our house last week was the arrival of our 13th grandbaby -- a boy. We now have a baker's dozen! We are so thrilled that he arrived safe and sound and that he and his mother are doing well. I'm so grateful for these little ones in our lives.

Friday, August 23, 2013

Friday, August 16, 2013

Thursday, August 15, 2013

Garage Renovation -- Priming Drywall


I'm learning some valuable lessons with the garage overhaul we're attempting. As I mentioned before parts of our garage had been drywalled twenty years ago when we moved into our house, and recently we had the other walls drywalled and taped as well. I've been in the process of painting the ceiling and those walls this last week, and I've learned that there's a reason there are a variety of primers on the market. One primer doesn't necessarily fit all circumstances.

First, let me apologize for the mess below that is currently our garage. It's no wonder we are renovating it. Usually it doesn't look {quite} this bad. We'd shoved all the stuff in our garage into this one corner for the reno, so it looked particularly deplorable in this picture. Anyway. You'll notice the twenty-year-old never-been-painted drywall had yellowed with age. There were also some water spots on it. The new drywall was a pristine gray color without any marks other than the putty used to tape it and fill in the holes.


When I asked the clerk at Home Depot, which primer I should use to cover my new drywall he suggested this...


It worked perfectly on the new drywall, covering it beautifully with a layer of primer before I painted the walls. However, when I used this product on the old drywall, it didn't cover them well and some water stains bled through the primer. I realized this Kilz Pro-X P10 is specifically mixed for new drywall and that I would need another stain blocking primer for the old walls. The water marks on the bottom of the old drywall were probably due to snow shovels, still wet, being placed against the garage wall. I went back to Home Depot and was pointed toward another primer that is mixed specifically to block stains and water marks...


I just needed one coat of this stain blocking primer on the old drywall. The stains vanished, and it worked beautifully!

This piece of advice is probably obvious to most, but I've done a lot of painting and didn't know what a difference the right primer would make, so I hope it helps someone.

Monday, August 12, 2013

Garage Overhaul...


This may be a boring and uninspiring post for many, but I'm excited about this project. Generally speaking, our garage has been my husband's domain. He's gotten many tools and other man toys to fill it up over the years, but we've never really had the inclination to organize it really well until now. A few weeks ago we were cleaning it and realized it was in desperate need of an overhaul. In Colorado the code says a contractor must insulate and drywall the walls of a garage that are adjacent to the house. For the 20+ years we lived in the house we'd never finished off the other walls, so we decided to start by having the framed walls in the garage insulated and drywalled. The hubs and I insulated the walls ourselves. I also applied the first coat of primer on the ceiling...


Then we had our handyman install the drywall. You can see in the photo below where the old drywall (that was never painted) has yellowed with age. I can't wait to get that covered with primer and paint! Here are the new walls taped and puttied...


This project is going to take some time because we have to move the items from the garage from one side to the other to complete the task. I don't think the neighbors would appreciate our moving everything in our garage to our front lawn while the project is getting completed. ;o) Today I put the first coat of paint on half the ceiling and primed half the walls...


Tomorrow I'll finish half the ceiling with the second coat of paint and paint the walls that I primed today. I'm using a silver gray on the walls of the garage. I'm hoping the gray color will be more scratch resistant than white because, after all, it is a garage, and it will get scratched.

I'll post about this project again in a couple of weeks when we we put up the cabinets.

Friday, August 09, 2013

Thursday, August 08, 2013

Luscious Jam...


Every year about this time I get in the mood to make jam. Our church teaches its members to be self-reliant and to build up a basic food and water supply to use in times of adversity or emergency. This teaching used to be looked at as extreme by some. Not so much anymore. In the last twelve years I've had many friends and neighbors ask me how they could go about creating a basic supply of food and other essentials. It's just common sense in today's world to have some money and necessities set aside.


When I first started canning my own jam to rotate through our food storage, it used to be much less expensive to can it myself rather than buy it in the store. I'm not sure that's the case anymore, but when you compare the taste of homemade to store-bought, there is no comparison. Homemade tastes so much better, so I continue to make it every year because, after eating homemade for years, we're spoiled.


This year I've made a variety of jams...


Strawberry, Mixed Berry (blackberry, raspberry, and blueberry), Raspberry, and Blueberry.
Be still my heart.


I also think there's a value in knowing how food is processed. Before I got married, I had no idea how food got from the garden to the table. Knowing how to process fruits and vegetables has its merits. 


Anyway, that's what I've been doing all week, and I have dozens of quarts canning jars filled with luscious jams to prove it. Enough for us and enough to give away to family and friends!

Wednesday, August 07, 2013

eBook from "All Free Sewing"...


A couple of months ago I was contacted by "All Free Sewing" and asked if I might like to include one of my sewing tutorials in an eBook they were putting together. Arrangements were made and my Ruffled Kindle Case was included in the book. Monday the eBook was published!


This eBook has 12 projects (some no-sew) that can be whipped up in minutes. It's a great resource to go to for that hard-to-gift person in your life!


Go here to download your copy of the book!


Monday, August 05, 2013

Two-Toned Fabric Tote and some Tips...


Generally I make my own patterns when I sew, but lately I've whipped up some projects {241 Tote and Little Girl Purse} where I've used patterns created by other talented ladies. I have to admit it has been a pleasure to merely follow a pattern and not have to create it from scratch! A couple of weeks ago Ashley, from the blog "Make It & Love It," posted the pattern and tutorial for a Two-Tone Fabric Tote where she featured two variations made from the same cute pattern. I decided I had to have one, so last week I created one for myself...


This is a generous bag with lots of room to store all the things that seem to be necessities in my life! The finished tote measurements are 17 inches wide by about 15 inches tall.
 

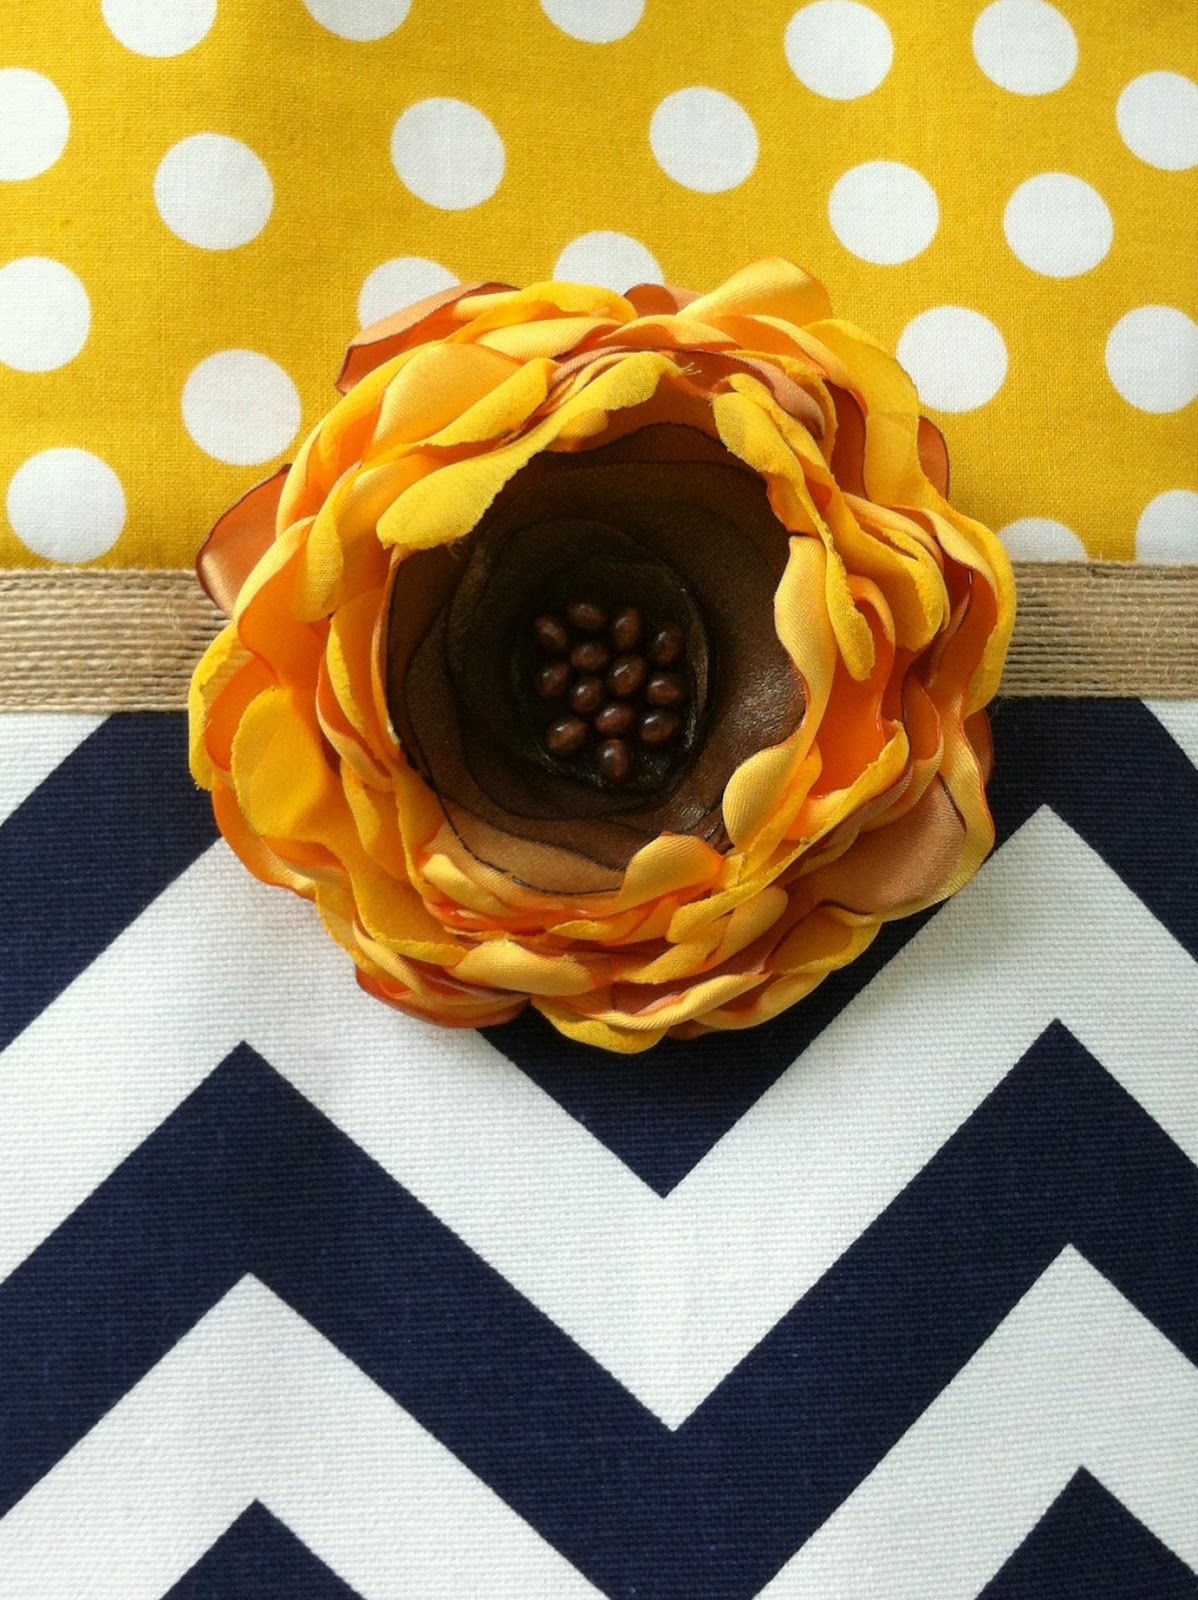
Like Ashley, I used fabrics bought at Hobby Lobby. {Love the chevron and polka-dot combo!} The "burlap" ribbon was also purchase at Hobby Lobby, and I made the cute sunflower from my fabric flower pattern that I sell in my Etsy Shop


I also purchased an orange flower at Hobby Lobby that I'll interchange with the sunflower depending upon my mood.


I'm occasionally asked why my totes and purses look more "substantial" or "sturdy" than other home-sewn purses. I'll let you in on some secrets...


I always attach fusible fleece to the outside fabric of my totes. The chevron fabric was already a heavier weight fabric {duck cloth}, but I still chose to adhere the fusible fleece to the wrong side of the fabric to give it even more body. In addition, I attach a heavy weight fusible interfacing to the lining. These two additions ensure a sturdy, well-crafted bag...


And here's another really, really important tip... When I make a bag like this with boxed corners, I always add a foam board base to the bag for support. I simply cut a piece of foam board the measurements of the bottom of the bag...


Then I take a piece of the lining fabric and cover the foam board. I use duck tape to tack the fabric down on the backside of the foam board... {very professional}... {{not}}.


You'll probably never know that ol' duck tape is there...


I place the support into the bottom of my tote, making sure the corners of the support are tucked into the bottom corners of the tote...

  
By including that step, the tote holds it's shape when you start filling it with essentials. So nice.


The other little changes that I made to the pattern were just personal preference. I love pockets in a bag. Pure and simple, the more the better, so I added two into the lining of this tote. I also added a snap closure to the lining.


I adore this bag. I appreciate Ashley sharing her pattern. It takes a lot of time and effort to create new patterns and tutorials, and I appreciate the fact that this pattern is available to us all without cost!
 

My sewing machine has been in the "sewing-machine-hospital" for a few days now. She's supposed to be released sometime next week. I'm missing her.