Thursday, July 29, 2010

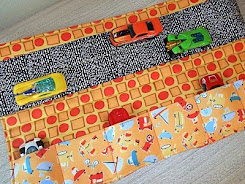
Lil' Boy Car Caddy...

It all started for me with a post about a week ago on "The Crafting Chicks", but Jamie alluded in her post to her inspiration which was the tutorial at "Homemade by Jill," and Jill gave credit to Sharla at "My Little Gems." That's how the blogging world operates. A great idea gets circulated and it grows and grows. Here's my version. Instead of calling it a "car cozy," I've named mine the "Lil' Boy Car Caddy."

This little caddy is a carrying case for hot wheel cars. It's the perfect gift for a little guy to keep him busy when he's out and about. There's a little "garage" for each car and a road for the cars to travel on...

Two of my grandson are traveling over the river and through the woods to Grandma's house this weekend. I can't wait to see them! I made one of these for the 2 years old and another for his brother, who will celebrate his 1st birthday while he's here! They're a little young for something like this, but hopefully they will enjoy it for a few years to come.

To make this car caddy I followed the directions at "Homemade by Jill," but I made a few alterations. I didn't use felt on any of it because I wanted it to be washable, and I lined all the pieces with fusible fleece to give it more durability. If there's one thing I know after raising five boys, it's that little-boy-toys need to be sturdy!

Here's a tip on sewing a straight line in the middle of fabric. I wanted to sew a "yellow line" down the middle of the "road." In order to do so I measured and put pins in the fabric in the middle of the "road," then I lined up my masking tape along those pins. Once the masking tape was down, I removed the pins. This allowed me to have a guide as I stitched my line...

It works like a charm! To fold up this caddy, just fold it in half lengthwise...

Then fold the length in thirds and snap shut. I chose a closure with a center release snapping buckle like this one...

All wrapped up and ready to go!

This was such an easy project. It takes very little fabric and works up very quickly. It would make a cute Christmas or birthday present for a little one in your life. Let the good times roll!


Linking to:
Friday Fun Finds @ Kojodesigns
Looking for a Creative High @ Those Northern Skies
Show & Share Day @ Just a Girl
Frugalicious Friday @ Finding Fabulous
Frugal Friday @ The Shabby Nest
Get Your Craft on Thursday @ Life as Lori


Tuesday, July 27, 2010

Bloomin' Tuesday...

We are lucky enough to have a peach tree in our backyard.

Fruit trees along the Front Range in Colorado (just east of the Rockies) are a hit and miss proposition. Most years we get fruit, but it's not unusual to have a late frost that hits the early budding trees eliminating the prospect of fruit for that year.

This year, however, was a good year. Our tree is full of big, beautiful, ripening peaches...

In the next few days we'll start harvesting these beauties...

Looking at all this ripening fruit has given me a hankerin' fer peach cobbler! (A southern drawl would come in so handy at times like this.) There seems to be two camps for cobbler recipes. One camp prefers the more rustic approach of biscuit-like dough plopped onto the top of the fruit and baked to a golden brown. The other camp prefers a sweet oatmeal cookie-like topping crumbled over the top of the fruit and baked till crisp.

You can't go wrong with either one, but I pitch my tent with the "oatmeal cookie-like topping" camp. I tend to be a little lazy with my culinary skilz these days, so a few years ago I concocted a recipe for "Suzanne's Easy Peasy Cobbler." This recipe can be used with any type of fruit, and the fruit can be fresh, frozen or even canned. I prefer fresh. Here are a few of my favorite combinations:

Peach & Berry Cobbler ::: peaches with a sprinkling of any type of berries

Berry Cobbler ::: a mix of blueberries, blackberries, raspberries, strawberries -- my personal favorite!

Apple Cobbler ::: straight up or with dash of berries or cherries (remember to put the apples in the microwave for a few minutes to soften).

Cherry Cobbler ::: a perfect 4th of July treat!

For any of the above Cobblers use the following recipe:

Suzanne's Easy Peasy Cobbler

This recipe will fill: two 8x8 inch square pans; or one 9x13 inch pan
  • Spray pan(s) with non-fat cooking spray and fill the bottom of the pan(s) with the fruit of your choice. You only need a fat layer of the fruit, but put in as much as you would like. If you are using cans, you need about 3 large cans of fruit.
  • Depending upon the fruit sprinkle very lightly with sugar or sugar substitute. I use a little sugar on tart berries, tart apples, and tart cherries, but not on peaches.
  • Here's the easy part...Buy a package of Oatmeal Cookie mix like the one to the right. I prefer Ms. Crocker's version (17.5 oz.), but I'm sure any will do.
  • Mix up the cookie batter as directed on the package.
  • Then crumble cookie mixture on the top of the fruit. Whaalllaaa!
  • Bake at 350 degrees for 30 to 40 minutes.
  • I like this best served warmed with a generous scoop of vanilla ice cream on top!
Enjoy!


Linked to:
Anything Related @ All Thingz Related
Bloomin' Tuesday @ Ms. Green Thumb Jean's

Monday, July 26, 2010

I'm Wreathed in Smiles...

I made a couple of great finds over the weekend! For awhile I've been looking for something to replace a piece of art that has become outdated in my main floor powder room. I knew it might take me awhile to find "that perfect something", but I was in no particular hurry. On Saturday I was in Target and came upon this little 9 inch wreath. It was on "clearance" for $9.08. Sweeeet.

Because this wreath is only 9 inches in diameter it is too small for its designated space, so I knew I would need to combine it with another item to make it appear larger. I thought about hanging it from a frame, but I couldn't find a frame at Target that I liked. Then I remembered Hobby Lobby's clearance sale and wondered if there was something I might pick up there to help with this project. I bought the wreath and headed to Hobby Lobby. At Hobby Lobby I found this square tin plaque (below). I did just as instructed and "Rejoiced." Amen. Seriously, it was just what I was looking for.

Even better, it's price had been marked down to...

It felt a little sacrilegious to paint over the plaque, but I did it anyway. I reached for Rust-oleum American Accents in "oregano", and gave it a couple of coats...

After it dried I took out my sanding block and gave it a little character...

Then I attacked it with some glaze, and gently wiped it down to the desired finish...

I didn't think the glaze was going to make much of a difference, but when it dried it definitely had done the job.

Here's a collage showing the different effects of spray paint, sanding and glazing. Each process adds a little more depth and character to the piece. (This is also an interesting case study on how the color of something changes in different light. The first picture was taken in the evening, the second in the morning and the third mid day!)

When the glaze was dry I glued the wreath to the plaque and let it cure for 24 hours. This morning I hung it up.

With the wreath mounted on the plaque it is now 15 1/2 inches in diameter and perfect for the space.

I love it, and the fact that it cost $11 makes me appreciate it even more!


Linked to:
Funky Junk Interior's Color Link Up Challenge
Friday Fun Finds @ Kojodesigns
Looking for a Creative High @ Those Northern Skies
Garage Salen Partay @ Debbiedoos
Transformation Thursday @ The Shabby Chic Cottage
Show Off Your Stuff @ Fireflies and Jellybeans
Get Your Craft on Thursday @ Life as Lori
Get Your Craft on Tuesday @ Today's Creative Blog
Anything Related @ All Thingz Related

Also - Check out "The Adventures of the Overloaded Mommy" for another idea on what to do with a plaque like this! Love it!


Wednesday, July 21, 2010

Panel Curtains...

Today I made the panel curtains for our laundry room. With the curtains finished the redo is complete. Oh dang. I just remembered. I still have to paint the inside of the double closet. I don't always paint a closet when I repaint a room. I must be one of those people that is more concerned about what people see on the outside than what they don't see on the inside. I know what you're thinking and you're probably right. A psychologist could have a heyday with that one. It either means I'm a shallow person OR that I only have so many hours in the day so I've learned to pick my battles. Ahem...In any case, I am almost finished with the room. I do intend to paint the closet this time.

I've used this HL canvas fabric for several pillows and a lamp shade recently, but none of those items are residing in my home, so it was high time I made a little something out of this fabulous fabric for my own enjoyment!

The window panels were so easy to make. I just sewed two pieces of fabric together -- the lining and the orange swirl fabric -- along the two long sides. I cut the lining fabric about 2" narrower than the orange fabric, so the orange fabric would have a 1 inch "hem" on the sides of the panel. Then I hemmed the tops and bottoms of the panel, installed the curtain rod and attached the clip rings. That's it. It took no time at all.

Easiest curtains ever!


Tuesday, July 20, 2010

Bloomin' Tuesday...

Ahhh, the dog days of summer. Hot, sultry days when one hardly has the energy to pull up a lawn chair and take a nap. While we humans are tucking into air-conditioned buildings and relaxing in pools, the flowers and veggies in my garden are soaking up the rays like there's no tomorrow. Of course I have to water them morning and night to keep them energized, but they are in their glory.

Speaking of "glory" -- my Morning Glories are beginning to bloom. These plants reseed themselves yearly in the area they are planted and faithfully shoot up their gorgeous blossoms. In some climates these beauties are considered pests, but in Colorado they are easily controlled. I love going out to my garden in the morning and seeing these beauties...

Do you remember back to the first part of June just after we had installed our birdie fountain and I had planted a gajillion impatiens around it? If not, here's a photo to jog your memory. See all those little impatiens surrounding the fountain...

Well, here's a photo I took this morning from the same vantage point. The impatience have grown and filled in to the point that they are reaching the top of the fountain. So beautiful and lush!

And lets not forget these vine-ripened beauties. We've already tasted a few of these and they are delicious!

I've also got some cilantro and basil percolating in their own little container. The other day I made some salsa and guacomole with these fresh ingredients (cilantro and tomatoes) and it was fabulous. There's nothing better than plucked-from-the-garden ingredients!

Hope you have a wonderful Bloomin' Tuesday in your neck of the woods!

To see more Bloomin' Tuesday posts,
visit Ms. Green Thumb Jeans.