Monday, November 28, 2011

Home Again...

My husband and I calculated the other day that we've been out of state at least once every month this year. In December we're staying planted and our family is coming to us! {So happy about that!} We just spent the last 10 days in northern California visiting my family. We had a wonderful Thanksgiving holiday and I even had the chance to craft a little bit. We helped "host" Thanksgiving this year for my family, so I wanted to try my hand at some centerpieces that I had pinned earlier in the month. I bought some inexpensive round glass vases at Michaels (tin cans would have worked too) and some long cinnamon sticks. I cut out a brown paper bag to go around the vase and hot glued the cinnamon sticks to the paper. They had a delightful, subtle fragrance. Then I bought some flowers and collected some greenery and gorgeous roses from my mother's garden. The result was really beautiful...


On Thanksgiving morning my husband, son and I went on a walk and collected beautiful fall leaves in a variety of colors, pods, and berries to put at the base of the vases with some greenery. 


Then I put my husband and son to work carving out little round circles in some miniature pumpkins we bought at the grocery store. We plopped a tea light in those and they were stunning when they were lit!


I left the "cinnamon vases" there, but I've decided I'll have to make some for Christmas at our house. I think they'll be beautiful with some Christmas greenery and white and red flowers!

I came back to an almost finished master bathroom redo. I'm so excited about that, however, I have a lot of painting to do in the next 36 hours, so I'll be AWOL for several more days. I'm so anxious to show you a fabulous redo of some master bedroom furniture we re-purposed for our computer room. {You heard me right.} I'll post that later this week! I'm also going to be using a damask stencil on our bedroom and bathroom walls -- stay tuned for that adventure!

Friday, November 25, 2011


I spy with my Etsy eye a...
 chocolate Christmas.


Clockwise, starting top left:

Distressed Rocking Horse Wall Hanging
English Toffee
Christmas Topiary
Gingerbread Photograph
Faux Fur
Felted Snowman

I hope you're enjoying this beautiful holiday weekend!

Monday, November 21, 2011

Christmas Photo Cubes...


I was inspired a few weeks ago by these cute paper photo cubes from Style Burb that I saw on Pinterest, so I pinned the photo and wrote it on my "to do" list!

I'm visiting family this week, but last week I had some time so I got busy. Instead of making them out of a paper template as suggested on Style Burb, I chose to buy 1 1/2" wooden blocks and Mod Podge the photos on the cubes along with some festive scrapbook papers.


Here's what you'll need for the project:

1.5" Wooden blocks (they are actually slightly smaller in size than advertised)
Mod Podge and a paint brush
Scrapbook papers
Cropped (square) photos of family members
Optional: Brown stamp pad for distressing block
Optional: 1 3/16" square paper punch

One and a half inch wooden blocks can be purchased at Hobby Lobby in a package of six for $2.99. They can also be purchased individually at Michael's for $.99 each. I started by distressing the outside edge of my wooden blocks by running the edges along a brown stamp pad...


Then I used a square hole punch to punch out some squares of scrapbook paper...


I went to my computer and found pictures of each member of our family. I cropped the pictures to make square close-ups. I inserted those photos into a Word document, sized them, printed them off and used my hole punch to make nice little square photos. I printed two pictures of each individual per wooden block. Examples of some of those photos are below...


Then I started the job of Mod Podging the photos and scrapbook papers onto each cube. I thought this was going to be very tedius, but it went surprisingly fast. I Mod Podged a couple sides at a time on each block and allowed a little drying time in between applications. Soon I had something like this...


I'm going to use these for holiday decorations and games at Christmastime, but I also think blocks like these would be a fun gift for a toddler!  I made 25 of these little cubes. That's how many members are in our immediate family. What's more they are all coming for Christmas {gulp}. That's right, all of our kids and grandkids will be home for the holidays. {I've begun taking a multi-vitamin with extra Iron in preparation.} I'm so excited!


The above photo made me hum the tune, "O Tannenbaum," which is about the only thing I remember from my three years of German in high school. ;o)

Thursday, November 17, 2011

Master Bath Remodel...

I just got through putting the second coat of paint on the master bathroom. I'm glad that's done. Here's how the work is progressing. My contractor promises me that most of the work should be done by the end of next week. He needs to set the tub, tile and grout the tub surround, and install cabinets and countertops. After that it's just little things like mounting towel bars and light fixtures. Yippeee! I have carpet scheduled to be installed on November 30th and our new bedroom furniture delivered a couple days later.

This is how the work has progressed this week:

In the shower room, the walls have been calked and the soap dishes have been added. Grout was added between the tiles on the floor and the cabinet was installed. Also plumbing fixtures were added in the shower. After the walls of the shower were up I ordered the shower door. That should come in this week and be installed soon.


I cannot tell you how much I love these cabinets. The beading on them is so beautiful and I love the slightly distressed look. It's just what we wanted.  I still need to pick out drawer pulls and cabinet knobs. One more thing to purchase, but it'll save the cabinets in the long run!


The tub was placed this week and the plumbing fixtures installed. That is one deep soaker tub. (Pass the Calgon, please.)


This morning I finished painting the main room of the master bath. Love the color -- Parachute Silk from Behr. The light fixtures will be replace and I'll need to do a some touch up work on the paint, but generally the painting in that room is finished. I still have to paint the walk-in closet and the closet in the bathroom -- I'll do that after the Thanksgiving holiday.


Emotionally I've done remarkably well for the last few weeks with all the construction commotion in the house, but this week I hit the wall. I don't like messy or cluttered or dust. I'm tired of the inconvenience of it all, but it's a small price to pay for what we'll have in the long run.

We've also been moving furniture from one room to another and changing up other rooms slightly. I have a fabulous repurpose of furniture that I'll tell you about after Thanksgiving! So excited about that! That project should be completed this next week!

Monday, November 14, 2011

Print button...

A couple of days ago one of my readers, Carla, wrote me and asked if I had a "print button" on my blog. She couldn't find it and wondered if I had placed it in a less than obvious spot. I have to admit that up until that time I hadn't heard about "print buttons" so I did a little investigating. I immediately came upon this website at "Print Friendly."  I followed the simple instructions and with a few easy clicks this button was installed at the end of each of my posts.


This button enables my readers to print my blog posts with the click of a button. It also has an option to make a pdf file or email the post. One can also scale the text size and/or omit the pictures. The benefit to you as a reader? You'll be able to easily print off any tutorial I publish with the click of a button! 


Sunday, November 13, 2011

Bathroom Remodel -- end of second week...


Our bathroom remodel is progressing slowly, but surely. By the end of the second week, the small room in our master bath that houses the shower and toilet is closer to completion.

If you'll remember it started out like this...


By the end of the first week all old furnishing had been removed, the shower floor had been installed and the shower wallboard had been installed. Also the sub-floor for the tile had been laid...


This is where the room stands as of yesterday. The "green board" {behind the shower walls} had been textured and primed, and the shower walls had been attached to the walls and the soap dishes had been installed. The tile on the floor was laid and grouted, and two coats of paint had been applied to the walls..


Unfortunately, with the flash on my camera the color on the walls looks yellow, but it's actually a light taupe brown. This is a closer indication of the color...


By the end of next week I'm hoping this small room will be completed and that work will have started on the tile surround of the soaker tub.

Friday, November 11, 2011

Thursday, November 10, 2011

Two More Pocket Pillowcases...


When I make presents for grandkids, I have to make in large quantities. We've been blessed with 11 grandkids, and even though only 7 are getting Pocket Pillowcases for Christmas that still means a lot of sewing! Yesterday I posted the Pattern & Tutorial for my Pocket Pillows. You can read that tutorial here. Today I made two more pillowcases. They take about an hour to whip up (including cutting out the fabric). So fun and easy. Here's one for the little lion cub in our lives...


And a cute little hippo in "girl blue" (as she calls it) for his cousin...


Remember, to go here for the pattern & tutorial on how to make these pillowcases.


Wednesday, November 09, 2011

Pocket Pillowcase Pattern & Tutorial...

Many thanks to those who left such sweet comments of encouragement about my Pocket Pillowcases that I blogged about earlier this week! I whipped up another pillowcase today and am publishing the pattern and tutorial for all to use. These pocket pillowcases would make a fabulous gift for a child or teenager. I love the different ideas of what could be stowed inside that little pocket -- to name a few: stuffed animals, books, journals, iPods, etc. You're sure to find interesting treasures in the pockets of these once the gift is given!


Pocket Pillowcase Pattern & Tutorial

You will need the following materials: 1 yard of flannel or cotton fabric, 1/4 yard of contrasting flannel or cotton fabric, thread, ric-rac (optional).

Tips: Use 1/2 inch seams unless otherwise specified. Press all fabric before cutting.

Fabric Layout

With the yard of flannel you will make the pillowcase back, pillow front and side panel front. To maximize your yardage do the following:

1. Cut the yard of fabric into two 20.5 inch x 34 inch rectangles. The measurement of 20.5 inches is approximate. You will need to cut the fabric in half lengthwise along the fold to make two pieces and then trim your selvage edges (self-finished edges of fabric) 1/4 inch to rid the fabric of most of the manufacturer's writing on the selvage.


2. Put one of the 20.5 inch x 34 inch rectangular pieces aside (pillowcase back). With the other 20.5 inch x 34 inch piece cut it to be 20.5 inches x 23 inches (pillow front) and put aside. Cut the remaining fabric into a 10 inch x 20.5 inch piece (side panel front).

With the 1/4 yard of contrasting fabric, you will make the side panel lining and the pocket.

3. Cut two pieces of fabric from this quarter yard -- one strip 10 inches x 19 inches (pocket), and the other 10 inches x 20.5 inches (panel lining).


Construction of Pillowcase

Attaching the Ric-Rac to Pocket:

1. Fold pocket in half to form a 10 inch x 9.5 inch "square". Press.

2. Pin the ric-rac to the underside of the folded seam and sew about 1/8 inch from seam. Press.


Construction of Side Panels:

1. Now we're going to make a tasty pocket sandwich! Place the pocket on top of the front side panel right sides up.

2. Place the panel lining right side down on top of the front panel and pocket. The pocket will be sandwiched in between panel pieces, like this...


3. Pin and sew seam.

4. Turn panels right side out and press.


5. Baste unfinished edges of side panel front (and pocket) and side panel lining together.


Attaching Side Panel to Pillow Front:

1. On the 20.5 inch edge of pillow front pin ric-rac and baste.


2. Pin side panel piece and pillow front right sides together and sew along seam.


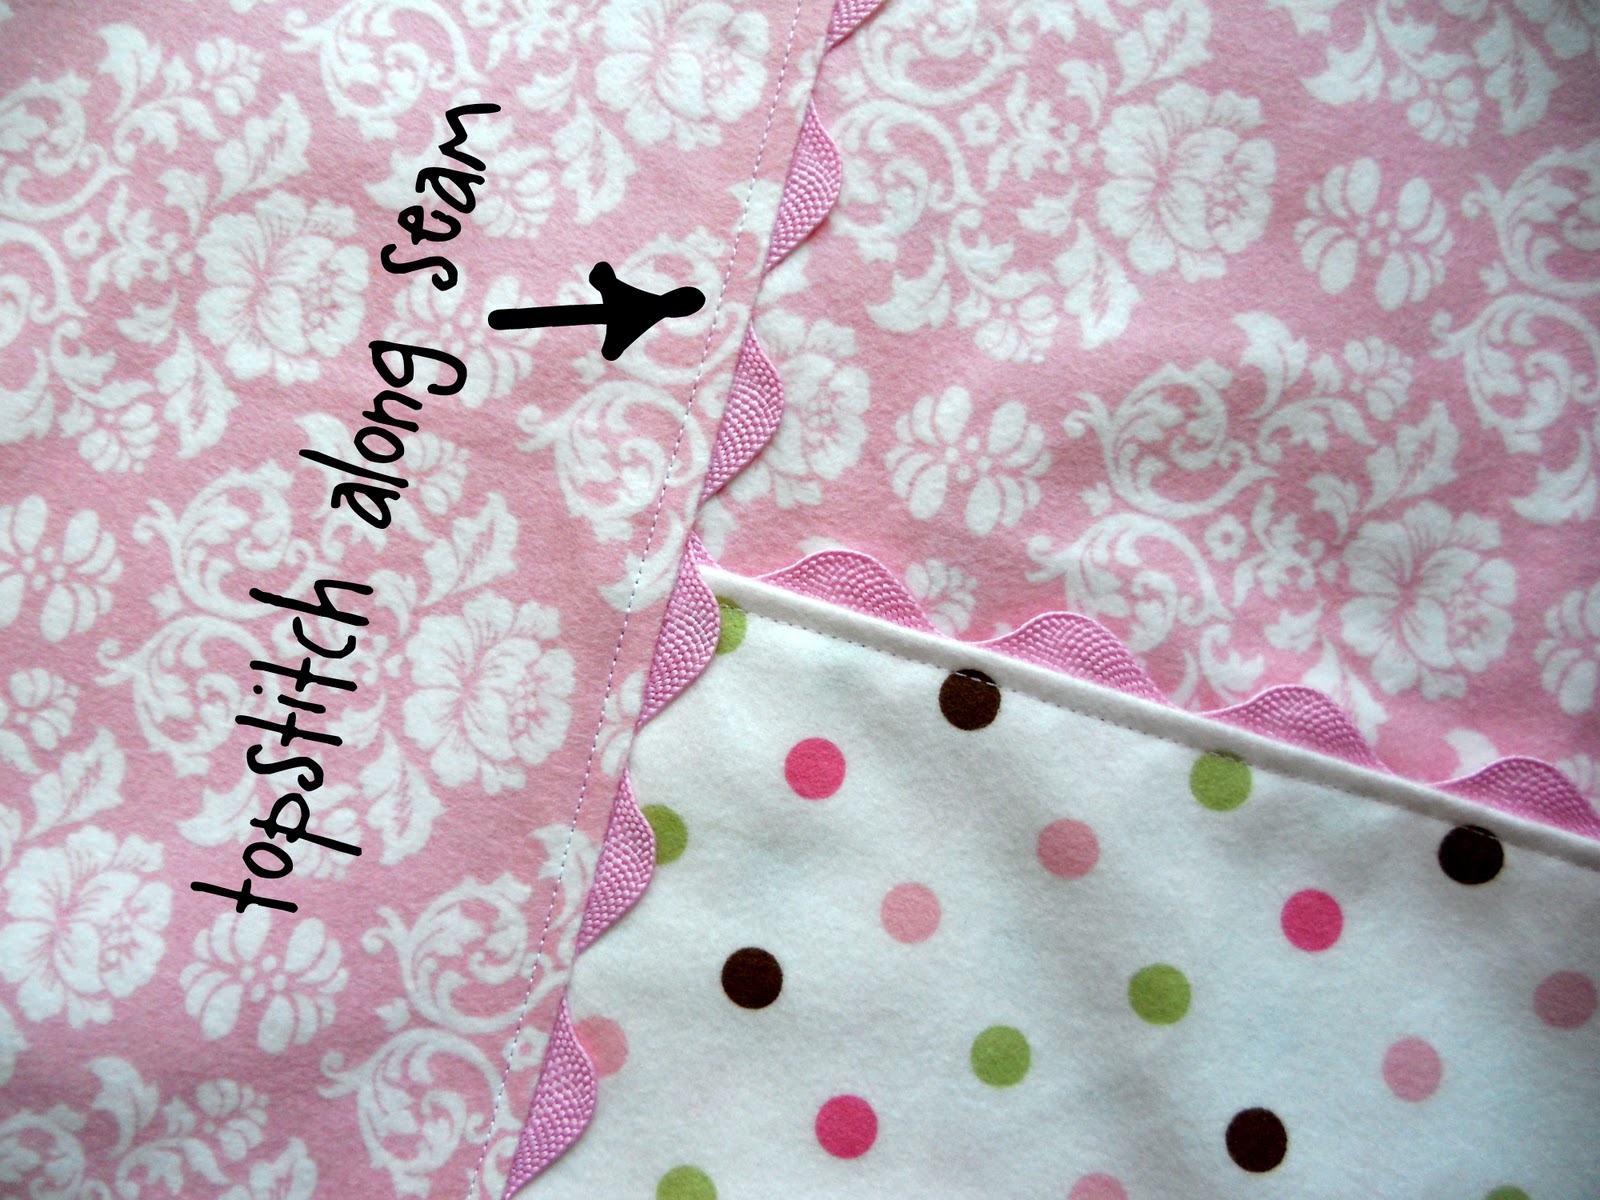
3. Press seam toward pillow front.

4. Topstitch seam to pillow front.


Pillowcase Back:

1. On one of the 20.5 inch sides of pillowcase back, turn fabric 1/2" from edge and fabric and press.


2. Measure front pillowcase to determine exact length of the completed pillow front. (It should measure about 31.5 inches long.)

3. Turn over pressed edge of pillowcase back to measure the same length as the pillow front.

4. Pin and sew to make side hem for pillowcase back. Press...


Finishing Pillowcase:

1. Pin front to back, right sides together, along the three unfinished edges. Sew seams. Trim seams to 1/4 inch and zig-zag edges of seams.

2. Turn pillowcase right side out and press seams!

Whaaaalaaaaaa! Your pocket pillowcase is finished!


Please let me know if this tutorial was helpful!

To see more of my Pocket Pillowcases go here!

Linked to:
Get Your Craft On @ Today's Creative Blog
The Inspiration Board @ Homework
Handmade Tuesday @ Ladybug Blessings
Mom It Monday @ Brassy Apple
Made by You Monday @ Skip to my Lou
Head to Head Showdown @ I Can't Stop Crafting
Crafty Lassie Tuesday @ Sew Stylish Boutique
Monday Link Party @ Craft-O-Maniac
Show & Tell Saturday @ Be Different Act Normal
Weekend Wrap Up Party @ Tatertots & Jello
Show & Share @ Just a Girl
Friday Favs @ Naptime Crafter
Whipperberry Linky Party
Hookin' Up with HOH
Strut Your Stuff @ Somewhat Simple
Show Off Your Stuff @ Fireflies & Jellybeans
DIY under $15 @ A Little Tipsy