Tuesday, August 31, 2010

Bloomin' Tuesday...

My Bloomin' Tuesday posts are getting few and far between. Today I disposed of the rest of my container plants and started preparing the yard for the big Fall clean-up. Soon we'll be blowing leaves into big colorful piles, but today I'll enjoy a few more shots of summer. One thing that screams "Summer" to me is the sound of a sprinklers. I love the sound of the chchchch -- pshewwwww of a rotating sprinkler. Here's one last shot of my delicious impatiens being given a drink...


Knowing that Summer is coming to a close my morning glory decided to pour on the steam. They are beautiful right now. Such a welcome sight every morning.


One last shot of one of my volunteers. Don't you love volunteers? They creep into your garden to the delight and enjoyment of all...


To visit more Bloomin' Tuesday posts,


Friday, August 27, 2010

Thursday, August 26, 2010

What's Your Creative Style?


I love to take blog quizzes that determine aspects of my personality by asking me questions about cookies, 17th century heroines or interior design style. Today I visited a favorite blog of mine and was forwarded on to another site that helped me determined my creative style. I must admit this online quiz was quite accurate. The questionnaire concluded that I "Communicate through Creativity." That is an accurate assessment. The rest of the paragraph wasn't too complimentary, but truth be told it does describe me with some accuracy. (Perhaps a spot of self-analysis is in order.)
Here's what "the experts" had to say about my Creative Style...

You think of art as a means of reaching out to others but, at the same time, you use it as a shield to some extent. It’s a way of participating in society, in a community. It’s the way you communicate with others and the way they can communicate with you. Seen in this light, creativity provides the basic materials to build a bridge between you and other people, so you can’t think of it as something that lies outside your relationship with others. You like the attention and good opinion of others. When you show people what you’ve made — a birthday cake, or a piece of music you’ve written — it’s your baby, so you are very sensitive about any criticism. You need to be able to distance yourself from the result, and allow others to enjoy it and feel part of it, without it reflecting on you alone. Your creativity allows you (or would allow you) to feel part of the world. You’ve got an inner exhibitionist and you think that this strengthens your relationships. You prefer to get on the stage than stay in the wings analyzing your inner life (although you do that, too). So let the show begin, but make sure your life doesn’t depend on the applause.

They could have done without that last sentence...geesh. Still ... it was rather fun! Go here to take the quiz for yourself!

Enjoy your day!

Tuesday, August 24, 2010

I'm back with a Plaque Attack!!!

This "Plaque Attack" is just for you!

The month of August is a blur. We've had our kids and grandkids visiting for the past month, and my blog has felt the brunt of my attention to those very important people in my life. I'm not apologizing, just stating fact. As much as I love blogging, it pales in comparison to the importance of family. Four of our kids and their families came home at one time or another this month. Each one overlapping the next. The last kiddos leave on Thursday and things get back to "normal", until my husband and I leave for a Labor Day weekend get-away to visit another child and his family. Life is so good.

...Enough catching up. I have a very exciting announcement to make. Last Christmas I made a little Christmas plaque. (You can see it here.) After showing it off I offered to send the wording for the plaque via an email attachment to those who wanted to recreate a plaque for themselves. I thought a few people would take me up on the offer. I was actually very surprised by the number of people who responded.

The other day I started thinking about this, and the idea of "Plaque Attack" was hatched! The best way to describe "Plaque Attack" is that it is a plaque-of-the-month club. Each month -- a few days before a new month begins -- I will make a post featuring a new plaque. The plaque wording will reflect holidays or activities unique to the coming month. If you like the plaque and would like to make one for yourself, you can email me requesting the document. (Make sure you specify the month you are requesting.) My email address is on my sidebar. I will be happy to send you the wording for the plaque in a power point document via email. No purchase necessary. All you will have to do is select a sheet of scrapbook paper and print it off!

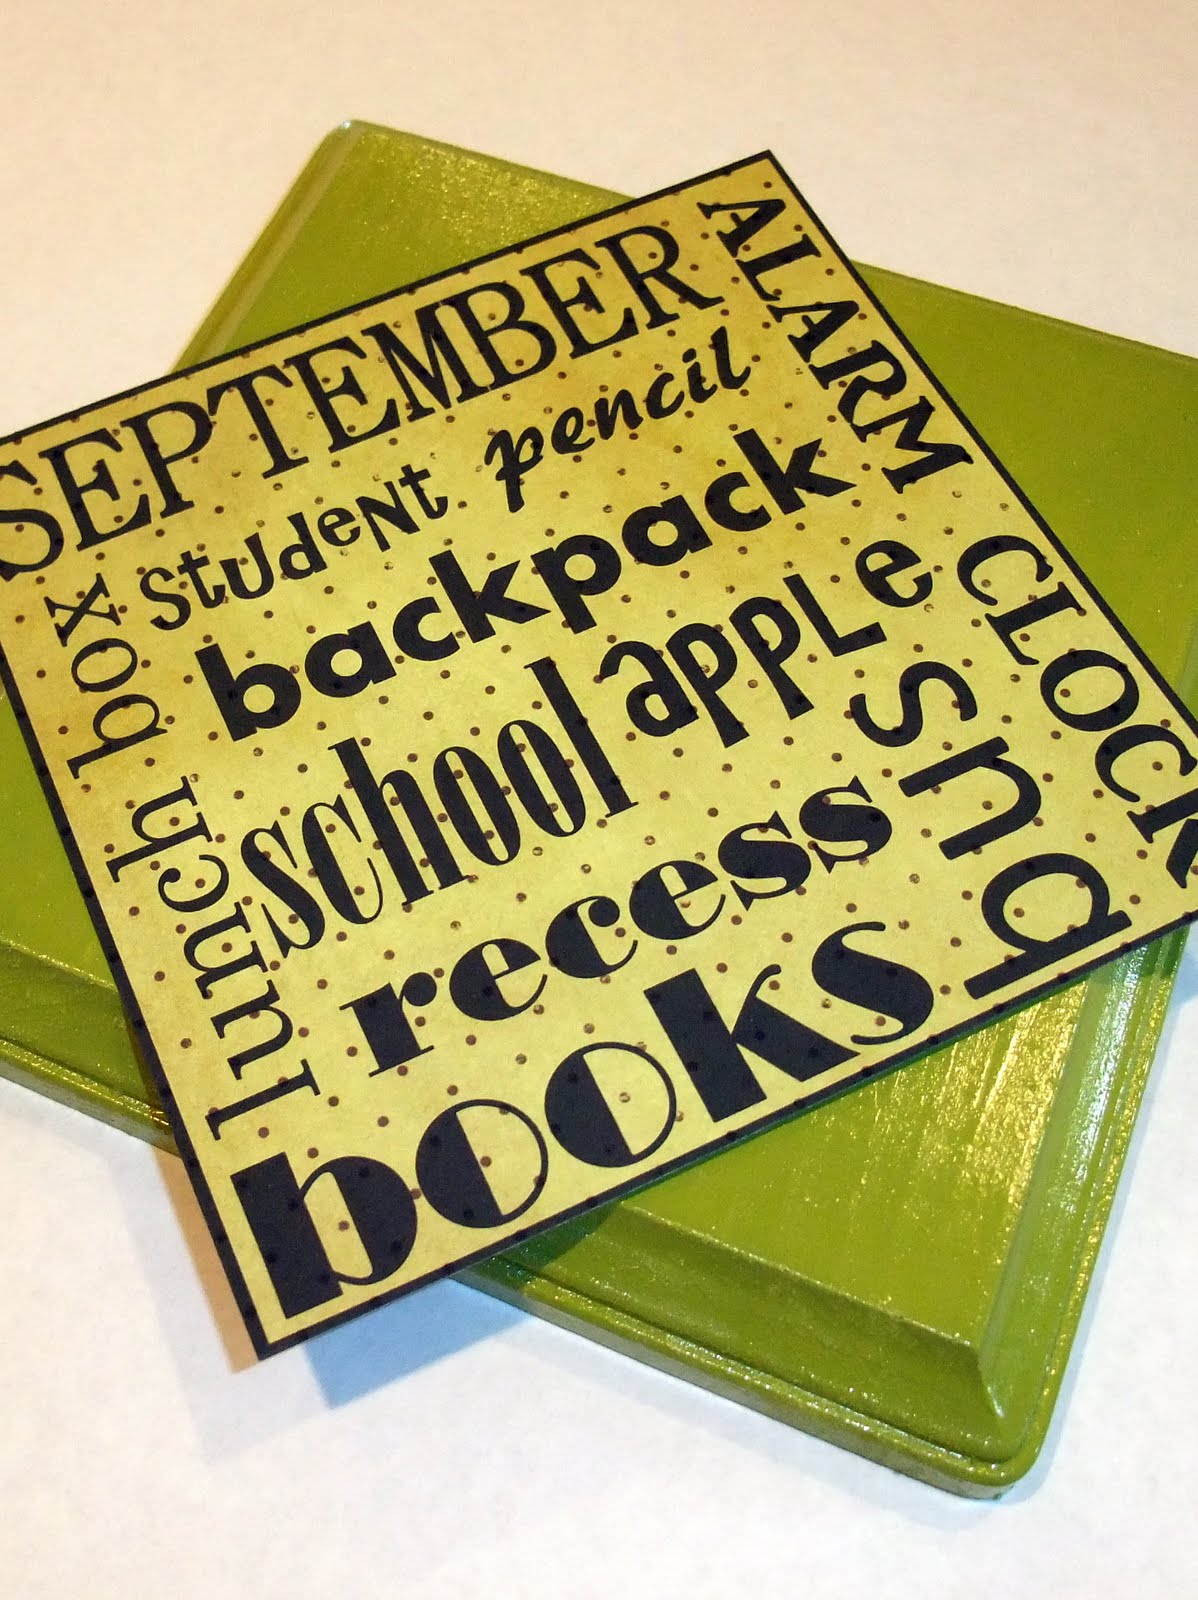
Today we are going to start with our
September "Plaque Attack!"

Subway art is the rage right now,
so this plaque is in the form of just such a sign!

You will need the following materials:
1- 6 1/2" square wooden plaque
1 - piece of scrapbook paper
Spray paint primer (optional, but recommended)
Spray paint in your choice of color
Mod Podge
Paint brush

Start by emailing me for the wording and printing it off on a piece of scrapbook paper. I chose an apple green color for my September plaque.

A 6 1/2" square wooden plaque can be purchased at any hobby store. I found mine at Hobby Lobby for a grand total of $1.47. The wood products at HL go on sale at 50% off every few weeks, so you can always stock up when they do. Not that $1.47 is going to break the bank, but why not take advantage of sales -- especially if you are making multiple plaques for friends!

I lightly sanded my plaque, primed it and painted it an apple green.

When you print the wording onto scrapbook paper, let the paper rest for about 12 hours to fully dry the ink before you attach it to the plaque, otherwise the ink may run. Then trim the paper to the correct size of your plaque. Paint the front of your plaque with a layer of Mod Podge. Then do the same to the back of the scrapbook paper, and apply the paper to the front of the plaque. Make sure all bubbles under the surface of the paper have been eliminated and that the paper is nice and flat. I have found that as the Mod Podge dries little bubbles under the surface of the paper will flatten out.

Suggestion: When using Mod Podge it is best to cover both surfaces with Mod Podge and then adhere the two surfaces together. Mod Podge adheres best to "itself." If you only apply Mod Podge to one of the surfaces, I have found the object you glue down has a tendency to peel off the other surface.

Finally, liberally apply a finish coat of the Mod Podge over the entire front of the plaque to give it texture and sheen. Let dry...

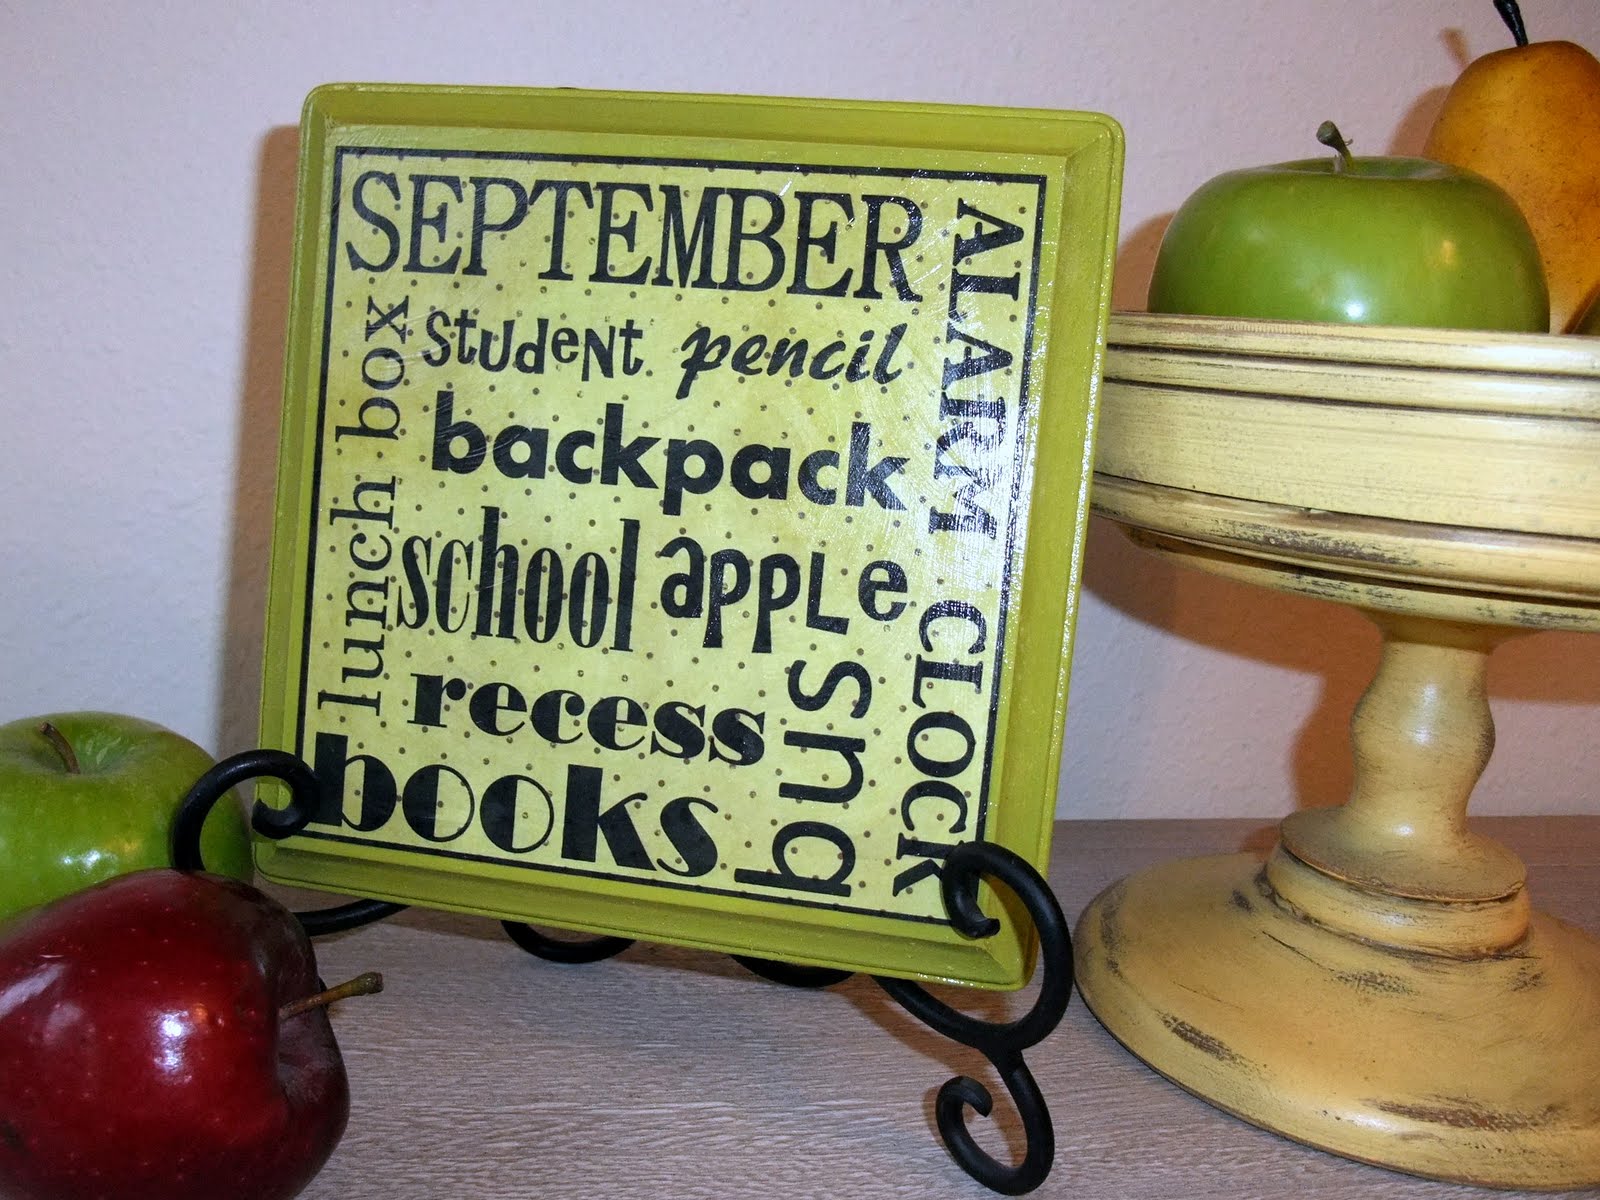
After it has dried you have a finished project that looks like this...

The only materials that I needed to buy for this project were the wooden plaque and the scrapbook paper, so this project cost less than $2! You heard me right. For under $2 you can make a cute plaque that reflects the excitement of the start of the school year!

If you would like to make this "Plaque Attack" just email me and request "September's Plaque Attack!" I will shoot back the power point document so you can make one for yourself!

By requesting this document via email you are agreeing not to sell the pattern or sell products with this pattern on them. You may make as many products as you would like for personal use.

October's "Plaque Attack" promises ghosts, goblins, bats and cats!

Enjoy creating!


Linked to:
Frugal Friday @ The Shabby Nest
Frugalicious Friday @ Finding Fabulous
Friday Fun Finds @ Kojo Designs
My Creative High @ Those Northern Skies
Fabulous Friday @ Frou Frou Decor
Hookin' Up with House of Hepworths
Transformation Thursdays @ The Shabby Chic Cottage
Get Your Craft on Thursday @ Life as Lori
Show Off Your Stuff Party @ Fireflies & Jellybeans
Transform Tuesday @ The Pumpkin Patch
These Creative Juices Linky Party

Monday, August 16, 2010

Bloomin' Tuesday...

It's Bloomin' Tuesday and time once again to highlight a few blossoms in our garden. Most of our visiting family members have left, so it's much quieter around here. You can almost hear the flowers blooming. Our beauticious perennial hibiscus is finally strutting her stuff. She usually makes her appearance the end of July, but like all my plants this year she is making her grand entrance a few weeks late.

When you have this perennial hibiscus, named "Luna Pink Swirl," gracing your yard you can pretend that you're living in the tropics even though you reside smack dab in the middle of the US of A. Its beautiful bloom is as big as a salad plate, and it adds a dramatic punch of color to any yard. When I catch a glimpse of it I feel like throwing a lei around my neck and doing the hula!

This hibiscus may look like a temperamental hot house plant, but she's as hardy as they come. In late fall I trim her down to several inches above the ground and by late Spring she's sending up shoots once again. So lovely...

This year I bought some variegated impatiens to plant around one of our locust trees. This variegated variety was new to our nurseries. I love how they filled in around the base of the tree and gave the area a whimsical feel with their little striped faces.

My last feature is a favorite rose of mine. I must admit our relationship was not always this congenial. I originally planted this rose in a little rose bed in our yard. After the first year it was more dead than alive, so I dug it up and replanted it in a corner of the yard thinking the move would finish her off. The next year she looked much better. Unfortunately, I didn't like where I had planted her. She was in the midst of ground cover and looked out of place as the only taller plant in the area, so I decided to remove her altogether. I hacked away at the plant and roots and disposed of the plant. Apparently I didn't get all the roots dug up, because the next Spring she burst onto the scene with vigor. For several years I tried to remove this plant by hacking away at the top of the bush and the roots. Each time she came back the next year healthy as a horse. I finally gave up and bent my measly little will to her much stronger one. She is currently the best looking rose I have in my yard, and she is proof positive that adversity can make one stronger...

To see more Bloomin' Tuesday posts,
go to Ms. Green Thumb Jean's!


Saturday, August 14, 2010

One more...

You may be getting tired of our plaque remakes, but I'm going to show just one more. For the first remake I made a "frame" for a wreath. The second remake was a shabby chic baby magnet board, and this remake is different yet again.

My daughter Shannon has been visiting this week. She has the colors of chocolate brown, lime green and turquoise in her home. Originally we were going to make her a magnet board with one of the plaques, but when the project was finished she thought she might use it in a different way.

As you will remember several plaques were purchased at Hobby Lobby for $2 each (90% off) to repurpose in various ways. Shannon used one of these plaques for her project...

She started by spray painting her plaque with a gray primer...

and then used Krylon (indoor/outdoor) spray paint in "Bahama Sea" -- purchased at WalMart for $2. I love the color of this paint. It's a fabulous turquoise blue that she's used on several projects in her home. Just beautiful! (This photo was taken right after the paint was applied before it dried. It dries darker than in the photo below.)

Next we found a piece of Amy Butler scrapbook paper (sold in packages at Hobby Lobby) and she Mod Podged that onto the center of the plaque.

A date with a paint brush and Ralph Lauren came next...

Shannon will probably use this as a "framed print" in a grouping with a lime green ceramic vase and other objects on the top of her kitchen cabinets.

I love how it turned out...

This colorful, contemporary version is so much better than the original piece!


Linked to:
Saturday Soiree @ A Little Lovely


Friday, August 13, 2010

Friday's Fabulous Finds...


I spy with my Etsy eye something...
beautifully organic.


Baby Girl Magnet Board...

You may remember a few weeks ago I found a fabulous deal at Hobby Lobby. It was a metal plaque on the 90% off clearance aisle that I repainted, sanded, glazed and used as a "frame" for a wreath I had bought on clearance at Target. You can see the finished project here.

I loved that project so much that I went back to HL that same day and bought the rest of the plaques (three in all) that they had on clearance for future projects. How could one pass up a sale like this?

This past week one of my daughters has been visiting and we used one of these metal plaques to make a magnetic board for one of her friends who is having a baby girl later this month. This particular friend has furnished her baby's bedroom in a shabby chic motif, so we decided to follow that lead and refinish the plaque with that in mind. This is what the 15 1/2" square metal plaque looked like originally...

We took the plaque and spray painted the living daylights out of it with a coat of primer and two coats of Rust-oleum Americana Accents in "Sweet Pea" (pink).

Then we used a technique that was used over at "The Adventures of the Overloaded Mommy" in regard to adding a piece of scrapbook paper to the middle of the plaque. We chose a pink and white damask paper that would fit in well with the shabby chic look. My daughter Mod Podged the paper onto the plaque...

Ralph Lauren Smoke Glaze was painted on and dabbed off to add a little character to the piece,

and it began to take on this shabby chic look...

We bought some "crystal faceted round stones" at Hobby Lobby and mounted those on craft magnets...

and added a darling little diamond studded princess "sticker" for a little glam and glitter...

An adorable photo of one of my granddaughters was included to show off the piece to all of you! This project was so easy to make and we think it's adorable. It easily cost under $10 to repurpose, but we think it would sell at a boutique for a good deal more!


Linked to:


Visit thecsiproject.com

Frugalicious Friday @ Finding Fabulous
Frugal Friday @ The Shabby Nest
Looking for a Creative High @ Those Northern Skies
Fabulous Friday Finds @ Frou Frou Decor
Show Off Your Stuff Party @ Fireflies & Jellybeans