Wednesday, June 30, 2010

a sneak peek...

I've been busy at work at, quite possibly, my favorite project evvvvvver. Ever. Ever. It has been formulating in my mind for quite some time, and I hope it turns out to be as fabulous as I've envisioned it in my musings. This project should be completed by the end of the week, but I thought I'd give you a little teaser...

I started by purchasing some "fine art" prints at Hobby Lobby. They were found on the 80% off clearance aisle. I wouldn't call myself clairvoyant by any stretch of the imagination, but six months ago even I would have been able to reason that the monkey print below would be found on the clearance rack come July. (To all monkey lovers out there -- I apologize.)

Earlier in the day I had gone to flea markets and thrift stores searching for inexpensive frames or framed prints. I wanted frames with a little character -- the gaudier the better! Unfortunately, there were none to be found. It was then that I remembered HL's clearance sale. I went there hoping to find some frames on sale and the rest is history. I brought those luscious frames home and went to work extracting the prints from the frames. You would think that would be an easy task, but I soon learned that HL glues, staples and tapes their prints into their frames -- all three on the same frame! It wasn't an easy task removing the prints from their homes!

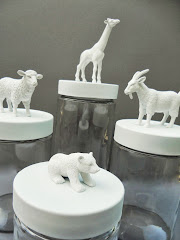
Now came the fun part. A little spray paint magic...

I'm still not finished with the frames, but that's all that can be shown right now.

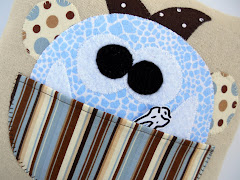
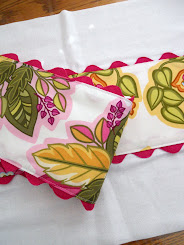
Today another element of this project arrived in the mail. That's it in the tissue paper. Can you guess what it is? Looks yummy, eh?

Later this week I will give you the low down and show the whole project. Right now I've got to get back to a little more spray paint shenanigans because those frames are not finished by a long shot!

Have a great day!


Tuesday, June 29, 2010

Bloomin' Tuesday...

I've always considered July to be the zenith in my garden. Everything is in full bloom and at its peak. Toward the first part of August the heat starts to take it's toll and the flowers begin to wilt a bit. Then as September approaches, temps cool down and the garden has one last "hurrah" before Fall sets in. For now, my blossoms are thriving. Here are a few photos of what's happening this week.

Ahhh, lovely Impatiens...
What would I do without their sweet, cheery faces!?!

Lilies are starting to burst...

I've always loved this little succulent called "Hens & Chicks."
You can see one to the left (& back) of the base of this birdbath...

Of all my flowering plants this year, the petunias are the star of the show.
To be honest, I've never much cared for petunias,
but after their gorgeous display this year
I've changed my mind.

Roses are in full swing, strutting their stuff...

Last but not least my clematis are beginning to bloom..

To see more Bloomin' Tuesday posts or to join in on the fun,
go to Ms. Green Thumb Jean's!


Monday, June 28, 2010

"Antique" Pedestal Bowl

I'm back in town after having a fabulous time at a family reunion last weekend. I'll have to tell you more about that in another post, but first I'll show you this little project I whipped up today. Raise your hand if you know that Hobby Lobby is having their semi-annual clearance sale. Yay!!! It's obvious that many of you already know, but if you haven't heard about their clearance sale (currently items are 80% off) why don't you high-tail it on down and check out it out. I bought this little metal pedestal bowl for $3. Unfortunately, I forgot to take the "before" photo, but it was painted black as night with red speckles. Odd. And dark. Gothic-like. Anyway, I wanted to lighten her up and place her on the desk in bedroom redo #3. I grabbed some Rustoleum American Accents Heirloom White spray paint and went to work.

I wasn't going for a pristine look, so I roughed her up a bit with some sandpaper...

and some Ralph Lauren Smoke Glaze...

Ahhhhh. Much better.

In my guest bedrooms a little chocolate treat is standard fair. It's important to have chocolate within reach -- especially when you are in unfamiliar surroundings and you've left your favorite blankie at home. Chocolate has a way of calming the soul of little people and big people. I thought this pedestal bowl would make the perfect container for a few goodies...

I'm feeling a chocolate craving coming on.
We may have to sleep in this bedroom tonight.


Hey All:
I've had a few people ask exactly what "Ralph Lauren Smoke Glaze" is. This is the top of the can which will give you all the information you need. Just make a copy of this photo, enlarge it a bit (so you can read it easily) and take it to Home Depot.

Linked to:
Nifty Thrifty Tuesday @ Coastal Charm
Anything Related @ All Thingz Related

Thursday, June 24, 2010

Mixed Up...

I mentioned in my post below that I had made a couple of new pillows for my youngest daughter, Jillian. The pattern I used was the exact same pattern (identical measurements) and fabric that I used for some pillows I made my older daughter, Shannon, a few weeks ago. As I was making the first pillow for Jill, I became preoccupied and soon realized I had sewn the fabric strips together in a different order than the first pillow I had made for the other daughter. It's interesting how a little thing like that can change the look of a pillow. So subtle, but it makes a bit of a difference. I thought I'd share this, because I've given you the pattern for the first pillows (here and here), but you might want to mix it up a bit too!


Here's the first pillow I made for Shannon. Note the fabric flowers and the orange swirl fabric are situated in the middle of the pillow...

I used the same measurements in this pillow for Jill, but by changing the order of the strips of fabric these flowers are offset...

Here's the second pillow I made for Shannon. Note the fabric flowers on this pillow are situated in the middle of the pillow...

I purposely sewed the strips of fabric together differently in this pillow for Jill, so these flowers would be offset as well...

Same fabric.
Same measurements.
Sewn together differently,
for a slightly different look!

Tuesday, June 22, 2010

Standing Lamp Redo

These last few days have been busy! I'm getting ready for a short trip this weekend, and as a result I've been sewing and painting up a storm. We're heading west for a family reunion and some of our kids will be there. Since our newly married daughter is attending the reunion with us, I asked if she would like me to make her some pillows like I made her sister here and here. I also had an extra floor lamp that we were no longer using, so I asked if she would like that as well. The answer was "yes!" so I went to work!

We decided the floor lamp needed to be updated a bit for their more contemporary taste. Here's the photo of the lamp before the redo. Personally, I'm fine with the metal finish on the lamp the way it was. I like different finishes in a room, including metals, but said child unit thought it might be better painted brown for her more contemporary place. I aim to please.

I took some Krylon "Outdoor Spaces" brown satin spray paint and went to work. No priming is necessary. When I was finished she looked like this...

Hmmmm. Very plain Jane chocolaty brown. As much as I love that color poured all over ice cream, for lamp bases I prefer a little more variation. I hoped by adding a darker glaze it would give it a little more pizazz and a more "natural" finish. I added a couple of tablespoons of black acrylic craft paint to about 1/2 cup Ralph Lauren smokey glaze and mixed it together.

Then I painted 'er on and lightly rubbed off the glaze till the finish was just right. Ahhh, so much better. It added just the right depth to the stand and made it look so much more natural. (It looks a little darker in the pictures than it actually is.)

See the difference up close and personal...

Next I concentrated on the lamp shade. The previous shade was very formal, so I bought an inexpensive more contemporary shade at Target -- marked down because it had a little "crease" -- and covered it in some of the fabric that I used for her pillows. I used the same process to recover this shade as I did on the last shade. This lamp is now wild and crazy and so very cute!

I love how it turned out. It hardly looks like the same lamp.

That's one of the pillows I made her. It clashes a bit on that chair, but it will go well on her brown sofa!

After going to all this "trouble"... I'm thinking this lamp would be perfect in my family room hoping she'll love it!


Linked to:
Boardwalk Bragfest @ Bobbypins Boardwalk
Trash to Treasure @ Reinvented
Nifty Thrifty Tuesday @ Coastal Charm
Get Your Craft On Tuesday @ Today's Creative Blog
Toot Your Horn Tuesday @ A Silly Little Sparrow