Thursday, April 28, 2011

Mother's Day Plaque Attack . . .

Because the month of May holds a very special holiday {Mother's Day} I have created two Plaque Attack documents this month. Yesterday I posted about the May Plaque Attack which you can download free of charge...


You can find that post here.  

Today I'm introducing a plaque specifically created for Mother's Day. I thought you might like to give a "Mother's Day Plaque" to some special mothers in your life for Mother's Day!


There are some beautiful greeting cards available for Mother's Day with very sweet sentiments, but these plaques actually cost less than a greeting card and give the recipient something a little more substantial and  heartfelt!


There are so many wonderful mothers in my life. My mother, of course, comes to mind first, but my mother-in-law, sisters, daughters, and daughters-in-law are also fabulous examples to me of motherhood.


I've been very blessed to have many wonderful women in my life that have helped and encouraged me in my role as a woman, wife and mother.


To receive the document and for a list of supplies and a tutorial on how to make this plaque, follow the links in this postIf you choose to download this document or request it by email, please consider becoming a "follower" and leave a comment below. I always love hearing from you!


Linked to:
Linky Party @ Running with Glitter
Mad Skills Monday @ Support Blog for Moms of Boys
Made with Love Monday @ Sew Chatty
Craft-O-Maniac Monday @ Craft-O-Maniac
Sundae Scoot Link Party @ I {love} Naptime
Show & Tell @ Be Different Act Normal
20 Below Friday @ Christina's Adventures
Show & Share Day @ Just a Girl
Free for All Friday @ Sassy Sites
Friday Flair @ WhipperBerry
Frugalicious Friday @ Finding Fabulous
Frugal Friday @ The Shabby Nest

Wednesday, April 27, 2011

Introducing May's Plaque Attack{s} . . .

Thank you! Thank you! I appreciated so much those of you who left a comment with words depicting "May" to help me with this month's plaque. I tried to use as many as space would allow! Thank you also to all those who downloaded the PDF in Google Docs last month and to those who requested the plaque via email. I can assume the download worked for about 75% of you, because just over 100 people requested the document via email and in the past I have over 400 requests! Yay -- for all of us!


Because this month holds a very special holiday {Mother's Day} I have created two plaques this month. One "month of May" plaque and one specifically for Mother's Day! I will publish a post on the Mother's Day plaque tomorrow, but know when you download the PDF or receive the email with the word attachment that there are two plaques in the document this month! I thought some might like a specific plaque to give to deserving mothers for Mother's Day!
 
In order to receive the documents for these plaques,
please follow the instructions below...

For those new to the "Plaque Attack Club," last September I introduced a new monthly feature on my blog and christened it "Plaque Attack." The best way to describe "Plaque Attack" is that it is a free plaque-of-the-month club. Each month, a few days before a new month begins, I will make a post featuring a new plaque. The plaque wording will reflect holidays or activities unique to the coming month.

This month I was a bit stumped, so I asked readers to come up with words for the May Plaque Attack...


Many have requested to be put on the email list to receive the plaque wording monthly. In actuality there is no "list." If you are new to the "Plaque Attack Club" know that you'll need to check back every month to receive each new document. A number of ladies have sent me photos of their plaques or a link to a post after creating them. Nothing makes me happier than to see your wonderful and unique creations! It's fabulous to see the different spin people put on the same basic idea. Please feel free to share your creations!


For a list of supplies and to find out how to make these plaques go HERE. Like last month I am offering May's  Plaque Attack in a downloadable PDF document via Google Docs. As always it is free of charge. If possible, before you download the doc would you consider becoming a "follower" and be so kind as to leave a comment below? I always love hearing from you!  If, for some reason, you would rather email me to request your Plaque Attack, feel free to do so. My email address is located on my sidebar. Please be forewarned: The PDF Google Doc version is 1/8" smaller than the emailed Word version. After downloading the PDF, print it off on plain paper to determine the size. If you'd like it a little bigger, then request the Word document through email.


By downloading this copyrighted document you agree not to sell the document or sell any items that use this document. It is for personal use only. You may make as many copies for yourself or to use as gifts as you would like. If you post about your plaque on your blog, I would appreciate it if you would link back to this blog post. Thank you!


Click here to download
May's Plaque Attack documents!

To print pattern: Bring up the document in Google Docs and go to "file" to the left of the document. Then click "print PDF." If you have trouble printing it, try using another browser -- Firefox should work for most. If you still have trouble, feel free to email me (my email address is on my sidebar) with a request for the pattern. Just put "May Plaque Attack" in the subject line of your email and please remember to leave a comment below! Enjoy!


Linked to:
Show & Share @ Just a Girl
Free For All Friday @ Sassy Sites
Hookin' Up @ House of Hepworths
Show Off Your Stuff Party @ Fireflies & Jellybeans
It's Sew Fun Tuesday @ It's Sew for You
All Things Inspired @ All Things Heart & Home

Friday, April 22, 2011

Friday's Fabulous Finds...


I spy with my Etsy eye a...
beautiful Easter weekend.


Clockwise, starting top left:

Wishing you a wonderful Easter!

May Plaque Attack . . . I'm stumped!

Although May is my favorite month of the year, I'm having trouble coming up with words associated with May for our May Plaque Attack. That's where you come in. Please leave a comment below with some words you would like to see on the May Plaque Attack! {Think spring} Thank you! I appreciate your help sooo much.


Thursday, April 21, 2011

Manfred Tooth Pillow Pattern is available . . .

...but first a word about Gwen! This week my posts have been all about Tooth {Fairy} Pillows! You were first introduced to Brunhilde, then Manfred, and now I will acquaint you with Gwen...


Gwen will be shipped to my granddaughter whose favorite color is "girl blue." I hope she likes it. She's five so a little young for a tooth pillow, but she's sure to need it sometime in the next year or two!


Yesterday I used this pillow to show you how to applique onto fabric. Go here to read that post.


By posting that tutorial, I gave most of the directions on how to make these tooth pillows. There are step-by-step instructions on appliqueing in that post. (This she-monster applique pattern can be bought here.)


Now it's time to make my
Manfred 
tooth pillow pattern available to all!

It is free of charge, however, if you request this pattern please be so kind as to leave a comment below. I'd love to hear you!  By requesting this copyrighted document you agree not to sell this document or sell any products using this pattern. It is for personal use or gifts only. 


To receive the PDF pattern and instructions for 
Manfred the Snaggle-Toothed He-Monster Tooth Pillow,
simply email me with a request for the pattern!

My email address is located on my sidebar under "Contact Information."
In the subject line of your email write "Manfred Tooth Pillow Pattern."


 Enjoy!


Linked to:
Visit thecsiproject.com
Blogger of the Month Linky Party @ Today's Top 20
Get Your Craft On @ Today's Creative Blog
Made with Love @ Sew Chatty
Mad Skills Monday @ Support Blog for Mom of Boys
Show & Share @ Just a Girl
Friday Flair Linky Party @ Whipperberry
For the Kids Friday @ Sun Scholars
Frugal Friday @ The Shabby Nest
Free for all Friday @ Sassy Sites

Wednesday, April 20, 2011

How to Applique on Fabric . . .

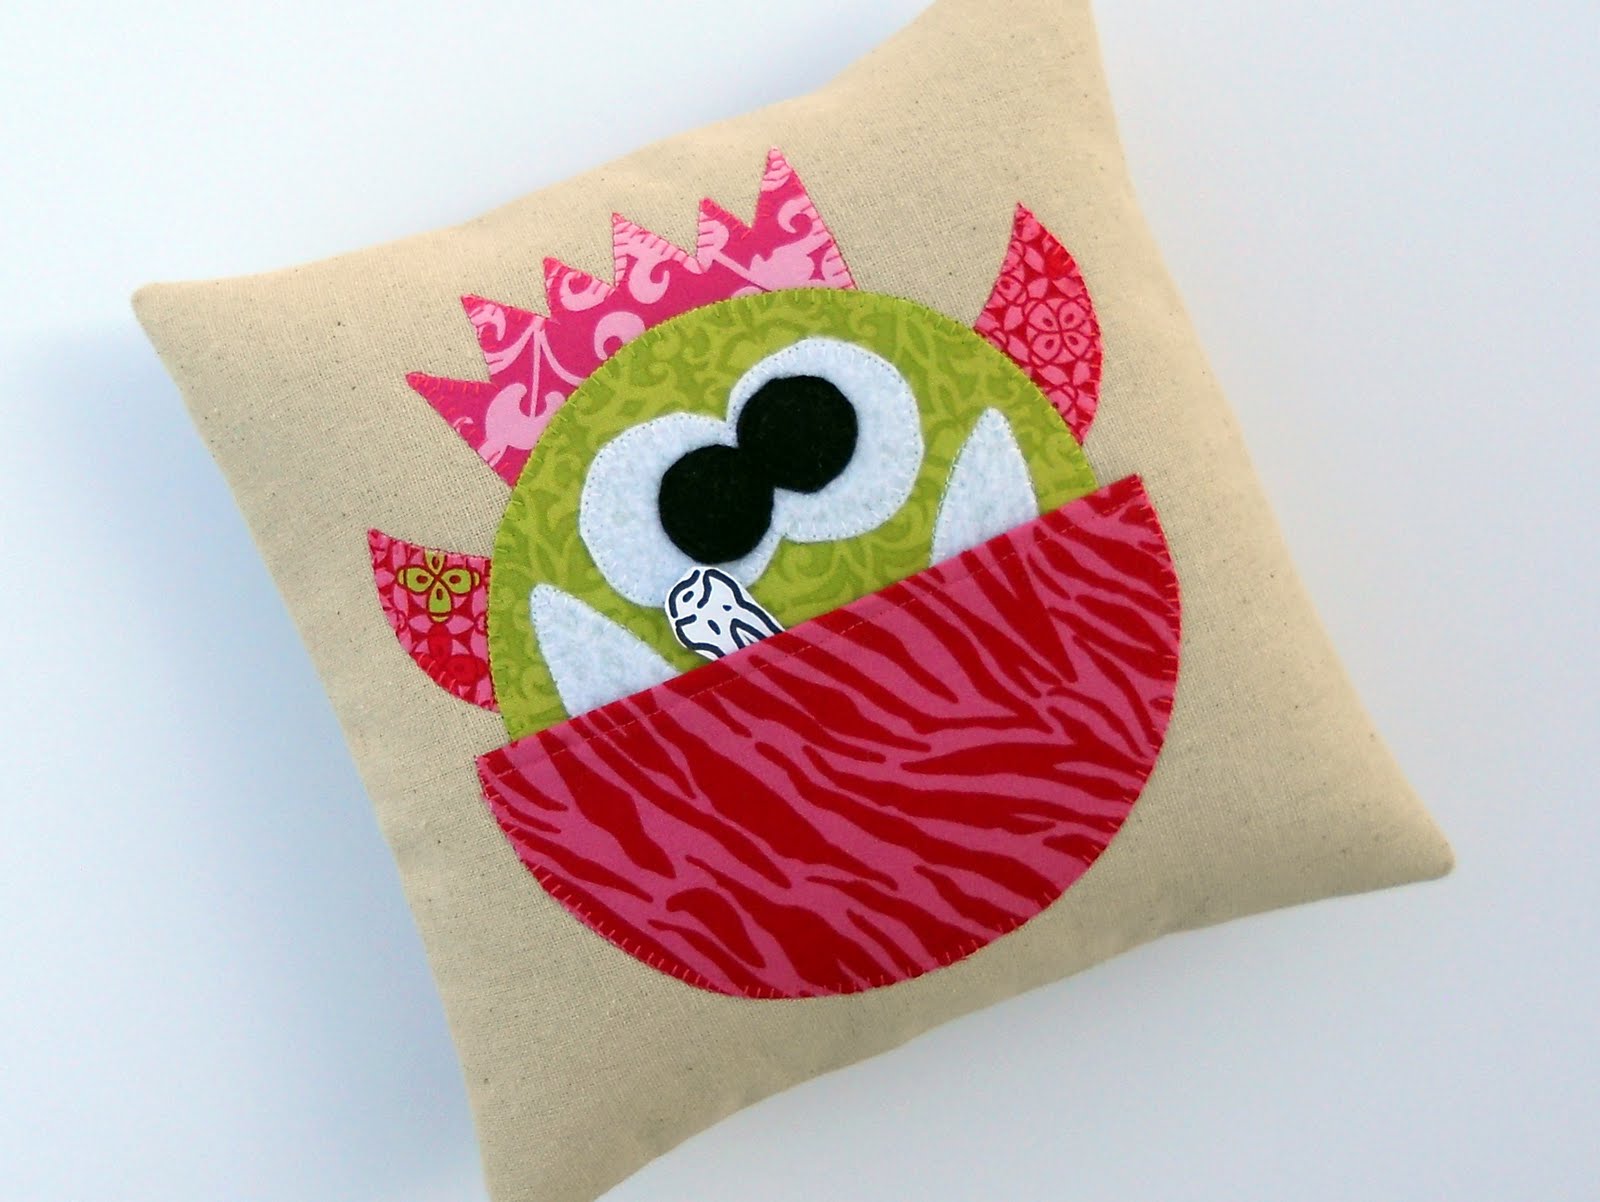
Earlier this week -- after posting about Brunhilde and Manfred my tooth pillow creations -- I promised a tutorial on "Fabric Applique".  Applique refers to the technique in which pieces of fabric are sewn onto another piece of fabric to create a design, pattern, or picture. The technique is especially popular right now on childrens items or totes. Here are some basic instructions that the beginner sewer can use to learn how to applique.


Before you Start: Find a design for your applique that can be broken down into basic shapes. You can draw your own creation onto paper or use a stencil or a coloring book page. There are also free applique templates online and many for a very reasonable price on Etsy. To make your pattern, simply trace the shapes onto a piece of paper.

Fabric Selection: Choose fabrics that will compliment or contrast. Beauty is in the eye of the beholder, so work with fabrics that appeal to you!

As you read through the tutorial, know that each step coincides with the number on the photos.

Step 1: Choose one piece of your pattern and cut a piece of double-sided paper-backed fusible web (like Wonder-Under) slightly larger than the pattern piece.

Step 2: Place the Wonder-Under rough side down (paper side up) onto the wrong side of the fabric. Remember the paper side of the Wonder-Under is to the iron!

Step 3: Adhere the Wonder-Under to the fabric by pressing your hot iron onto the paper.

Step 4: It shouldn't take more than a couple of seconds -- just long enough to adhere it securely.


Step 5: Take the pattern piece and lay it over the paper side of the Wonder-Under.


Step 6: With a pencil draw around your pattern piece and cut it out. You will now have a piece of your applique with the Wonder-Under attached to the back.


Step 7: In order to apply the applique to the background fabric, you will need to take the paper off the Wonder-Under on the back of your pattern piece. Sometimes it's difficult to remove this paper from the fabric on the edge --  as the fabric edge will fray a little as you are trying to get the paper off. Years ago I devised this trick. Run a needle or pin along the back of the paper and then bend the paper at that line. The paper will split at the line.

Step 8: Now it will be much easier to remove the paper from the back of the fusible web or pattern piece.


Step 9: Continue using this same technique to fuse Wonder-Under to the back of all your pattern pieces. (Important note: I only use Wonder-Under on cotton fabrics -- for the felt pieces the fusible web is not needed. That will be explained later.)


Step 10: Now it's time to get the background fabric ready for your applique. I always iron on a piece of fusible fleece to the wrong side of the background fabric to give it more body. (This isn't necessary when you are appliqueing onto a wearable item, like a shirt or onesie.)


Step 11: At this point you should have all your cotton pattern pieces with Wonder-Under adhered on the back. The paper backing should have been taken off each piece. Arrange the applique pieces onto the background fabric. Remember that applique is a layering technique with one piece laying on top of another.

Step 12: Take off all but the bottom pieces of applique and iron those bottom pieces onto your fabric.

Having the fabric fused to your background will ensure that the fabric pieces will stay in place as you sew around them. Some say there is no need to sew around the applique pieces if you have fused them onto the fabric, but I believe that's a risky opinion at best. Your applique will not be nearly as durable if you don't secure the pieces by sewing around the edges.

Step 13: Now it's time to sew around those applique pieces. I choose to use a blanket stitch (#36 in the photo below) on my sewing machine. A zig-zag (#6 in the photo below) or satin stitch (#16 in the photo below) can be used if your machine doesn't have the blanket stitch. If you don't have a sewing machine, you can do this work by hand.

Step 14: Set the stitch to the length and width you desire.


Step 15: Stitch around each piece.

Step 16: Continue adding layers and adding each additional piece in the same way.

Step 17: Because felt "melts" when it is ironed fusible web or Wonder-Under shouldn't be added to the back of the felt pieces. They have enough body to stand alone anyway. Just pin the felt piece down using two pins to secure it and sew around.


Steps 18-19: Continue pinning and layering each additional piece.

Step 20: Soon you will have your completed applique...


I hope this tutorial was helpful. I would suggest you practice a little on pieces of scrap fabric before you dive in, but it won't take long for you to get the hang of it!

Tomorrow I'll be posting the pattern for Manfred the Snaggle-Toothed He-Monster Tooth Pillow!


Linked to:
Free For All Friday @ Sassy Sites
20 Below Thursday @ Christina's Adventures

Tuesday, April 19, 2011

Manfred: the snaggle-toothed he-monster


Yesterday I posted about Brunhilde and the tooth {fairy} pillow I made for my granddaughter. 
Please go here to read that post.


Today I'd like to introduce you to 
Manfred
the snaggle-toothed he-monster tooth pillow...


This little 10 inch pillow works much the same as his female counterpart, Brunhilde, except this one is for the little boy in your life. Before your little guy goes to bed he deposits his "lost" tooth in the tooth {fairy} pillow, like this...


Sometime during the night the tooth fairy pays a visit, takes the tooth, and leaves him a treasure. When he wakes up in the morning he knows just where to look for his stash!


By reserving this pillow for this special occasion and only bringing it out when there's a lost tooth, it makes this milestone that much more special!


Stay tuned to this blog because later this week I will be sharing the pattern and brief instructions so you too can make a Manfred Tooth Pillow for one of your little guys!


Tomorrow I will post a tutorial on how to apply an applique onto fabric. It's easy! The tutorial will be geared for the beginner sewer! After the reading the tutorial and practicing a little even a beginner sewer should be able to make one of these little Tooth {Fairy} Pillows!


Have a great day! 


Linked to:
What I Made Wednesday @ Sweet Peas & Bumblebees
Show Off Your Stuff Party @ Fireflies & Jellybeans
Hookin' Up @ House of Hepworths
20 Below Thursday @ Christina's Adventuers
Show & Tell @ Blue Cricket Design
All Things Inspired @ All Things Heart & Home
It's Sew Fun Tuesday @ It's Sew Fun for You
Anything Related @ All Things Related


Monday, April 18, 2011

Brunhilde: the snaggle-toothed princess she-monster

The other day I was skipping through some favorite blogs when I was directed to a relatively new blog and an adorable monster applique. I had been {unsuccessfully} trying to come up with an applique for a project I'd had on my mind for quite some time, and I knew when I looked at Lisa's monster applique it would be perfect for what I was imagining. My thanks to Lisa at "Stubbornly Crafty" for sharing her talents and encouraging me to use my version of her applique for this purpose! {Please see "update" below.}

Without further ado may I introduce 
Brunhilde...


You might surmise that Brunhilde is merely a run-of-the-mill snaggle-toothed princess she-monster mini-pillow, but in actuality she is so much more.


Allow me to explain the purpose of this snaggle-toothed monster's creation. Below is a photo of our oldest grandchild. {Sigh} Is there anything cuter than the toothless grin of a 6 year old?


For some time now I've wanted to make this little princess and my other adorable grandchildren {that are sure to be in the same toothless boat someday} a tooth pillow. Here's how a tooth {fairy} pillow works. Before the child goes to bed her "lost" tooth is placed in the pillow for safe keeping until the tooth fairy's visit. {Because no one in my household is a six-year old with a loose tooth, I was led to substitute a drawing for the real thing. An imagination is required if you are a regular reader of my blog.}


The next morning when she awakens the tooth fairy has visited and left a little something in its place...


This little 10 inch pillow can be reserved and used only when a little one has lost a tooth. Using it on this auspicious occasion makes it all the more special!


{Update: A little misunderstanding ... I have since learned that Lisa purchased this applique from an Etsy site, so if you are interested in buying this applique please go here.}

Stay Tuned: On Tuesday (tomorrow) I will share my "little boy version" of this tooth pillow {Manfred: the snaggle-toothed he-monster}! Later in the week I will share some brief instructions and my pattern for the Manfred tooth pillow. From those instructions you should be able to easily make a Brunhilde pillow after purchasing the applique pattern here. I'll also be posting a tutorial later this week on how to applique for beginner sewers!


Linked to:
Made with Love @ Sew Chatty
Mad Skills Monday @ Support Blog for Moms of Boys
Craft-O-Maniac Monday @ Craft-O-Maniac