Monday, September 27, 2010

October's Plaque Attack!


October is such a fun month. 
It heralds the beginning of autumn and the holidays.
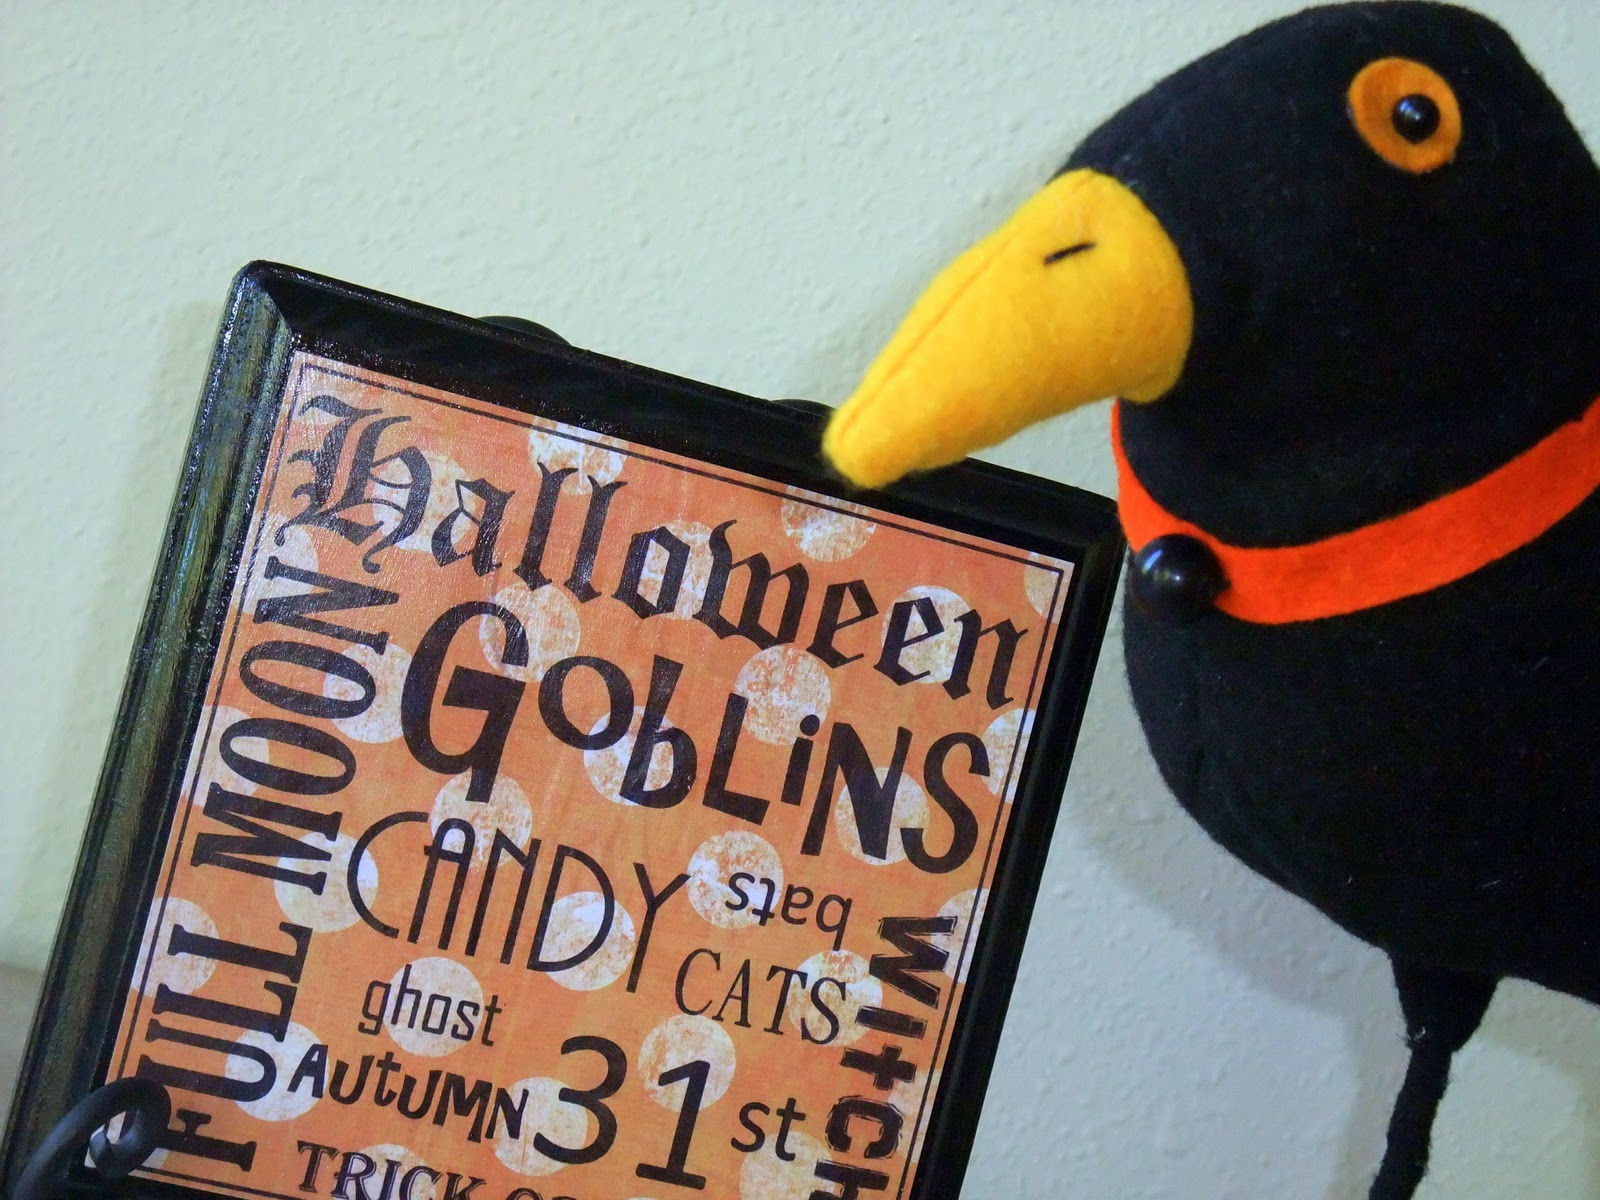
October's Plaque Attack reflects our first fall holiday...
Halloween!
Last month I introduced a new monthly feature on my blog -- the "Plaque Attack" club! The best way to describe "Plaque Attack" is that it is a plaque-of-the-month club. Each month -- a few days before a new month begins -- I will make a post featuring a new plaque. The plaque wording will reflect holidays or activities unique to the coming month.
If you like October's plaque and would like to make one for yourself, please email me requesting the document. (Make sure you specify the month you are requesting.) My email address is on my sidebar. I will be happy to send you the wording for the plaque in a Word document via email. No purchase necessary. Then all you'll have to do is select a sheet of scrapbook paper, print it off, and follow the instructions below...

You will need the following materials:
1- 6 1/2" square wooden plaque
(Plaques can now be purchased online here.)
1 - piece of scrapbook paper
Spray paint primer (optional, but recommended)
Spray paint in your choice of color
Mod Podge
Paint brush
Start by sending me an email requesting the Word document for "October's Plaque Attack." Print it off on a piece of "Halloween themed" scrapbook paper.
A 6 1/2" square wooden plaque can be purchased at most hobby stores. I found mine at Hobby Lobby for a grand total of $1.47. The wood products at HL go on sale at 50% off every few weeks. If you're going to be making a few of these throughout the year, you might want to stock up when sales come around!
I lightly sanded my plaque, primed it and spray painted it black. No need for fancy-schmancy spray paint here. I bought mine at Wal-Mart for about $2. I used "glossy" for this project...
When you print the wording onto scrapbook paper, let the paper rest for about 12 hours to fully dry the ink before you attach it to the plaque, otherwise the ink may run. Then trim the paper to the correct size of your plaque. Paint the front of your plaque with a layer of Mod Podge. Then do the same to the back of the scrapbook paper, and apply the paper to the front of the plaque. Make sure all bubbles under the surface of the paper have been eliminated and that the paper is nice and flat. I have found that as the Mod Podge dries little bubbles under the surface of the paper will flatten out. Let dry. Then, liberally apply a finish coat of the Mod Podge over the entire front of the plaque to give it texture and sheen. Let dry...
Remember,
if you would like to join in on the fun
and become an "official" member of the 
"Plaque Attack" Club,
just email me and request "October's Plaque Attack!" 
I will send you the Word document so you can make one for yourself!

 
Important: 
By requesting this document via email you are agreeing not to sell the pattern or sell products with this pattern on them. You may make as many products as you would like for personal use or gifts.
Look forward to November's "Plaque Attack" toward the end of October!
Linked to:
Anything Related @ All Thingz Related
Mad Skills Monday @ Support Blog for Moms of Boys
Motivate Me Monday @ Be Colorful
Motivate Me Monday @ Keeping it Simple

Friday, September 24, 2010

Friday's Fabulous Finds...

I spy with my Etsy eye something...
pumpkiny


Clockwise, starting top left:

 Have a wonderful weekend!

Easiest Halloween decoration ever...

I like Halloween, but I'm a "fair-weathered" player when it comes to decorations. I've never been into the spooky, dark aspects of Halloween. They creep me out. I guess that's the whole idea, but I don't like to play that game. With only a few exceptions I decorate with "fall" decorations that last from the first of October until the end of November. However, I do make this exception...
Eyeballs. That's right. Eyeballs. Even these would freak me out if I didn't know the "eyeball" wrapper surrounded chocolate with a caramel center. I can rationalize anything that has to do with chocolate. Chocolate makes even eyeballs more palatable. I digress....let me start at the beginning.

Last year we had a rather terrific windstorm that knocked a hefty branch off our aspen tree. I decided to put those branches to good use. I spray painted those babies black, plopped them in a container (any will do), and whaalaaa! I love the gnarly, knotted branches that an aspen tree creates -- perfect for Halloween...
Unlike chocolate, candy corn has never been a favorite of mine. Other than the shape and colors of that particular candy it's never appealed to me. However, I do think this treat helps create fabulous Halloween decorations...
When my painted branches looked so cute midst candy corn, I thought to myself, "if it works with candy corn, perhaps it will work with eyeballs." And it did...
Yesterday I spray painted the bottom of a little cloche I found at a thrift store some months back and placed the cutest little pumpkin right there in the middle...
These decorations incorporate the "Three "E's" of decorating.

What? You've never heard of the "Three "E's?"
Seriously?

Well, I guess that's because, technically,
they are my "Three E's" of decorating.

They are:
Effective
Economical

and
Edible
 The last "E", of course, carries the most weight. 
(no pun intended)

 Have a great day!
Linked to:
Featured Followers Friday @ My Repurposed Life

Thursday, September 23, 2010

The Bax . . .

If you follow my blog, it won't come as a surprise that I have a thing for pillows. The addition of a themed pillow to a room can change a room from drab to fab, and it's one of the easiest ways to add a punch of holiday magic to any room! Generally my creations start with a doodle. That's how "Baxter the Bat" came to be. You may lovingly refer to him as "The Bax" as I do...
Baxter is a spin-off from my "Give a Hoot" pillow that I made earlier this year.
(More "Give A Hoots" here.)
Once again I started with a professional artist's basic tools: a pencil, paper and a salad bowl...
with a yardstick I drew lines to use as guides...
a little salad bowl magic once again...
a vitamin lid and you've got yourself some bat wings...
Then I added 1/2" to the outside edge of Bax's body and cut out his body and his different features (wings, eyes, fangs, inside of ear). Stitch witchery and an iron were used to adhere the smaller pieces to the body. A quick decorative stitch around the edges permanently attached them to the body of Bax...
The sweet hum-drum of a sewing machine.
A snip. 
A tuck. 
Some botox stuffing. 
And an hour later Baxter is reborn in fabric in the form of a cute Halloween pillow!
I used cotton fabric for the body of Bax, 
some fake leathery fabric for his wings and ears, 
and felt for his eyes and fangs.
Some minky fabric on the back finished him off and made him perfectly soft for little heads.
 
Baxter looks at home in a tree, but he's perfectly comfortable relaxing in a chair in our family room too!
Linked to:
Visit thecsiproject.com
SNS @ Funky Junk Interiors
Motivate Me Monday @ Be Colorful
Show & Share Day @ Just a Girl
Frugal Friday @ The Shabby Nest
Frugalicious Friday @ Finding Fabulous


Wednesday, September 22, 2010

"Baxter the Bat"


Hey Ladies...
Head on over to Eighteen25 and check out my post today!
Eighteen25 has had an entire month of 
Spooktacular Halloween ideas...

My contribution?
(You may lovingly refer to him as "The Bax.")

Please leave a comment on my post at Eighteen25, 
so I don't feel like a loser-dweeb! ;o)
Thank you!

Tuesday, September 21, 2010

Trick-or-Treat bags made easy!

I'm ahead of schedule this year. I usually don't start thinking about Halloween until October 1st, but this year I've cranked out a few Halloween projects well ahead of time. One of the first projects I finished was a Trick-or-Treat Bag.


Do you remember the Lil' Girl Springtime Totes that I made? Well, this Trick-or-Treat Bag is the same pattern. If you're interested in making one of these Halloween totes, just buy some cute Halloween fabric and follow the Lil' Girl Springtime Tote instructions (sans the fabric flower on the front!).


The fabrics I chose for these bags are the dream child of Alexander Henry and can be purchased at Fat Quarter Shop (and many other places). I was introduced to this line at "Your Fabric Shopper."  I combined Endora's Dots, Witches in Stitches, and Witchy Stitchy Owl with natural muslin to make these adorable Trick-or-Treat bags.


I love the thought of a Trick-or-Treat bag that is used year after year -- at least while the children are small and need only a little tote -- rather than a pillowcase! I'm a sucker for traditions.


Last year I also made some Trick-or-Treat Bags for my grandkids. (Pictures below.) You can see the post about these little bags here. The bags were appliqued, but otherwise the pattern was the same as the Lil' Girl Springtime Tote except the front piece was only one piece of fabric, so its measurements were identical to the back piece of the tote. Before sewing the bag together, I cut out a rectangular piece of fabric and appliqued it to the front piece of the tote. Then I appliqued a piece of "candy corn" on top of the rectangle. Below are a few examples from that sewing spree...


All of these totes are so easy to make and they make fun little Halloween gifts for the ghosts and goblins in your life!


Linked to: 
Frugal Friday @ The Shabby Nest
Frugalicious Friday @ Finding Fabulous
DIY Fall Festival @ The DIY Showoff
Get Your Craft On @ Life as Lori
Show Off Your Stuff @ Fireflies & Jellybeans 
Hookin' Up @ House of Hepworths
Strut Your Stuff Party @ Somewhat Simple 
Transformation Thursday @ The Shabby Chic Cottage
Show & Tell @ Blue Cricket Design
Anything Related @ All Thingz Related 
The DIY Project Parade @ DIY Show Off
Get Your Craft On @ Today's Creative Blog
Nifty Thrifty Tuesday @ Coastal Charm
Mad Skills Monday @ Support Blog for Moms of Boys


Photobucket

Monday, September 20, 2010

Dwipe...

Last week my daughter and I finished several projects. One of these projects was making several Dwipes for friends and family that have recently given birth to little girls. I also made one for my Etsy -- it'll be in there later today.
The Dwipe came to be when one of my daughter-in-laws wondered if I could create a pattern for a diaper and wet wipe case. Soon after the "Dwipe" was born. I've been selling them and giving them as gifts ever since.
It's a small tote where a parent can store essentials -- a travel case of wet wipes, a thin changing pad, and a few diapers. This tote can also come in handy for the parent who is training their child. One can put a change of clothing into the tote in case of emergency. This mini-tote can then be thrown in a glove compartment, purse, or diaper bag and you're ready to go! Carrying this type of tote to a restroom will be more subtle than carrying a child, package of wet-wipes, and a diaper and more convenient than a heavy diaper bag. Fathers love the Dwipe because it's more compact than carrying a diaper bag to the restroom when their child needs a quick change. This, along with some wet wipes and a package of diapers, makes the perfect gift for a new mother.

Friday, September 17, 2010

Friday's Fabulous Finds...


I spy with my Etsy eye something...
 crimson and smokey gray


Clockwise, starting top left:

Have a wonderful weekend!

90 days to go...

The thought of putting up a Christmas craft so early in the year goes against my better judgment, but my daughter and I have been crafting this week and she finished this Christmas block advent calendar yesterday so I thought I'd better take a few pictures of it before she packs it away and heads home tomorrow. This calender is much like the Halloween advent calendar we made earlier this week. Just so you know there are 90 days left until Christmas...
That's a whole quarter of a year. 
It give me plenty of time to procrastinate.