I started by stopping by Home Depot and purchasing a 4"x4"x12 foot piece of Douglas Fur -- about $13. While there I asked them to cut the 12 foot length into 18 square cubes and 9 rectangular pieces that were double the length of the cubes. (Home Depot cuts their lumber for no additional charge.) While I was waiting to get these cut I noticed a "discard" pile where they sell odd lengths of wood for $.51 a piece. There were three 4 foot lengths of 4"x4" pine in that area for that price! Moral of the story -- it would be worth checking out that pile before purchasing the longer length for 12 times the cost! Still, even at $13 the wood came to less than $1.50 per calendar and I was able to get 9 calendars out of that 12 foot length of wood.
To complete the project, purchase or collect the following supplies:
- sandpaper
- black spray paint
- scrapbook paper
- Mod Podge
- paint brush
- stamp pad for distressing
I sanded the blocks down with an electric sander and spray painted them with a glossy black paint...
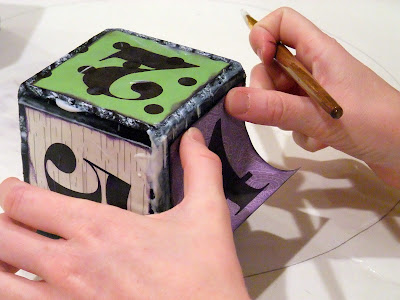
Instead of vinyl lettering I made two PowerPoint documents and printed the numbers and phrase onto scrapbook paper. If you would like to make an advent calendar, just email me {my email address is on my sidebar} and I will send you the PowerPoint documents that you can use to create a calendar of your own. Just type "Halloween &/or Christmas Advent Calendar" in the subject line of your email me and {please} choose to "Follow" my blog! I made these documents in Microsoft PowerPoint 2007. If you don't have that program you won't be able to bring up the documents. There is one "number" document. You'll need to change the numbers to print each page.
Then I cut out the phrase and numbers and distressed the edges of the paper using a black ink pad...
A
Let those babies dry and you've got yourself a calendar...
Now for the tricky part. I spent the longest time trying to figure out how to place the numbers on the blocks to create the 1st through the 31st days in October. Then, my husband Googled "wooden block calendar" and within seconds my question was answered. That, my friends, is one of the reasons he is the bread-winner in our family.
The first cube should have the numbers 0, 1, 2, 3, 4 and 5. The second cube should have 0, 1, 2, 6, 7 and 8. The "6" is then turned upside-down to create the number "9" when needed. Someone had to get up mighty early in the morning to figure that one out!
This idea could be applied to many holidays...
Later this week my daughter and I are planning on making a "Count Down to Christmas"!


