Thursday, September 30, 2010

Printing on Fabric...

I've been inspired by those who have posted tutorials for printing on fabric. In August Gail at "My rePurposed Life" created just such a tutorial. It seems that each tutorial that is published is a little different, so I'm here to show you how I accomplished the feat this week! Printed fabric is a fabulous way to add a special touch to your home. All you need is a piece of cardstock paper, some light-colored fabric and spray adhesive. 
Begin by ironing your fabric flat and laying it down on a flat surface. Spray your cardstock with the adhesive, and gently lay it onto the fabric -- adhesive side down. Press the cardstock onto the fabric, then trim your fabric edges to the exact size of the cardstock.

I went to the "The Graphics Fairy" for this Pumpkin image. Karen has hundreds of beautiful images that you can download free of charge. Download your chosen image to your computer.

Then bring up a new Word document and insert the saved image into your Word document. Below is an image from my computer screen. It shows the dimensions that I enlarged the image to so it would nicely fit on my 8.5x11 inch piece of paper.(Height 5.8"; Width 9.7")
To print onto your fabric put your cardstock/fabric into your printer -- fabric side down (for inkjet printers).  Make sure you set the 'Print Quality' to "best." Then print the image onto your cardstock/fabric.When it emerges from the printer it will look like the photo below. Gorgeous, eh?
Warning: There are many tutorials that tell you to tape your fabric onto the cardstock. For me, this method didn't work well at all. With this method my fabric was too loose to print nicely. Below is an example of the differences between the taping method and the adhesive method. The fabric in the top of the photo was taped to the cardstock. The fabric shifted as it went through the printer and printed unevenly onto the fabric (note right side of fabric). The fabric on the bottom was attached to the cardstock with spray adhesive. You can see how the outside margins of the image are straight...
Let the ink on your fabric dry for several hours, then peel off the cardstock from the fabric.
(Note: This method of transferring a print directly onto a piece of fabric is NOT washable. I used it on a seasonal pillow top that I'll display for one or two months out of the year. Understand that there are no little ones in my home, so the need to wash this item is greatly diminished. ;o) If you want to print onto fabric that will need to be washed, you'll want to use iron-on transfer sheets to transfer your image onto fabric. I'll post about that method within the next couple of weeks!)

I used my printed fabric as a middle panel in a very simple seasonal pillow...
For those interested, below are the dimensions of the unfinished panel pieces. I used a 1/2" seam allowance on all my seams for this pillow...
I can't even begin to tell you how much I love this method of transfering an image to fabric. It's so inexpensive and easy! 
This particular image makes for a fabulous, earthy, autumn pillow.
 I have another couple of images up my sleeve that I'll be using this next week.
I'm aware this will come as a big shock, but the images I have in mind won't be used for pillows. I know. I know. Pick yourself up off the floor.
A girl has to diversify every now and then.

Linked to:


Visit thecsiproject.com


Brag Monday @ The Graphics Fairy
SNS @ Funky Junk Interiors
Catch-as-Catch-Can @ My rePurposed Life
Show & Share Day @ Just a Girl
Friday Fun Finds @ kojo designs
Porch Party @ First a Dream
Frugalicious Friday @ Finding Fabulous
Frugal Friday @ The Shabby Nest
Best DIY Projects of September @ Beneath My Heart
Hookin' Up with HOH @ House of Hepworths
Transformation Thursdays @ The Shabby Chic Cottage
Show Off Your Stuff Party @ Fireflies and Jellybeans
Get Your Craft On Thursday @ Life as Lori
A Crafty Soiree @ Yesterday on Tuesday

Tuesday, September 28, 2010

"Girls Night Out" Halloween Pillow...

It's a known fact that girls require a night out with friends every now and then. Getting all dolled up in the latest fashions and going out on the town offers a nice diversion from the hum-drum of every-day life -- especially when you've been bending over a bubbling cauldron all day. That's when one deserves to kick up her heels, snatch the broom out of the closet, and hit the treetops with your best girls. "Girls Night Out" is my physical manifestation, in pillow form, of just such an evening!
Meet (from left to right) Agatha, Rhiannon, and Zefira ("Zeffie" for short). In spite of their many differences, they are the best of friends...
::: Agatha :::
Agatha keeps the girls in formation line with military-like precision. Although no one has designated her as such, she is the leader of the pack and everyone knows it. Her long-johns and sturdy cape are evidence of her practical nature. Don't judge. It's cold at night...
::: Rhiannon :::
She's the baby in the group. Rhiannon is spontaneous, spunky and filled with mischief. Her sense of style reflects her saucy attitude...
::: Zeffie :::
Zeffie is my personal favorite. She's a practical gal with a touch pizazz! I love her "sensible" shoes -- covered in orange leopard skin -- and her matching bedazzled bag.
I created "Girls Night Out" in early September hoping to share it on my guest post on Eighteen25's Spooktacular Series. By the time I was finished with it I knew it was far too complicated to post with a tutorial, so "Baxter the Bat" was designed instead. I created "Girls Night Out" by layering fabrics over one another and appliqueing each item onto the top of the pillow. It was like dressing someone -- first the leggings, then the dress, then the capes, and finally the accessories and shoes, including the broomsticks! One cannot forget the broomsticks -- they are the ultimate accessory for these witchy gals. Twenty-five different pieces of fabric were used to complete the top of the pillow. The pattern for this pillow isn't going to be shared. It's my original work. It literally took me hours and hours to draw, cut it out and piece it together, so I'm keeping this one to myself -- the pattern and the pillow! ;o)
Here's wishing that you can enjoy a night out with your girlfriends soon. And here's hoping they behave themselves and don't end up acting a tad bit witchy --  like Agatha, Rhiannon and Zefira!

Monday, September 27, 2010

October's Plaque Attack!


October is such a fun month. 
It heralds the beginning of autumn and the holidays.
October's Plaque Attack reflects our first fall holiday...
Halloween!
Last month I introduced a new monthly feature on my blog -- the "Plaque Attack" club! The best way to describe "Plaque Attack" is that it is a plaque-of-the-month club. Each month -- a few days before a new month begins -- I will make a post featuring a new plaque. The plaque wording will reflect holidays or activities unique to the coming month.
If you like October's plaque and would like to make one for yourself, please email me requesting the document. (Make sure you specify the month you are requesting.) My email address is on my sidebar. I will be happy to send you the wording for the plaque in a Word document via email. No purchase necessary. Then all you'll have to do is select a sheet of scrapbook paper, print it off, and follow the instructions below...

You will need the following materials:
1- 6 1/2" square wooden plaque
(Plaques can now be purchased online here.)
1 - piece of scrapbook paper
Spray paint primer (optional, but recommended)
Spray paint in your choice of color
Mod Podge
Paint brush
Start by sending me an email requesting the Word document for "October's Plaque Attack." Print it off on a piece of "Halloween themed" scrapbook paper.
A 6 1/2" square wooden plaque can be purchased at most hobby stores. I found mine at Hobby Lobby for a grand total of $1.47. The wood products at HL go on sale at 50% off every few weeks. If you're going to be making a few of these throughout the year, you might want to stock up when sales come around!
I lightly sanded my plaque, primed it and spray painted it black. No need for fancy-schmancy spray paint here. I bought mine at Wal-Mart for about $2. I used "glossy" for this project...
When you print the wording onto scrapbook paper, let the paper rest for about 12 hours to fully dry the ink before you attach it to the plaque, otherwise the ink may run. Then trim the paper to the correct size of your plaque. Paint the front of your plaque with a layer of Mod Podge. Then do the same to the back of the scrapbook paper, and apply the paper to the front of the plaque. Make sure all bubbles under the surface of the paper have been eliminated and that the paper is nice and flat. I have found that as the Mod Podge dries little bubbles under the surface of the paper will flatten out. Let dry. Then, liberally apply a finish coat of the Mod Podge over the entire front of the plaque to give it texture and sheen. Let dry...
Remember,
if you would like to join in on the fun
and become an "official" member of the 
"Plaque Attack" Club,
just email me and request "October's Plaque Attack!" 
I will send you the Word document so you can make one for yourself!

 
Important: 
By requesting this document via email you are agreeing not to sell the pattern or sell products with this pattern on them. You may make as many products as you would like for personal use or gifts.
Look forward to November's "Plaque Attack" toward the end of October!
Linked to:
Anything Related @ All Thingz Related
Mad Skills Monday @ Support Blog for Moms of Boys
Motivate Me Monday @ Be Colorful
Motivate Me Monday @ Keeping it Simple

Friday, September 24, 2010

Friday's Fabulous Finds...

I spy with my Etsy eye something...
pumpkiny


Clockwise, starting top left:

 Have a wonderful weekend!

Easiest Halloween decoration ever...

I like Halloween, but I'm a "fair-weathered" player when it comes to decorations. I've never been into the spooky, dark aspects of Halloween. They creep me out. I guess that's the whole idea, but I don't like to play that game. With only a few exceptions I decorate with "fall" decorations that last from the first of October until the end of November. However, I do make this exception...
Eyeballs. That's right. Eyeballs. Even these would freak me out if I didn't know the "eyeball" wrapper surrounded chocolate with a caramel center. I can rationalize anything that has to do with chocolate. Chocolate makes even eyeballs more palatable. I digress....let me start at the beginning.

Last year we had a rather terrific windstorm that knocked a hefty branch off our aspen tree. I decided to put those branches to good use. I spray painted those babies black, plopped them in a container (any will do), and whaalaaa! I love the gnarly, knotted branches that an aspen tree creates -- perfect for Halloween...
Unlike chocolate, candy corn has never been a favorite of mine. Other than the shape and colors of that particular candy it's never appealed to me. However, I do think this treat helps create fabulous Halloween decorations...
When my painted branches looked so cute midst candy corn, I thought to myself, "if it works with candy corn, perhaps it will work with eyeballs." And it did...
Yesterday I spray painted the bottom of a little cloche I found at a thrift store some months back and placed the cutest little pumpkin right there in the middle...
These decorations incorporate the "Three "E's" of decorating.

What? You've never heard of the "Three "E's?"
Seriously?

Well, I guess that's because, technically,
they are my "Three E's" of decorating.

They are:
Effective
Economical

and
Edible
 The last "E", of course, carries the most weight. 
(no pun intended)

 Have a great day!
Linked to:
Featured Followers Friday @ My Repurposed Life

Thursday, September 23, 2010

The Bax . . .

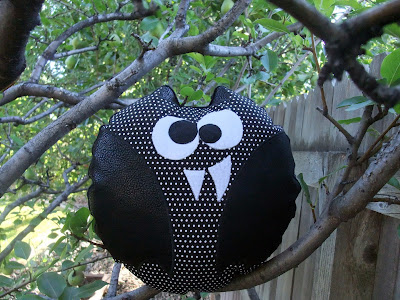
If you follow my blog, it won't come as a surprise that I have a thing for pillows. The addition of a themed pillow to a room can change a room from drab to fab, and it's one of the easiest ways to add a punch of holiday magic to any room! Generally my creations start with a doodle. That's how "Baxter the Bat" came to be. You may lovingly refer to him as "The Bax" as I do...
Baxter is a spin-off from my "Give a Hoot" pillow that I made earlier this year.
(More "Give A Hoots" here.)
Once again I started with a professional artist's basic tools: a pencil, paper and a salad bowl...
with a yardstick I drew lines to use as guides...
a little salad bowl magic once again...
a vitamin lid and you've got yourself some bat wings...
Then I added 1/2" to the outside edge of Bax's body and cut out his body and his different features (wings, eyes, fangs, inside of ear). Stitch witchery and an iron were used to adhere the smaller pieces to the body. A quick decorative stitch around the edges permanently attached them to the body of Bax...
The sweet hum-drum of a sewing machine.
A snip. 
A tuck. 
Some botox stuffing. 
And an hour later Baxter is reborn in fabric in the form of a cute Halloween pillow!
I used cotton fabric for the body of Bax, 
some fake leathery fabric for his wings and ears, 
and felt for his eyes and fangs.
Some minky fabric on the back finished him off and made him perfectly soft for little heads.
 
Baxter looks at home in a tree, but he's perfectly comfortable relaxing in a chair in our family room too!
Linked to:
Visit thecsiproject.com
SNS @ Funky Junk Interiors
Motivate Me Monday @ Be Colorful
Show & Share Day @ Just a Girl
Frugal Friday @ The Shabby Nest
Frugalicious Friday @ Finding Fabulous