Thursday, October 31, 2013

Happy Halloween!


It's a beautiful day in Colorado. Thinking of the those in the mid part of our country today and hoping you stay safe and sound. {I keep track of the weather a little more earnestly these days since the flood last month in Colorado!} I stepped into our backyard a minute ago and took these photos of our pear and oak trees. They are celebrating Halloween in all their orangy glory! I'm feeling grateful we live in such a beautiful place.


Wishing you a happy and safe Halloween!


Monday, October 28, 2013

Herringbone Accent Wall -- Finished!


Saturday I finished an accent wall that I've been working on most of the week. It started with Plan A -- using a stencil on the wall. That plan was discarded for Plan B  -- which involved using miles and miles of painter's tape and a whole lot of patience.  The painters tape served as the lines between the herringbone pattern. Because this is a shuffled herringbone pattern, I put a little piece of tape on the sections to be painted. Then I covered those areas with white paint to seal the edges of the tape so there would be crisp lines when I added the colored paint...


Before painting I figured out the color pattern I would be using by adding a dash of paint to each block...


By Saturday I had painted the Herringbone pattern on the wall and all I had to do was wait for the paint to dry! Here's a photo after the paint was applied...


The dimensions of the project are easy. For the same pattern place the vertical tape 8 inches apart.  Then mark down every four inches for the diagonal pattern, like this...


I was a little concerned that the colorful paint would seep under the tape because our walls are textured, but when I removed the tape there wasn't much of that at all. Grateful. A teeny bit of touch up was all that was required.


Here's the finished wall...


This project was very time consuming, but I absolutely love it!


It's exactly the playful feel that I wanted for this rec room for the grandkids!


FYI: Here's some information on the paint I used. All the paint was from the Valspar "Eddie Bauer Home" Signature Collection: Island Blue, Dahlia, Taffy, Yogurt, Java, Dark Mango, & Apple Green.


Happy. Happy. Happy.


Linked to:
I Heart Naptime Linky Party
Friday Favs Party @ Naptime Crafter
The CSI Project
Handmade Tuesdays @ Ladybug Blessings 
Show Me What Ya Got @ Not Just a Housewife


Saturday, October 26, 2013

Herringbone Wall...


This week I've been working on an accent wall in our basement rec room. I'm getting there. I have two coats of colored paint on the herringbone pattern already done. I just need to put one more coat on the dark salmon and the yellow to finish it up...


These are not colors that I'm normally drawn to, so I've been a little unsettled about this project. I've committed to the colors though because I want this rec room to be a fun, playful place for the grands. I think these colors play to that.


I'm really hoping the paint hasn't seeped up under the tape. I ran a coat of white paint on the tape to seal the edges before I started with color, but if that didn't work on this textured wall it is going to be one hot mess! Wish me luck. The tape will come off later today after all the paint dries.


Friday, October 25, 2013

On to Plan B...

A couple of days ago I mentioned that I was going to be working on an accent wall in the rec room in our basement. I had bought a beautiful herringbone stencil from Royal Design Studio for the wall.


I started tracing around the stencil lines and it became apparent very quickly that the stencil wasn't going to work on our textured walls. There was only 1/8" of an inch between the blocks, which isn't enough of a space on a fully textured wall. So, I painted over what I'd traced, and I quickly devised a Plan B. {I'll use that beautiful stencil some other way!}

Plan B is comprised of miles and miles of 1" painters tape and a whole lot of patience. I began by making vertical lines 8" apart on the wall. Our long level became my best friend...


Then I created a herringbone pattern, copying the same shuffled herringbone pattern as on the stencil. My pattern is twice as big as the one on the stencil. The painters tape serves as the lines between the herringbone pattern. Because this is a shuffled herringbone pattern, I put a little piece of tape on the sections to be painted. Then I covered those areas with white paint to seal the tape so there would be crisp lines when I added the colored paint...


To say this is a labor intensive project is a gross understatement. I worked on this project for more than 8 hours yesterday and this is as far as I got...


I'm going to finish the taping today, and I might even start adding the colored paint. Can't wait to see the finished project!

UPDATE: Go here for the finals outcome of this fun wall!

Wednesday, October 23, 2013

Vacation?


I've had a little note on the sidebar of my blog announcing that I am taking a bloggy break and have been on "vacation." That's stretching it a bit. This has been my itinerary for the last seven weeks:

A week in Virginia.
Two (plus) weeks of flood clean-up in Colorado.
Long weekend in Missouri.
Weekend in Utah.
A much needed weekend home.
A week in Tennessee.

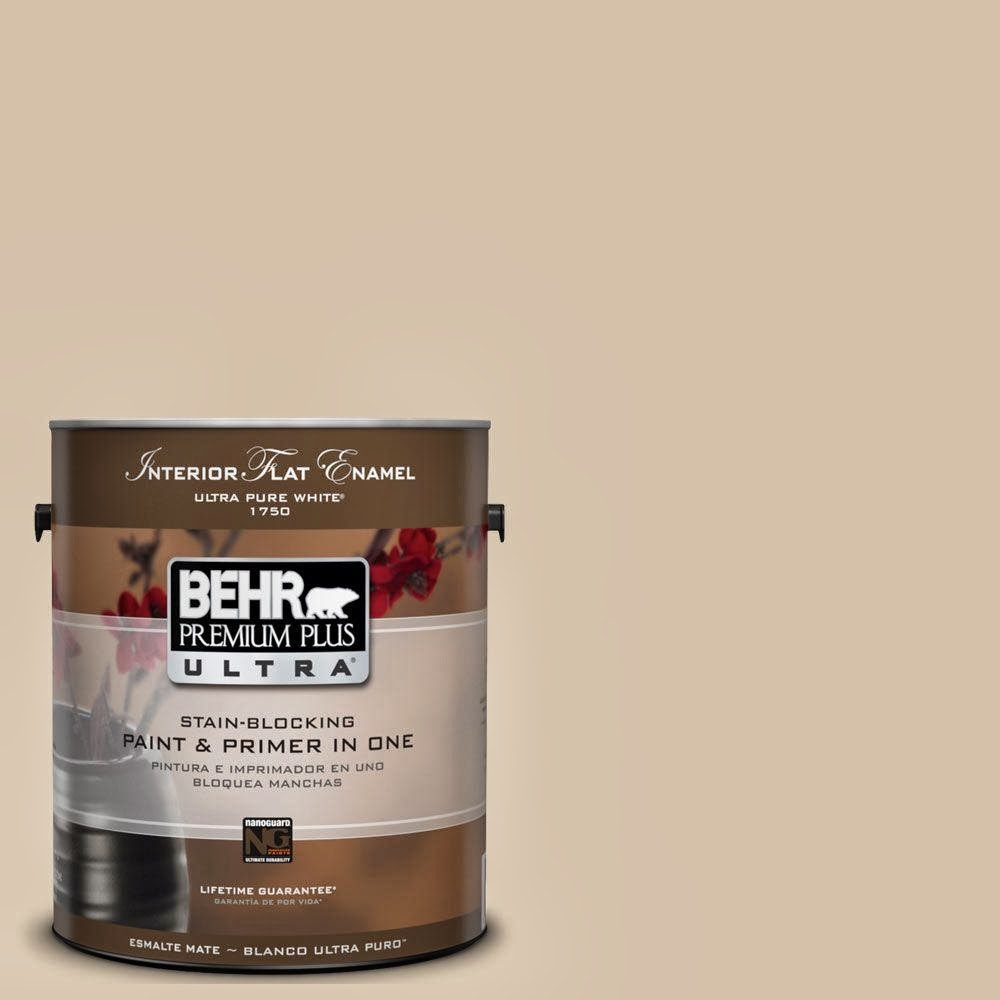
We just arrived home last night from Tennessee. With the little time I've had between trips, I've been busy painting our rec room downstairs. This is a room mostly dedicated to the grandkids and their toys. Adults hang out there too while the little ones play, but it's purpose is a play place for kids. I've painted the ceilings white, one accent wall white, and the other three walls are painted "Parachute Silk" by Behr. I love this taupey neutral color. 


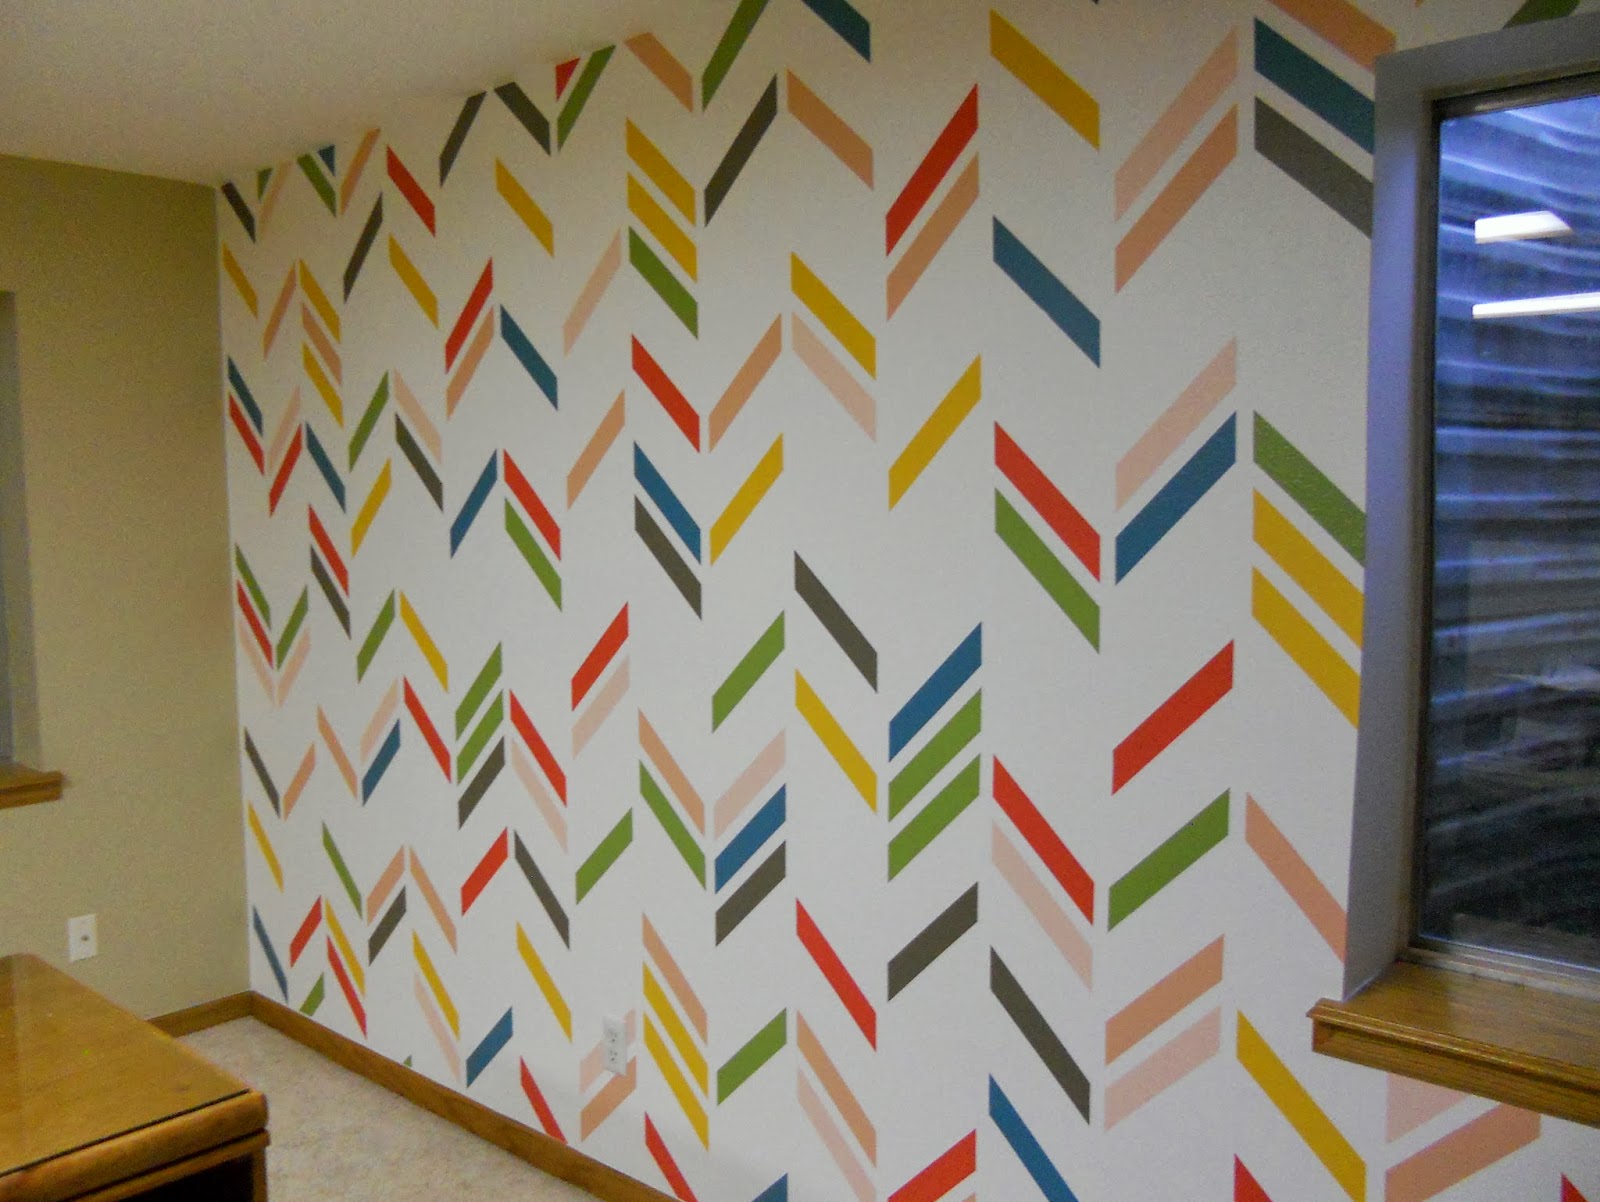
Painting the accent wall will take a little time. I found this amazing stencil (Royal Design Studio) via Pinterest and quickly ordered it. I loved the herringbone shuffle design and the color palate they used on the white background...


This wall, however, will take time because I'm going to trace the stencil and tape every one of those lines to get a crisp edge. Stenciling on textured walls is a challenge under the best of circumstances, but that particular patterns is meant to be precise, so I've decided to take my time and do it right. I imagine it will take me a couple of weeks to finish.

Over a month ago I had planned to start Christmas presents early, but so far I haven't stitched a thing. Plans are in the making, however, and I should be able to get a few projects done while painted walls are drying! I'll post some of those ideas as they become available. 

I love Fall. There's a peacefulness and serenity that comes with this season. I'm trying to soak in and enjoy those feelings. Wishing you have a wonderful, autumn day.

{a glimpse of the color in our backyard ::: northern red oak}

Friday, October 18, 2013

Friday, October 11, 2013

Friday, October 04, 2013