Tuesday, July 30, 2013
Little Girl Purse...
A year or more ago I pinned this adorable little girls purse pattern {free} by Nicole Willmore from Moda called Ruby's Party Bag. I finally had the cause to make it last week...
I'm going to give this itty bitty purse to an itty bitty girl that I love. She's going to become a big sister next month, so I wanted to make her a little surprise to give her when I go out to help.
This purse is about 8" wide and 6" tall {not including the straps} and is perfect for a toddler's tote. The pattern is easy to follow and whips up in no time. And, best of all, the pattern is free! Love the ruffles around the top of the bag.
I also like the side piece on the bag that makes it a little roomier inside. It's fully lined and is cutest with three contrasting fabrics...
Go here to download the free pattern and instructions. I love patterns that are given freely...so nice!
Monday, July 29, 2013
Beautiful day...
It's a beautiful day in Colorado this morning. The temps have dipped and we're having a little rainy spell. So nice. I sat in our backyard this morning drinking in the solitude. My mother had hip replacement surgery this morning. She's 90 years old. I was worried about her, but being in the garden helped calm my nerves. Nature has that effect on me. I got a call a few minutes ago -- the surgery went well. So relieved...
The Freckled Pear Give Away Results...
It's time to announce the winners for
give away!
The following three {lucky} ladies will receive a pattern
of their choice from
Congratulations ladies...
Your patterns will arrive via email from
Dana at The Freckled Pear!
Your patterns will arrive via email from
Dana at The Freckled Pear!
Friday, July 26, 2013
Friday's Fabulous Finds...
I spy with my Etsy eye something...
nautical.
Clockwise, starting top left:
Wishing you a wonderful weekend!
Wednesday, July 24, 2013
Snappy Bag Sunglass Case Tutorial...
Earlier this week I published a post about a tote I made for a friend...
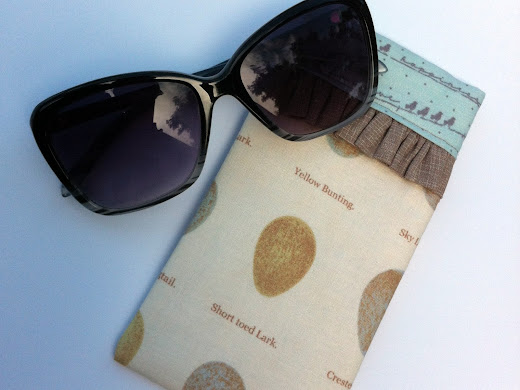
In addtion to the tote, I made this Snappy Bag Sunglass Case...
Do you remember my Snappy Bag? ...
This little bag is a mini-pouch that has pieces of a metal tape measure in the top casing that forms a "hinge" that snaps open and shut!
Well, I used this same approach when making the Snappy Bag Sunglass Case. The closer at the top of the case snaps shut, with the help of the metal tape measuring pieces, to ensure the sunglasses stay inside the case.
The dimensions of the fabric for the Snappy Bag Sunglass Case are totally different than the Snappy Bag, of course, but the instructions you follow to make it are identical. Here's the tutorial...
Materials needed:
Bag front: 4 1/4" x 13" cotton fabric
Bag lining (& casing for
measuring tape): 4 1/4" x 16 3/4" contrasting cotton fabric
Ruffles: Two 2" x 9"
strips of same (or other) contrasting cotton fabric
Interfacing: 3 1/2" x 13"
fusible fleece interfacing
Two 3" lengths of
3/4" wide metal measuring tape
ThreadUse 3/8" seam allowance.
Directions:
You will follow the same directions for the Snappy Bag Sunglass Case as you do for the Snappy Bag. Simply interchange the measurements above for the measurements of the Snappy Bag in the tutorial.
Linked to:Sundae Scoop Party @ I Heart Naptime
Friday Favs Party @ Nap Time Crafter
Tuesday, July 23, 2013
241 Tote...
I've been meaning to make this bag for awhile now. It's for a friend of mine that deserves a little something special...
This is such a simple, practical pattern and it's the most comfortable purse I've ever carried. The pattern was created by Anna at Noodlehead and is her "241 Tote Pattern." When I first bought this pattern I made about 10 bags for family and friends immediately. It's such a fun, easy pattern to follow.
I enlarged the pattern to make a bigger tote and added two pockets to the lining. One can never have too many pockets in a bag...
There are these roomy pockets on the outside of the bag too...
I bought the linen-like fabric from Fabricworm. It's from "Robert Kaufman Quilter's Linen Parchment" line. I love this line of 100% cotton fabrics that have a linen look. The birdie fabric is from the "Noteworthy" line for Moda and the little "egg" fabric is from the "Aviary" line by 3 Sisters for Moda. I love how the fabrics play off each other without being too similar...
When I started my blog it was all about totes and purses. As I made this tote it felt kind of good to get back to my roots.
Don't forget to sign up for the Give Away I'm currently sponsoring for Dana from the "The Freckled Pear." Go here for details.
Monday, July 22, 2013
Staycation - Trail Ridge Road, Rocky Mountain National Park
A week ago we were on top of the world -- literally. Trail Ridge Road is the highest continuous paved road in the United States. The hour and a half drive traverses Rocky Mountain National Park in Colorado from Estes Park to Grand Lake and covers some of the most breathtaking mountain scenery you'll ever see. The drive up to Estes Park and over Trail Ridge Road takes two hours from our home, but we double that time by taking advantage of the many scenic overlooks along Trail Ridge Road. We started our day-trip with a photo taken a few blocks from our home. Do you see the tallest two side-by-side peaks in that photo? The one on the right is Longs Peak which is over 14,000 feet above sea level. That's close to where we're going along Trail Ridge Road, and I'll reference that peak several more times.
Trail Ridge Road is closed during the winter and usually reopens Memorial Day Weekend depending on the snow pack and closes again when snows start accumulating in October. Here's the entrance to Rocky Mountain National Park -- just outside of Estes Park (elevation 7,500 ft.).
Our first stop was the turnout at Rainbow Curve. This vantage point gives a beautiful view of the distance you've traveled from Estes Park in the valley below...
I turned around 180 degrees and took this next shot. This is an example of why these mountains are called the Rocky Mountains...
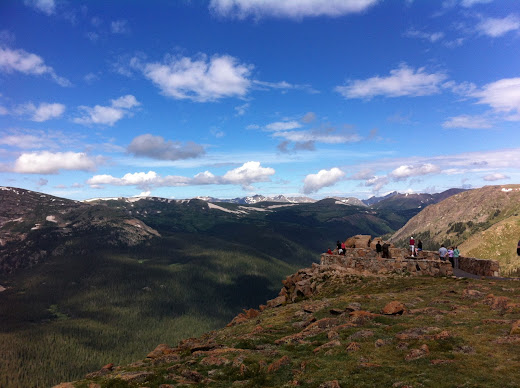
Our next stop was at the Forest Canyon lookout. It's a beautiful spot. At this point in the drive you are at 12,000 feet above sea level, above treeline and in the tundra. Nearly one third of the park is above treeline which is 11, 400 feet of elevation in the park -- the limit above which conditions are too harsh for trees to grow. Do you see the flat-top mountain in the distance? That's Longs Peak. We're on the other side of it now...
Trail Ridge Road is not for the faint at heart. If you have a fear of heights, it'll give you a little trouble the first time. The road itself is well paved and plenty wide, but most of the way up and down there is a sheer drop-off on one side of the road. During one stretch you literally traverse a ridge where the drop-off is on both sides. My advise: close your eyes. That only works if you are not in the driver's seat, however.
Ordinarily that wouldn't be much of a hike, but at 11,800 feet it becomes more of a challenge because the air is so thin. Many who are not from Colorado have a tough time of it. Those of us from the Front Range in Colorado have an easier go, but it's still almost 7000 feet higher than what we are used to! It's worth the pain though, because this is what you see when you get to the top...
It's not unusual to see wildlife and herds of elk, sheep or deer as you travel along the road. It's a little more unusual to see a mother moose and her baby. We were lucky...
We spent a few hours in Grand Lake and then made our way back home. Clouds often build during the afternoon hours, and true to form we got in a little rain on the way back home. Here's one last look at Longs Peak shrouded in clouds...
If you ever find yourself planning a trip to Rocky Mountain National Forest, here's a little advice.
- Dress in layers and bring a jacket. It was 68 degrees in Estes Park when we started and 53 degrees at the Alpine Visitors Center at noon. We've seen snow at the visitors center in July.
- Bring ibuprofen or Tylenol. You might get a headache because of the altitude. I've learned to do a preemptive strike and take two ibuprofen before we leave the house!
- Start the drive early in the morning for your best chance at good weather. The weather usually deteriorates as the day progresses.
- Bring plenty of water to keep hydrated. Dehydration = headache.
- Don't forget to bring your iPhone so you can take awesome photos like we did! ;o)
{Sorry for the loooong post. It's kind of hard to be succinct when you really love a place.}
Friday, July 19, 2013
Friday's Fabulous Finds...
I spy with my Etsy eye a...
weekend in France.
Clockwise, starting top left:
French King Bed
Samsonite Suitcases
Vintage Map of France
Photograph
Love Sign
Wishing you a weekend get-away!
Subscribe to:
Posts (Atom)


