Saturday, February 28, 2015

Thursday, February 26, 2015

Baked Chocolate Banana Donuts...


I'm hoping the skies clear and the snow stops soon. Otherwise, I may qualify for a contestant on the Biggest Loser Season 17. As I mentioned yesterday, there's just something about cold snowy weather that makes me repeatedly fire up the oven. Yesterday it was homemade bread, today chocolate donuts. Seriously, I need some blue sky to work off some of these carbs! Still... it's pretty hard to say "no" to these babies.


Fortunately, I found a Pilates video on Amazon Prime that I'm finding helpful. 
{sigh}

About a year ago I received an Amazon gift card from one of my kiddos and his wife. I held onto it for months waiting for just the right item! Here's what I finally purchased with that card...


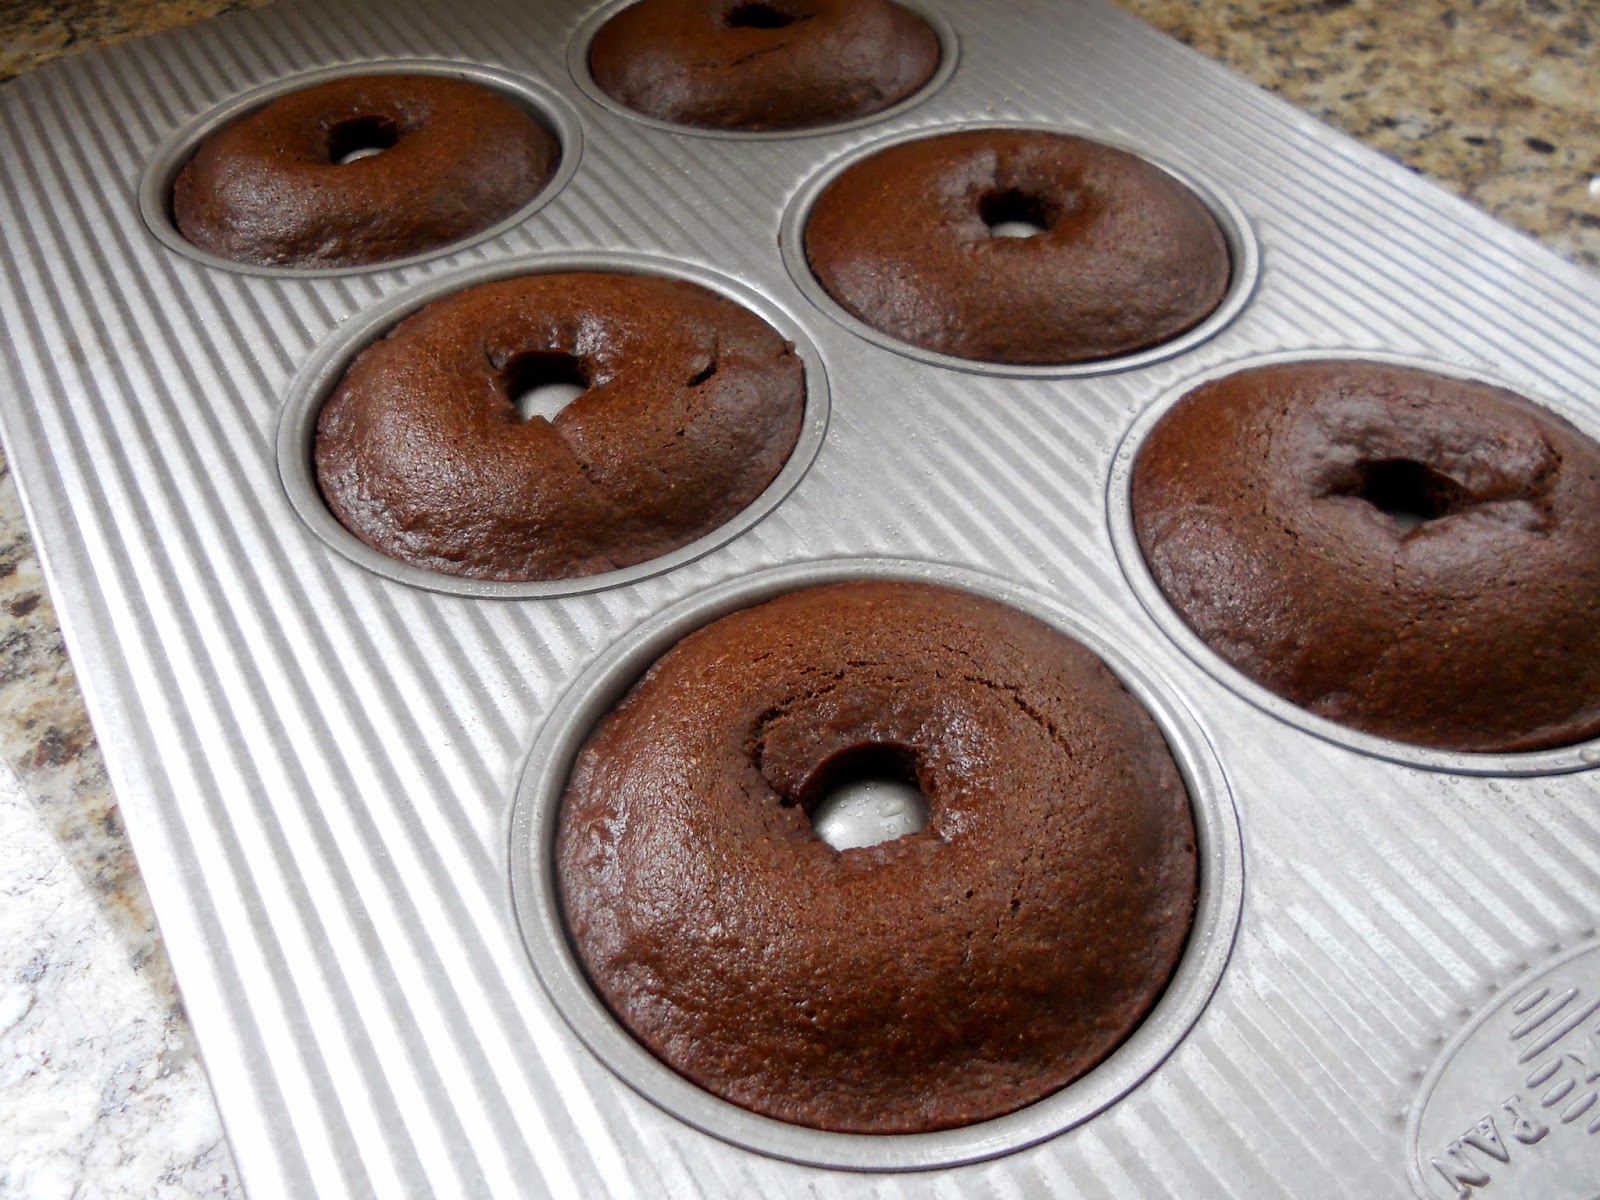
I kept seeing fabulous looking baked donuts on Pinterest, and I knew I needed one of these donut baking pans to try some of those recipes. Today was the day! I have a number of baked donut recipes pinned on my "Bread" board, but I chose this "Chocolate Glazed Chocolate Banana Donut" {from the blog, "Baker By Nature"} for my first foray into baked donuts.


I followed her donut recipe to the letter, but I doubled the recipe to make a dozen donuts. Her hint about using a ziplock bag to  pipe the batter into the donut pan molds was very helpful.


I had to bake my donuts a little longer than her 11 to 13 minutes {more like 15 minutes for mine} -- probably because we live 5000 feet above sea level. The donuts came out slightly firm and springy to the touch and inverted without any problem once they had cooled in the pan for 5 minutes...


At this point I varied from the recipe. Instead of making a homemade glaze, I simply bought a ready-made container of Pillsbury Creamy Supreme Dark Chocolate Frosting. Remove the top of the container and the foil, and put the frosting in the microwave for about 40 seconds to soften and melt the frosting a little to make a chocolate glaze. {The frosting should be soft and warm enough to drizzle from a spoon.}


Poor the glaze into a small bowl, dip each donut into the chocolate glaze, and return the donut to the wire rack.


Sprinkles can be added at this time. As the donuts rest the glaze will set.


One can fool oneself into believing that these donuts are healthy for you. After all -- they are baked. They are made {partially} from whole wheat flour. Two of the ingredients are coconut oil and almond milk. By my way of thinking, I can convince myself I am doing my body a favor by ingesting these beauties.


Some people may take a more realistic approach to eating donuts. 
{Those people are not your friends. Just sayin'.}


Go to Baker by Nature for this yummy recipe.

Wednesday, February 25, 2015

One Hour Homemade Wheat Bread...

It's another snowy day in Colorado. On days like this I just want to escape the elements and hunker down at home. I love watching it snow, but I prefer watching it from inside my warm, dry house.


Today I decided to make some bread, rather than brave the elements, so I turned to a quick recipe that has become a favorite of mine.  It's an easy one hour bread recipe that I've tweaked to include wheat flour. I love adding whole wheat flour to my bread recipes, because then I can tell myself I've eaten "healthy" when I down a whole loaf in 2 1/2 hours. {just kidding}


Simple One Hour Homemade Wheat Bread

Makes 1 to 2 loaves.

3 1/4 cups white flour
2 cups whole wheat flour
1 1/2 tsp. salt
1 1/2 Tbsp. (rounded) instant yeast
1 1/2 Tbsp. oil
2 cups warm water (about 100 to 115 degrees Fahrenheit)

1. Combine dry ingredients into a mixing bowl. Add oil and water and mix for one minute. (I use an electric mixer with a hook.) The dough should be very sticky. If it's too dry, add a little more warm water.

2. Knead with the hook in your electric mixer (or by hand) for about 3 to 4 minutes.

3. Spray kneading surface with cooking spray and turn dough out onto surface. Knead dough briefly until it has a smooth even consistency. This will only take a few turns of the dough to accomplish.

4. This recipe makes one large loaf or two smaller loaves of bread. (I prefer to shape my dough into one large loaf and put it in a pan that is 12" long x 4.5" wide x 3" tall. If you have smaller pans, shape the dough into two loaves.) Shape into loaf and place into greased loaf pan. Lightly spray the top of the loaf with cooking spray. Cover with a large dish towel and let rise for 25 minutes.

5. While loaf is rising, preheat oven to 350 degrees Fahrenheit. Bake at 350 degrees for 25 minutes or until golden brown and bread sounds hollow when tapped. Remove from pan onto wire rack to cool. While the loaf is still warm run a tablespoon or two of butter over the top of the loaf. The butter will melt as you're doing this and it will give the loaf a beautiful shiny glaze and add a yummy buttery flavor to the crust.


I love this quick and easy bread recipe because it literally takes a little over an hour from start to finish. I'm going to use this loaf for BLTs that I'll make for dinner. Who doesn't love a good bacon, lettuce and tomato sandwich? Here's a recipe that we've grown to love that's a little different than the regular BLT version.

***UPDATE: I just wanted to show you the beautiful texture of this yummy bread...


Monday, February 23, 2015

Beautiful Blossoms & Life...


One can always tell when my life gets busy, because the first thing that gets axed are blog posts. So far this year we've had a new little grandson join our family, the hubs and I took a cruise to Central America and Mexico, and a son got engaged. All wonderful things! We also have two more grandbabies due in March, a college graduation in April, three baby blessings and the wedding in August. I may have left out a thing or two. Within the next few months our immediate family members will number 33. No wonder I don't have much time for blogging.


This weekend we had a snowstorm. Turns out it wasn't as impressive as the 18 inches they were predicting, but it was still enough to keep us inside, hunkered down with doughnuts and hot chocolate a plenty. Since I was inside a good deal of the time, I used my time wisely and made a few fabric flowers from the pattern I sell in my Etsy store.


My DIL-to-be and I will be making some of these for the flower girls to wear in the wedding, so I thought I'd put a few together and experiment with different types of fabric.


I used 100% polyester chiffon, satin, tulle, organza, lace, etc. Then I garnished them with feathers, buttons, sparkles, beads and pearl add ons.


Today I took some photos of the flowers with the snow as a backdrop. Aren't they beautiful on that sparkley, white snow?


The colors for the wedding are going to be a silver, sage, white, cream and champagne tan. I've ordered a beautiful silver sage fabric that we'll use for most of the flowers...


 This green flower is too bright for the wedding, but I know someone who loves green, so it won't go to waste.


 I have to admit I love the curly petals of this pattern.


I've pinned a lot of beautiful examples of fabric flowers on one of my Pinterest Boards. Feel free to check them out under "Blossoms". They are sure to give you lots of inspiration!


Friday, February 20, 2015

Friday's Fabulous Finds...


I spy with my Etsy eye some...
 sunshine on a cloudy day.


Clockwise, starting top left:

Wishing you a sunny weekend!

Saturday, February 07, 2015

Friday's Fabulous Finds...


I spy with my Etsy eye... 
some color in the middle of winter!


Clockwise, starting top left:


Wishing you a colorful weekend!