Monday, March 31, 2014

Placemat Pillow...


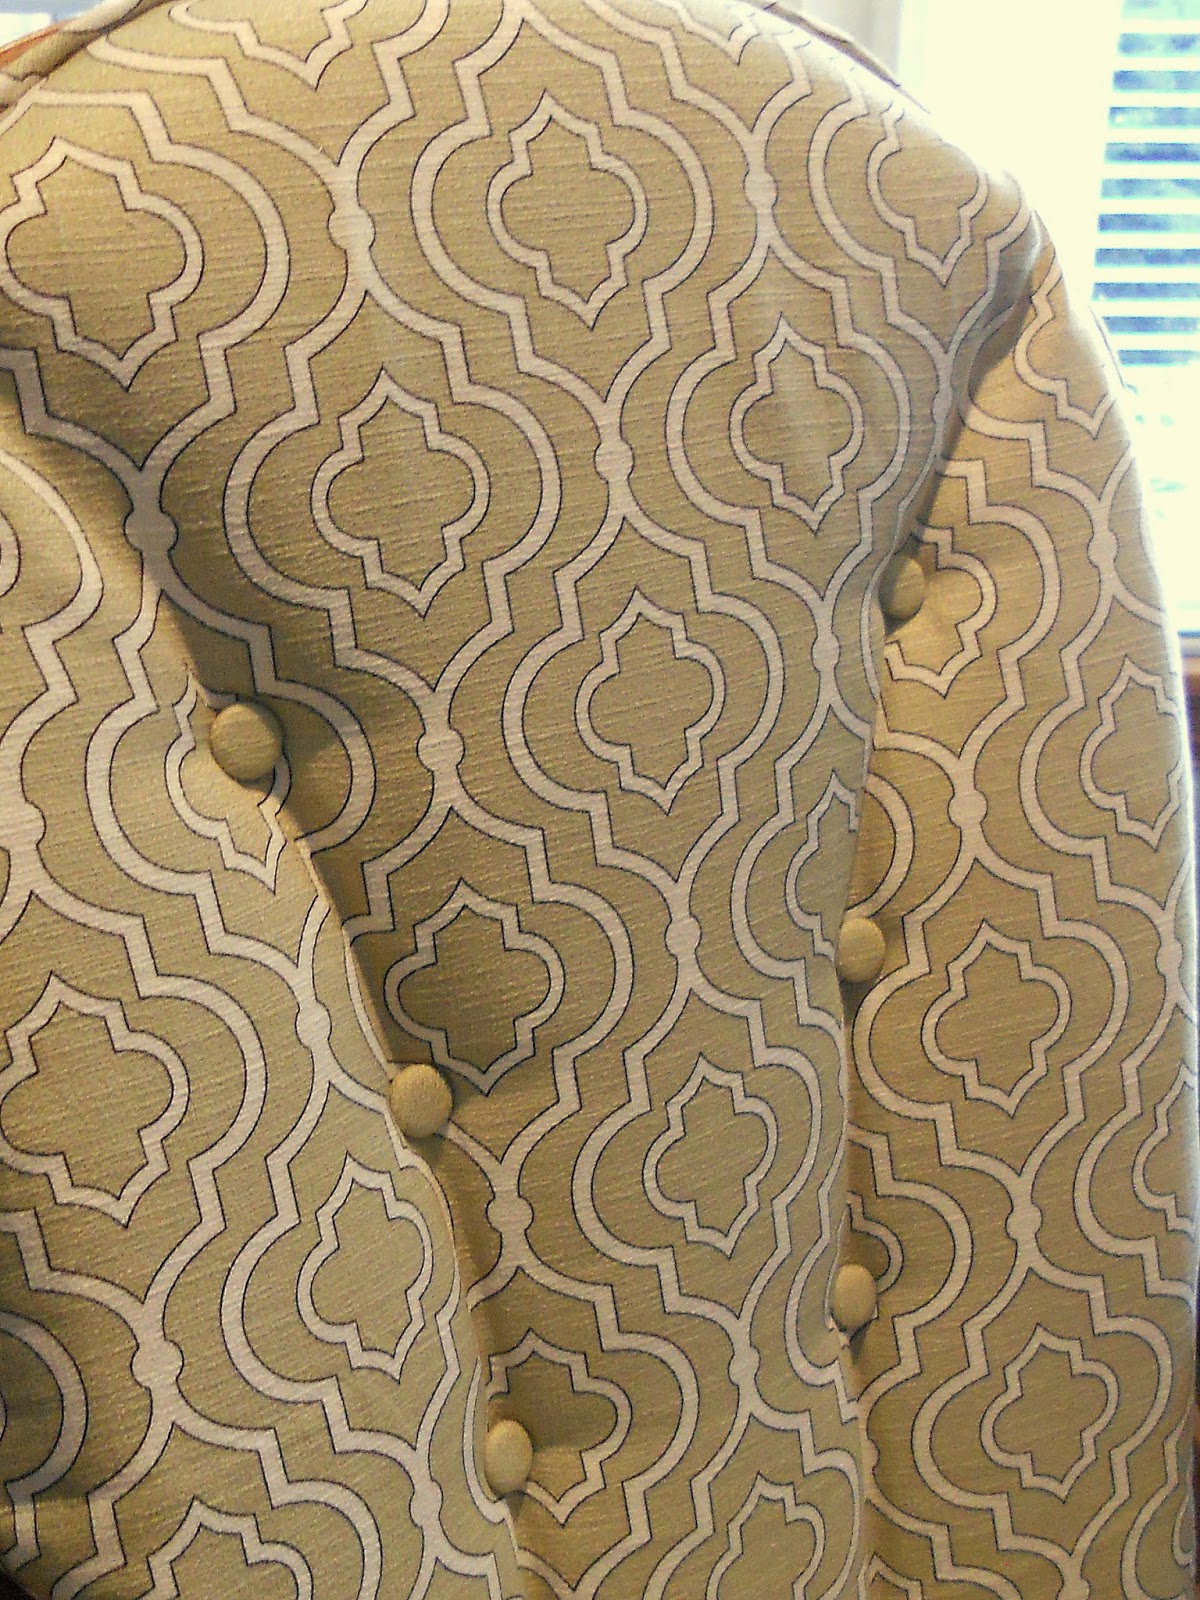
I've shared this idea about five times already on my blog, but here I go again! For the last few days I've searched for a new pillow that would add a touch of color to our recently reupholstered glider rocker.  I couldn't find anything I had to have. I eventually found myself at Target looking in their pillow aisle. When I can't find a pillow that I like in the pillow aisle, I go to the linens. There I can often find a placemat that can easily be converted to a pillow, and this was no exception.


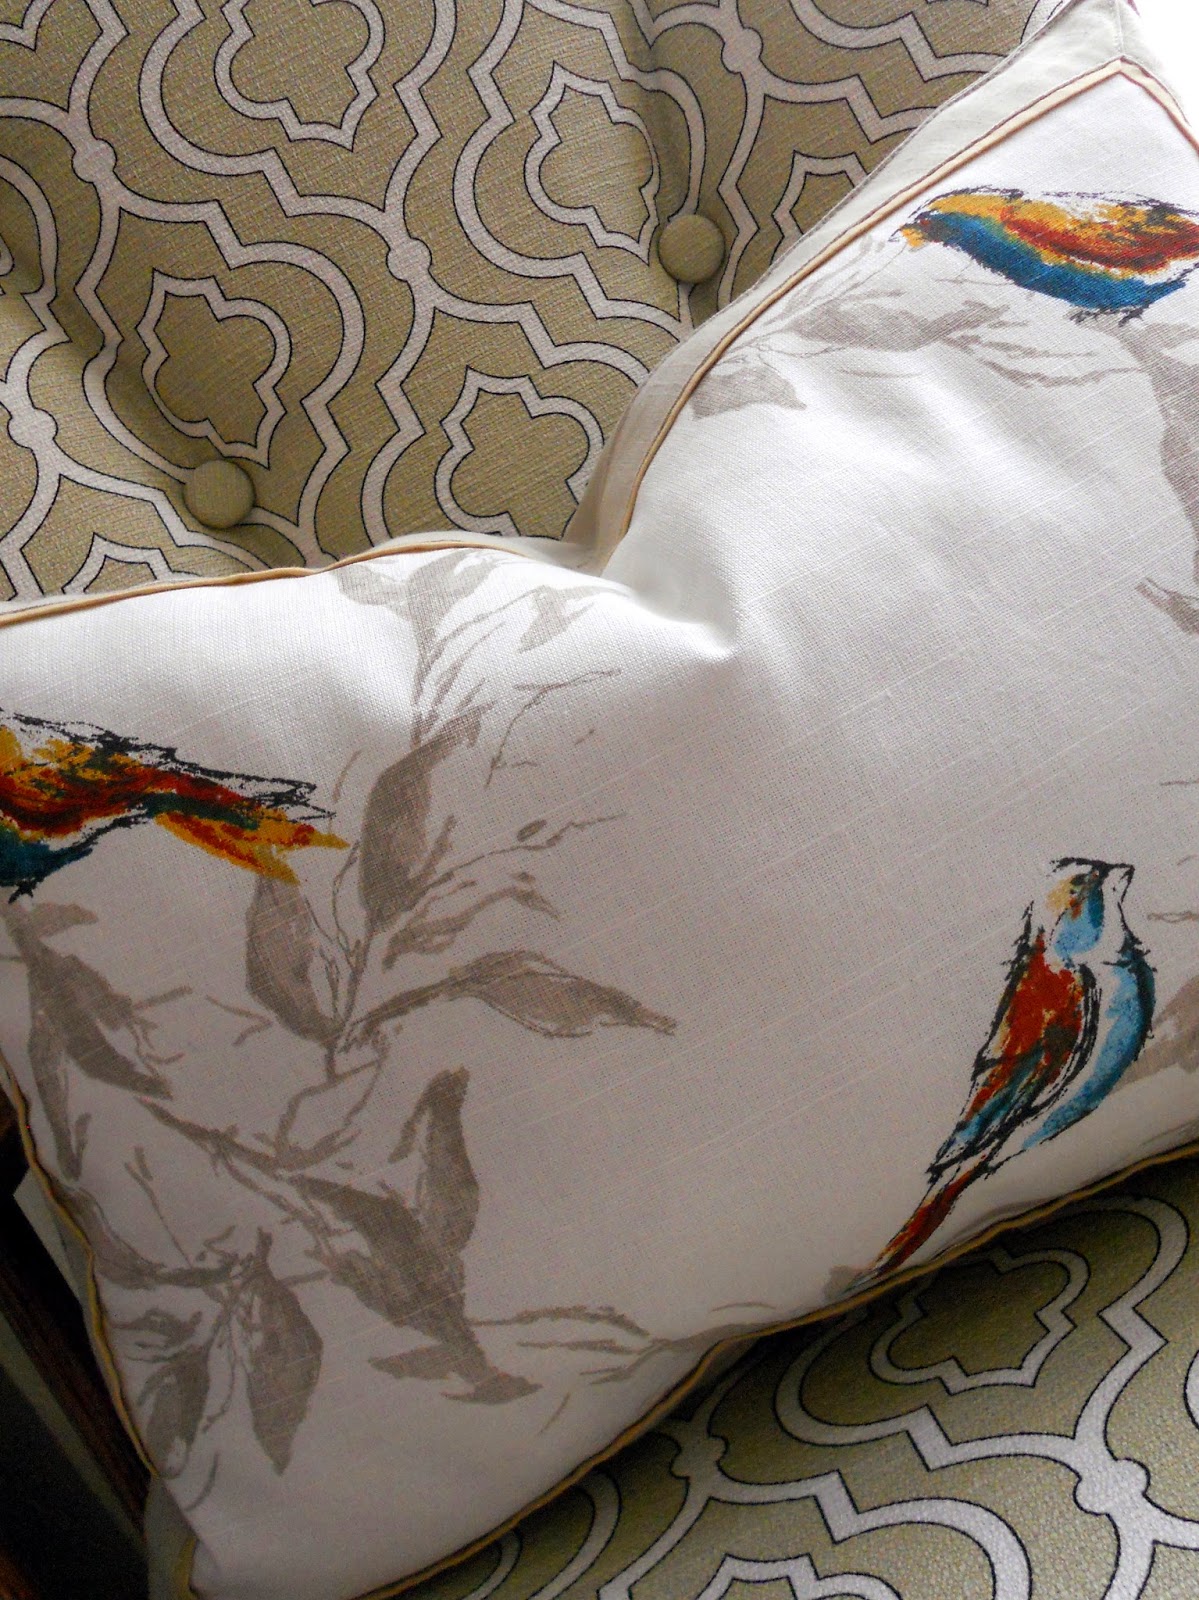
This placemat is from Target's Threshold line. It's the perfect placemat to convert to a pillow because it has a lining on the back. In other words, it is two pieces of fabric sewn together -- the front piece of the placemat and a back lining.


You'll need 15 minutes at the most to make this pillow. Use a seam ripper or sharp pair of scissors and open a hole in the bottom seam of the placemat that is large enough to fit your hand through -- about 5 inches. This particular placemat had topstitching and the seam, so I had to go through both of those stitches to create the opening.


Then, fill the placemat with Poly-Fil Fiber or another filling of choice. In my opinion, there's nothing like the feel of a down feather pillow!

Hint:  Sometimes I will buy an inexpensive Aller-Ease Down Alternative Pillow at Target, cut it open, and use the filling for my sewing projects. It's messy, but it makes a beautiful down-like pillow.

When you have it filled to your liking, simply stitch the seam back together. You can do this with a sewing machine or by hand.


What you have left is this beautiful pillow...


Cost:
Placemat: $3.99
Filling: $2 - $5
Needle & Thread


Tuesday, March 25, 2014

Recovering Cushions for another Glider Rocker...


A few weeks ago I gave a much needed face lift to a worn out glider rocker in our play room. When that project was completed, I knew I needed to transpose another glider rocker that we had in our study. The upholstery was tired and old and in need of replacing...


I scoured the internet and finally came upon a few fabrics that I thought I might like, so I ordered some swatches. 


Clockwise, starting top left:

Ordering the fabric swatches was a really good move. There's nothing like seeing the prints in person. I chose Swavelle Mill Creek Donnetta Aspen for a couple of reasons. First, I liked the hint of green in the fabric, and, second, I loved how the fabric mimicked the accent wall I had already painted in the study...


I recovered the existing cushions the same way I've always done it. Go here for a tutorial. Here's the finished project.


A side note: The true color of the fabric is somewhere in between the color on the fabric swatch and the colors shown in the recovered cushions. There's a hint of taupe/green in the fabric.

My favorite part of the cushions is the tufted covered buttons on the top cushion...


It feels good to check another project off the list. Here's the "before and after" photo we all love to see...


It cost about $30 to refinish these cushions -- $22 for the fabric and $8 for the buttons. It's amazing what a difference can be made with such a small amount of money!

Thursday, March 20, 2014

Take me away...


A month ago my husband and I looked at each other and agreed that we needed to get away from it all! Mind you, we voice that opinion regularly, but there are times when one means it more than other times. We ran to the computer and quickly booked a last-minute four day cruise. We didn't even care where we went. We just wanted to go! We ended up booking a cruise from San Pedro (LA) to Catalina to Ensenada and back. Whilst on the cruise, we decided that a get-away similar this had to be a bi-annual occurrence. We travel often, but rarely by ourselves -- most often we're visiting children or parents. We enjoy those trips too, but it was fabulous getting away -- just the two of us. 

We boarded the ship and by the next day we had paddled over to Catalina. It is situated in a beautiful little harbor. I don't think it's changed much in the 80 years it's been a vacation destination...


We toured the island and ended up eating lunch in Avalon. We're all about calcium and protein...


The next day we sailed into Ensenada (Baja California). We've decided we like the gulf side of Mexico better -- more lush and tropical -- but we enjoyed the sites we saw around this city too. 


We went to La Bufadora -- a blowhole or geyser located on the pennisula near Ensenada. We also did a little shopping. So relaxing.


The last day the ship traveled slowly up the coast to home port. Yesterday we disembarked and flew home. It was the perfect get-away before the festivities of our son's wedding next month!

Friday, March 14, 2014

Friday's Fabulous Finds...


I spy with my Etsy eye some... 
fresh minty goodness.


Clockwise, starting top left:

Wishing you a relaxing weekend.

Wednesday, March 12, 2014

Doll Cradle Bedding {Part 2}...


A couple of days ago I cut a mattress from a piece of foam and made a fitted sheet for the little doll cradle I picked up for $2.50 at Goodwill a couple of years ago.


After making the sheet I decided a little baby doll quilt was in order. I'm not a quilter. Quilters need patience, and I'm not a very patient person. I did, however, decide I could whip up a little 22" x 18" quilt that would fit this cradle perfectly. I started by sewing 15" strips of fabric together. I chose a variety of widths from 1 1/2" to 2 1/2" wide...


Then I cut that piece into a 6", 4.5" and 3" length, and sewed white flannel between those strips...


I put a lightweight quilt batting between the front and back and bound the edges of this little dolly quilt.


Then, for good measure, I made a pint sized 21" square ric-rac'd receiving blanket...


With the dolly diapers and bib and all this new bedding for the doll cradle, I think my little granddaughters will be in 7th heaven!

Monday, March 10, 2014

Doll Cradle Bedding {Part 1}...


A year ago I found a doll cradle at Goodwill...


I scored when they sold it to me for $3.99, minus the senior discount of $1.50! That's right I paid $2.50 for this adorable, curvacious beauty...

(I can't wait for my grass to be this color again!)

I planned on making some bedding for the cradle soon after it was purchased, but  life happened and a year and a half later the grands are still using baby blankets -- instead of baby doll blankets. It was time to change that.

Last week I purchased a 2" foam cushion at Hancock Fabrics. It was easily trimmed down to cradle size to form a mattress. 


With a little turquoise fabric I found at Hobby Lobby, I created a crib sheet to cover the mattress...


Coming soon... the quilted blanket I made for the cradle!

Wednesday, March 05, 2014

Baby Doll Diapers and Bibs...


Several weeks ago I babysat our two year old granddaughter for a week. During the stay she found our diaper stash. We literally have diapers of every size. When our grandbabies come to visit, I often tell their parents not to bring too many diapers with them. That way they have more room in their luggage for other essentials. As a result we have a stash of diapers in every size. Our little Ellie has an affinity for playing with baby dolls, so when she found the stash of diapers every doll in the house was diapered immediately. And, of course, being the good momma that she is, she changed her babies frequently. The newborn size diapers in my stash was greatly diminished that week. Soon after they left I searched Pinterest to find a baby doll diaper and bib pattern. A few days later all our dolls were appropriately attired.

The doll in the photo above is 13" long.

I found the diaper pattern at Skip to my Lou. I twerked it a little (making the back a little higher, and the front tabs a little longer), but for the most part I used Cindy's cute pattern. This cloth diaper can be used on dolls 13" to 17" tall because of the expandable waist. Because we have dolls all different sizes, I put a strip of velcro (soft side up) across the front of the diaper, instead of putting smaller pieces on the front at exact places to fit a specific doll. By doing this the waist of the diaper can be expanded to fit a variety of dolls. See photo below...


I found a baby doll bib pattern at The Crafty Cupboard. I added 1/2" around the outside edge of the bib and made the neck hole a little larger to better accommodate the variety of dolls we have. I whipped up a half dozen diapers and as many bibs in one day. I'm also going to make a few little cloth "wet-wipes" and a dolly Dwipe, so our little mommas who come to visit have a place to store these baby supplies.


In a month some of our grandkids will visit again, and I'm looking forward to seeing them play with these items and a few more I'll be making in the coming weeks.


Monday, March 03, 2014

Grocery Bag Dispenser...


Are you one of those women that uses Pinterest with a passion, but rarely creates anything from the myriad of pins you've stored? Me too. I've decided to turn over a new leaf ...


I store the plastic bags I accumulate from the grocery store under my kitchen sink. The other day I opened it up, and it looked like a plastic bag factory blew up in my cupboard. Seriously. I decided right then and there what my next project would be, and, fortunately, I remembered I had pinned a tutorial for this very item. This Grocery Bag Dispenser is from a tutorial at Moda Bake Shop.


I happened to have a "charm pack" of fabrics in my stash, but you could also cut your own 5" x 5" squares from scraps or fabric you currently have. The project only takes 16 squares.


I used a 1/2" seam on this project, which makes finished squares that are 4" x 4".


It's amazing how many plastic bags fit into one of these dispensers. It tidies up a cupboard lickity-split!


I added a tab to the top of mine in case I ever want to hang it from a hook...


This project takes about an hour to complete, and it's the perfect project for a someone just beginning to sew.


Go here for the complete tutorial! 

Linked to:
Made by you Monday @ Skip to my Lou