Monday, November 20, 2017

Emery's Quilt ...


Here's the latest "Emery" quilt. The first quilt I made for this little two-year-old granddaughter was shipped off to Texas for flood relief efforts in October, so I whipped up another one for the kiddo. I love these adorable Little Red Riding Hood fabrics.


Emery is our two-year-old granddaughter with a ton of personality. She's the one that stands at the edge of the pool, yells "cannonball!" and belly flips into the pool. She needed a quilt full of color and a little sass.


Two colors that I don't put together a lot in "real" life are red and pink, but I have to admit that they have been a favorite color combination for granddaughter quilts this year. Red, pink, and white are so bright and cheerful...


Sunday, November 19, 2017

Banner Display Holder...


I'm not sure this is even blog worthy, but a few months ago I made a little banner holder that I know  will get a lot of use. At the time I made it for a table display for the buffet at a baby shower. This month I used it at a church party for the ladies in our congregation. It's so easy that I thought I'd share.


I like a buffet to have a little height and I love banners, so I made this little banner holder in about 10 minutes. All you need is two 8" {or larger depending on your preference} wood rounds and a couple of wood dowels about 1/2 inch in size. You can find these wood rounds and dowels at most hobby stores and a great online source is Save-On-Crafts... here.


Find the center of the wood round and mark with a pencil. Then drill a hold the size of the dowel. Done. 


You can find banners, pom-poms, and tassels to hang from the banner holder at a myriad of places... Target, Hobby Lobby, Michaels, World Market, party stores, etc. So many fun options out there. I found the two I displayed here at Hobby Lobby.


Here's one little trick to make the dowels stand up perfectly straight. If the dowel is leaning a teeny bit to one side, just slip a natural colored toothpick between the dowel and the wood round and break it off so the end of the toothpick is left between the dowel and the round. The toothpick becomes a shim and forces the dowel to "straighten up." Or you can glue the dowels in place, but I think it's easier to store the holder if the pieces aren't glued together.


A banner display makes for a fun and affordable way to decorate for a party...


Saturday, November 18, 2017

Two More Granddaughter Quilts...


A few months ago I gave away a few quilts I'd made for three of our granddaughters for Christmas to those in need in the aftermath of hurricane Harvey. So... in the last couple of months I made three more to compensate. All of the quilts I've made have been "one of a kind" till these two. I walked into the quilt shop by our home and instantly fell in love with these fabrics and decided to make two from these sweet prints.


I just don't think it gets cuter than this...


I made these identical quilts for Hazel (18 months) and Charlee (8 months). I used the star pattern that I've used on a lot of the baby and toddler quilts. I love the simplicity of it. It works up so fast!


I can hardly believe it, but this Monday I pick up the last four quilts from the quilter. All I have to do is bind those four, and I will have finished the quilts for the hubs, our children, the kids-in-law, and all our grandchildren. Forty-one quilts in all. I feel relieved and pretty accomplished, if I do say so myself. I'm so grateful that my husband fully supported me in this mighty adventure. He was so sweet to encourage me every stitch of the way!

Wednesday, November 15, 2017

Kitchen Renovation Reveal...


Well, folks, it's been long in coming, but I've finally gotten around to posting our kitchen renovation. For starters, it took about 5 1/2 weeks from start to finish, but I'm sure it could have been a week less if we hadn't gone on a 10 day vacation in the middle of it. I did get sick of eating out -- and for a girl who eats out a lot, that's saying something. One tip I would give if you are thinking about a kitchen renovation is to keep your microwave till the end of the reno. We had the kitchen gutted and all the appliances but the fridge taken away at the beginning of the project. It would have been great to have the microwave on a table to use during the reno. That's about the only thing I would have done differently. Also, we didn't change the footprint of our kitchen. I've always loved the spaciousness in our kitchen and I've never needed or wanted an island. That's due to the large peninsula we have with so much working space. Not changing the footprint really cut down on costs, which was great. Our kitchen does have plenty of room to add an island if someone would want to do so in the future.

Let's start with some before and after photos from different angles. Here's the angle showing the before desk area and the after. I guess you could say we changed the floor plan by taking out the desk. In the 25 years we lived here, we never used the desk as a desk. The counter above it became a catch-all for mail and the likes, so we didn't want it in the new kitchen. We love that the new area has more storage with more cupboards below and above...


Here's another angle. We always had a "built-in pantry" in the kitchen (shown in second photo), but the new pantry has pull-out shelves, so it is much more usable.


Another angle...


I absolutely love the products we decided upon. The cabinets are a warmer "white" than it shows in the photos, and the glaze around the cabinets picks up the dark brown in the granite. I wanted a really simple subway tile for the backsplash. I don't care for a "busy" backsplash. I would much rather the granite and the cabinets be the star, than the backsplash -- although the backsplash is often what your eye is drawn to first. I love the gray tile with the cream cabinets. The tile picks up the gray in the granite, and the cupboards pick up the whites in the granite -- beautiful...


I love decorating once a room has been renovated, and I always tend to add a touch of whimsy. I didn't want a lot on the counters. Most of the time anything on my counters in the kitchen has to be functional... except for these mice. I bought them in Bar Harbor, Maine, on our trip. Fell in love with them... even though I cannot stand the real thing...


Well, that's about the end of the tour. I did buy one more thing that pretty much typifies my life right now. It's this sign....


I choose joy. That's something I want to be reminded of daily -- that joy and happiness are a choice we make -- not a circumstance. One more thing I choose is fresh flowers -- often. {P.S. - I'm a sucker for Joanna Gaines' new line at Target. Get a load of that beautiful pitcher.}


Monday, November 06, 2017

Another Dishtowel Curtain...


A couple of days ago I posted about a dishtowel curtain I made for our kitchen windows. I decided to make another set of dishtowel curtains for our nook area -- our informal dining area just off the kitchen. A little background info...

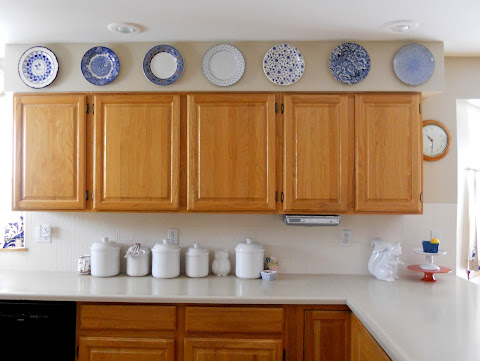
I've had a collection of blue and white plates for years. My parents started my collection with plates from Williamsburg and various places in Europe. Each time they would visit a spot they would bring me home a blue and white plate. After awhile other family and friends continued the tradition and soon I had enough blue and white plates to cover the soffit around my kitchen. Here's what it looked like...


I liked it for a long time, but for the last several years I was definitely in the mood for a change. Ergo, the kitchen renovation and the removal of the plates. The plates, however, have a sentimental place in my heart, so I wanted to find a way to use some. I ended up moving some of them to a wall in our informal dining area off the kitchen, but that created another problem. What to do with little window to the left of the plates and the other identical window on the other side of a sliding glass door in the same room.


I knew I wanted to play off the blue and white plates, and I had just bought the dishtowels for the curtains in the kitchen, so I decided to look for another dishtowel that might work. I found another dishtowel at Cost Plus World Market that I loved...


I bought a tension rod from Amazon and made a simple gathered curtain.  These windows are narrow -- only about 17" in width. I used two towels per window. 

Here are some very simple instructions for how to make these curtains. All you'll need is:

a tension rod
double fold bias tape
 & dish towels 
That's it!

I picked up some double fold quilt binding bias tape at Hobby Lobby and cut a length the width of the towel + 1".

Unfold the bias tape and iron the middle fold flat. {See above right.}


On the wrong side of the towel, pin the bias tape 1 1/4" from the top of the towel to make a casing for the tension rod. When you get to the edge of the towel, turn under the ends of the bias tape about 1/2" on each side. Then stitch the bias tape to the towel close to the top and bottom edge, leaving the ends open.


Insert the tension rod through the casing you've made and you're done. It's the easiest curtain I've ever made. 


These curtains literally take minutes to make. Like... five minutes -- maybe six if you're feeling a bit sluggish that day.


I was kind of limited by colors, but here are other samples of cute dish towels at World Market that could be transformed into curtains...


Love those pom-poms. Anyway, one last look at the dishtowels turned curtains I made. Love these simple and easy-to-make curtains...

Saturday, November 04, 2017

Kitchen Dishtowel Curtains...


When we decided to renovate our kitchen, I knew it would be a gut job. Everything went. Although we contracted out all the heavy work, I knew the decorating tasks would be left up to me. {Yay!} There's nothing I love more. I started looking on Pinterest for some curtain options for our corner kitchen windows and the windows in our nook (right next to the kitchen). One of the options I found on Pinterest was this dishtowel curtain idea from "Refresh Restyle."


I fell in love. So simple to make and I love the looser weave on cotton dishtowels that still give privacy, but allow light to filter through. I especially loved the little tassels on the ends of the towels.  So, I started looking for some creamy towels with a touch of gray and I found these at Cost Plus World Market...


Love at first sight. This inexpensive dishtowel (regularly $3.99, but often on sale for $3.19 each) has the same adorable tassels with just the colors I needed. Unfortunately, I have two corner windows that are much taller and wider than the window in the picture above, so these dishtowels were not as long as the length of my windows. That's ok, however, because I love my curtains in these windows to be a little more than half the length of the window. Weird? Maybe. But, my windows have a northern and eastern exposure, so I get the glorious early morning sunshine through them. I love my curtains in that spot to reach a little more than halfway up the window allowing us the privacy we need, but low enough to fill my kitchen with sunlight! I tried just folding the top a few inches more than they had in the above window, but then the window coverings looked bulky and weird, so I went a different route.

First, as I said, my windows are wide, so I used four dishtowels per window. I sewed two together lengthwise for one side of one window and two more together for the other side of that window.  I cut off the top of the towels 23" from the bottom (tassels not included). I marked, folded, and pressed the fabric 21" from the bottom of the towel. Then I folded the hem under twice, so I had about a 1" hem and the dishtowel was 21 inches long.


I ordered some curtain clip rings and a couple of tension curtain rods.  Put them all together and whaaalaaa....


Mind you, I only have my iPhone to take photos, so inside photos are always dark, but you get the idea. One more...


Since I was on a dishtowel roll, I also made some dishtowel curtains for the nook area that I'll post about soon. Wishing you a wonderful fall weekend!