Sunday, February 06, 2011

Thankful Thoughts


A couple of years ago I began a post entitled “Thankful Thursday.” I was motivated to write this weekly post by bloggers who wrote regular gratitude journal entries on their sites. Their thoughts were often poignant and sweetly personal. As a result of their musings my heart was made more grateful, and I became more appreciative of my own blessings. In time writing my own gratitude post helped me to look at things with a more positive attitude and a more thankful heart. Eventually my “Thankful Thursday” post went by the wayside, but I’ve decided to re-institute it as a weekly post that I'll publish on Sundays. I'll call this post "Thankful Thoughts."
At the end of each week I will answer one or more 
of these three questions...
1.) What surprised me this week?
2.) What moved me this week?
3.) What inspired me this week?
By concentrating on these questions throughout the week, I know I will start and end each week with a more grateful, happy heart and a more positive outlook on life. So, let's get started...
What moved me this week?
I have a friend who I love and admire. Colleen is kind, thoughtful, a good listener, faithful and faith-filled, trustworthy, cheerful, beautiful (both inside and out). Truth be told she's one of those people who possesses a litany of wonderful qualities and characteristics that most of us can only hope to acquire in time. She also has Multiple Sclerosis. She has never, however, allowed that disease to define her. Often when Colleen is in your presence, you find yourself forgetting about the disabilities and the struggles she faces on a daily basis because her demeanor reflects such happiness and contentment. Still, life is definitely not easy for her.

Last Sunday I was walking with her through the hallway at church on our way to another classroom. I could tell she was having a particularly difficult time walking that day, so we progressed slowly down the hallway chatting as we went. When we got to the room there wasn't space for me to sit next to her, so we ended our conversation and I sat in the row behind her. We arrived in the room a couple of minutes before the class was scheduled to begin, so we chatted with people next to us as we waited. Soon after being seated I noticed my friend and her "neighbor", a recent widow, with their heads together in whispered conversation. I couldn't hear what they were saying, but this sweet little widow had drawn a handkerchief from her purse and was dabbing her eyes. Colleen's arm was wrapped around her shoulders, and I could tell she was offering love and support. I was moved. I suppose Colleen knows better than most what the arm of a friend can mean to one in need, but she often moves me with her outward expressions of love and concern for others. 
What inspired me this week?
I love a certain someone whose birthday was last week. She is one of my beautiful daughters-in-law.  Ever since I’ve known Mia she has loved her birthday. And I mean “Loved!!!” In years past instead of celebrating the day of her birth, her birthday celebrations were a month-long extravaganza. It always made me smile. This year, however, things changed, and her actions inspired me greatly. Each week Mia sends out an email to those she loves. This is what she said in this week’s email:
This year we were a little more compact with (my birthday) celebrations. We really only went crazy for a week instead of a whole month. ... I guess I felt like my birthday madness had become tiresome even to myself. A person can only handle so much gluttony. 
So for most of the month I sort of let it go, didn't make everything about me and what I wanted. Then last week I was reading on a blog about a girl who did a service based birthday. She did a random act of kindness for every year that she was old… I thought the best way to celebrate my birthday would be to attempt to do 33 (gasp!) random acts of kindness or intentional acts of service.

It was magical. There is something so profound about getting outside of your own head and paying more attention to those around you.

Then Mia went on to list 30 random acts of kindness that she performed for different people that week. She concluded with:

It felt wonderful to try and find nice things to do for others. It made me more patient, and I smiled more at the kids and strangers. I tried really hard to get all the way to 33 but didn't quite make it. I will prepare better next year and hopefully make it all the way to 34. 

This girl inspires me in countless ways, but I love how she celebrated her birthday this year in service to others. She's inspired me to do something like this for my birthday in May.

Wednesday, February 02, 2011

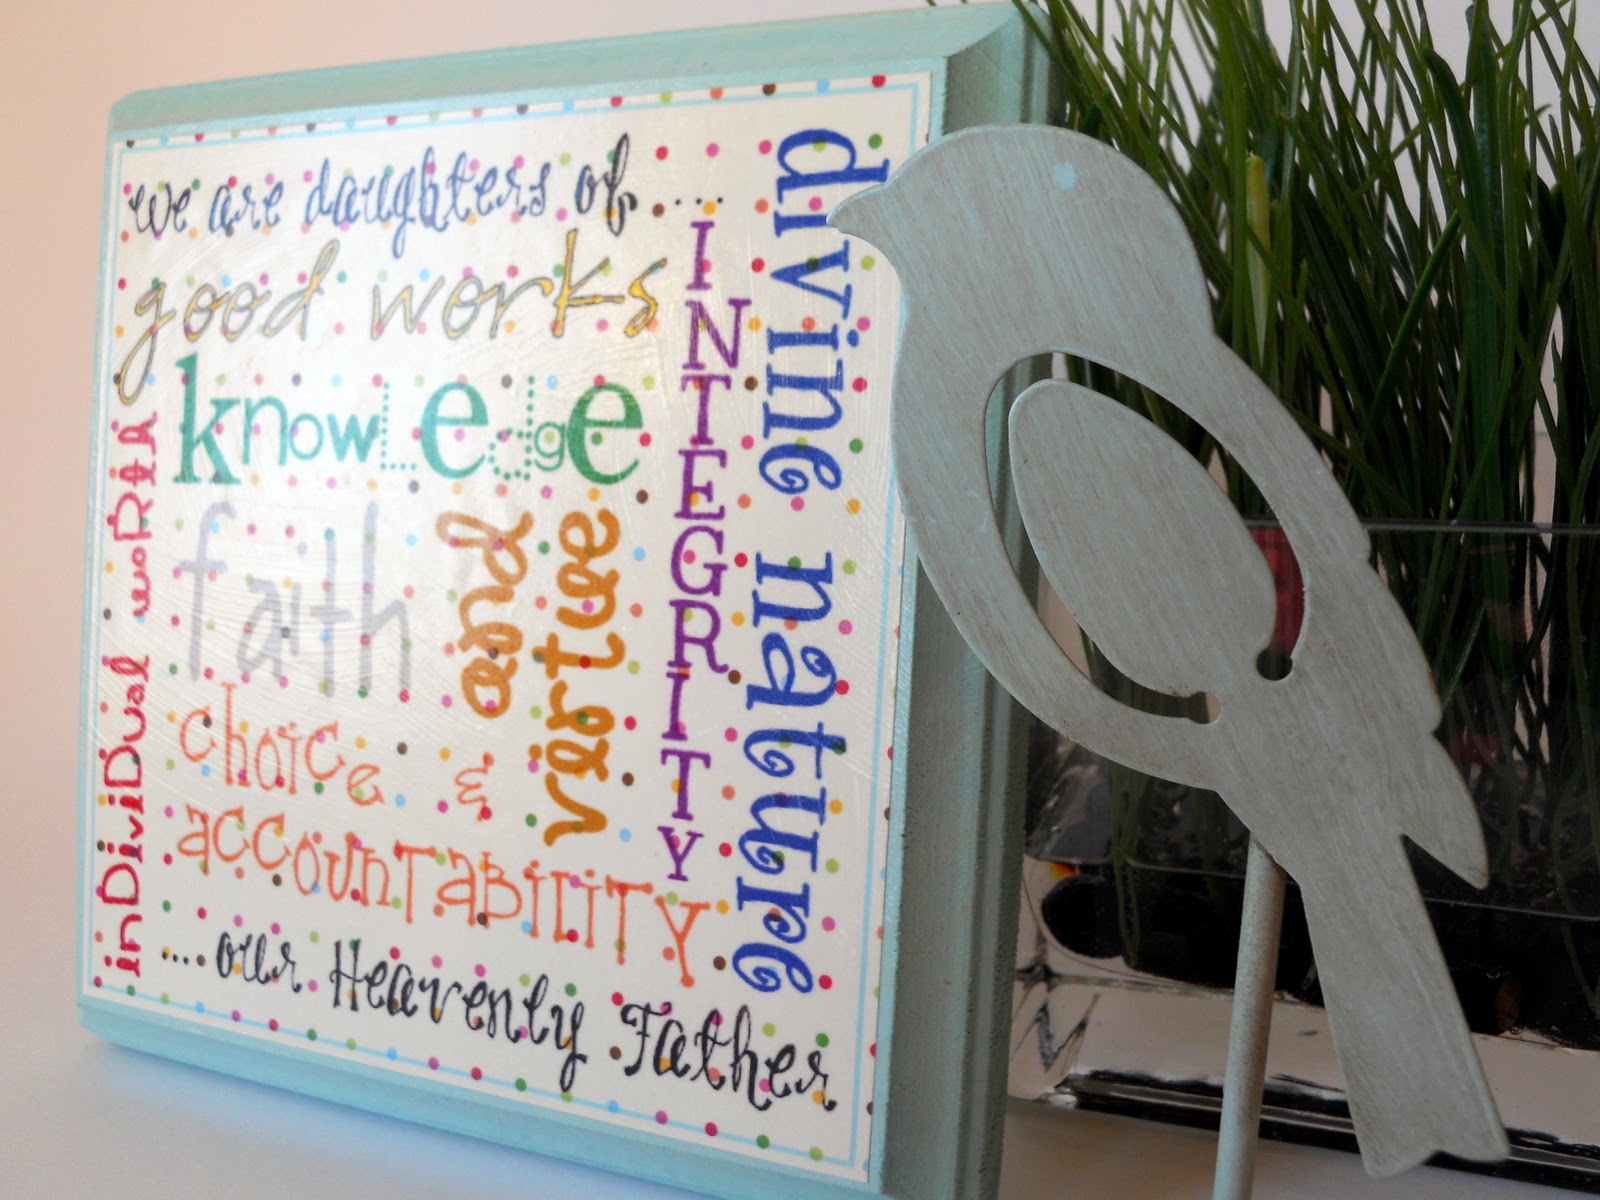
Young Women Values Plaque & an Important Plaque-Making Tip!

In our church (The Church of Jesus Christ of Latter-day Saints -- aka "L.D.S." or "Mormons") our young women throughout the world ages 12-18 are part of an organization that is aptly named "Young Women." This organization helps our teenage girls grow and mature in the gospel of Jesus Christ. The girls and their leaders meet twice weekly -- on Sundays for a spiritually-oriented lesson and once during the week for an activity night. I've been privileged to serve as a leader in Young Women several times, so I was thrilled when one of my daughters called me to let me know that she had been asked to lead the group of Young Women in her congregation.


Every week our young women recite together the "Young Women Theme." It goes like this:

We are daughters of our Heavenly Father, who loves us, and we love Him. We will stand as witnesses of God at all times and in all things, and in all places as we strive to live the Young Women values, which are: Faith, Divine Nature, Individual Worth, Knowledge, Choice and Accountability, Good Works, Integrity, and Virtue ... 

Generally this theme comes to mean a great deal to the girls that go through the program. They learn the meaning behind each of those values and the merit of internalizing the principles and making them a part of their daily lives .... that's the goal anyway! ;o)


I made a "Young Women Values Plaque" for my daughter to use in her class and thought some of the rest of you might be able to use it as well. The document is the same size as my "Plaque Attack" documents, so you would use a 6 3/4" x 6 3/4" plaque. If you can't find plaques in your area, I've found an internet resource here that sells them for just $1.49 each. Go to my tutorial to find out how to make these plaques.


{Important Tip} I learned a valuable lesson last week when I was making this plaque. Occasionally when I've made my plaques I've been disappointed because sometimes the ink bleeds a little when I put on the Mod Podge. As I was making this plaque, I had to throw one out because the purple ink bled so badly. I decided to try the product below to see if it would seal the ink on the paper, and it did...
That's Rust-oleum Painter's Touch Ultra Cover 2x Matte Clear Sealer. You can get it in the spray paint department at Home Depot or the like. I printed the document on my scrapbook paper and then sprayed this sealer on it. Hold the can about 2 feet away from the paper and very lightly spray it one direction and then the other direction. You don't want to get the paper wet. You just want to spray on a light coating to set and seal the ink, so it doesn't bleed when you apply the Mod Podge. In the collage below you can see the difference that the clear sealer makes. I didn't use the sealer on the paper of the plaque on the left. Note the purple and black letters that bled into the surrounding paper. I applied the sealer on the paper for the plaque on the right. Much, much better.


There are so many applications for this plaque. The girls could make them during an activity. They cost less to make than a birthday card bought at a store, so you could make them for the girls as a birthday gift. They could be given to Young Women as they enter the program.  Mothers and daughters can make them together. Etc. Etc. Etc.


I'm offering this plaque free of charge to all. Feel free to request this plaque document whether you are a member of our church or not. Certainly any young woman could benefit from having this plaque in a conspicuous place so she can read it often! Just leave a comment below and shoot me an email (my email address is on my right sidebar under "Contact Information") with the words "Young Women Plaque" in the subject line and I'll return your email with the plaque image in a Microsoft Word document. I'm heading out to my daughter's home next week, so I'll be out of town from February 8th - 11th, so you might want to request your document as soon as possible! Any emails I receive between those dates will be answered on February 12th!


Important: By requesting this plaque you agree not to sell this document or sell products with this document attached. You may make as many copies of this for personal use or for gifts.


Linked to:
The Typography Challenge @ CSI

Tuesday, February 01, 2011

{ Artisan Bread }


Unfortunately, I'm home. Yesterday I was supposed to fly to my daughter and son-in-law's home in Nebraska. Right about now I was expecting to be surrounded by little boys who call me "Grandma." Instead I'm surrounded by snow and temperatures well below zero. You heard me right. Well below zero ... -19 to be exact. I believe last week at this time I was bragging about Colorado's 65 degree weather. It doesn't pay to be a braggart. I need to remember that. Anyway, yesterday I was feeling downright depressed about this sudden change in plans, so I buried my face in carbohydrates and didn't come up for air till late in the evening. {And that, my friends, is a fairly accurate representation of how I deal with crisis.}

I've baked my share of bread in my life, but I've never found such a simple and simply delicious bread recipe. Seriously, you've got to try this crusty on the outside, moist and chewy on the inside easy-to-make loaf! This bread has a unique rustic taste and texture. I made two small loaves yesterday and put the rest of the dough in the refrigerator to bake later in the week. I toasted one -- or maybe 5 -- slices of bread and then, for good measure, spread on several pounds of butter and homemade jam. It was delicious...


It's easy to have fresh bread whenever you want it with this recipe. To start, just mix the dough and let it sit for two hours. No kneading required. Then shape and bake a loaf, and refrigerate the rest to use over the next couple weeks. That's right -- weeks! When you want some fresh-baked bread, take some dough, shape it into a loaf, let it rest and rise for about 40 minutes, then bake. Your house will smell like a bakery, and your family and friends will love you for it. Seriously, it's the easiest bread recipe in the world! Only four ingredients! Here's the recipe...


Artisan Bread in Five Minutes

3 cups lukewarm water
1 1/2 Tbsp. yeast
1 1/2 Tbsp. salt
6 1/2 cups unbleached, all-purpose flour
cornmeal


1. In a large plastic bowl mix yeast and salt into 3 cups lukewarm water (about 100 degrees). Stir in flour, mixing until there are no dry patches. Dough will be soft. Loosely cover. Let dough rise at room temperature 2 hours (or up to 5 hours).

2. Bake at this point or refrigerate, covered, for as long as two weeks. When ready to bake, sprinkle a little flour on dough and cut off a grapefruit-size piece. Turn dough in hands to lightly stretch surface, creating a rounded top and lumpy bottom. Put rounded dough on cookie sheet generously sprinkled with cornmeal; let rest and rise 40 minutes. Repeat with remaining dough or refrigerate it.

3. Place an oven proof dish with about 1+ cup water on the bottom rack in your oven. (This will ensure a crispy crust.) Preheat oven to 450 degrees.

4. After the dough has risen, dust top of dough with a little flour, slash top with serrated knife three times. Bake until well browned, about 30 minutes.

Tip: To keep the "crusty-like" crust on the bread, don't wrap it or put it in a tightly sealed container after baking.

Yield: about 4 loaves


 I can testify to the fact that this bread
cannot compare to having two sweet little boys snuggling in your lap, 
but it might help you drown your sorrows
until that day comes!

Linked to:
Show & Tell Saturday @ Be Different Act Normal
Friday Fun Finds @ kojo designs
Hookin' Up with HOH
Show Off Your Stuff @ Fireflies & Jellybeans
Get Your Craft on Thursday @ Life as Lori
All Things Domestic @ Crazy Domestic

Monday, January 31, 2011

iPad Case

About a month ago I was directed to this fabulous pillow tutorial at the blog Sew, Mama, Sew! I fell in love with the quilting techniques used in making that pillow and knew I wanted to use those techniques at some point in time -- either to make that gorgeous pillow or something else. Shortly after reading that tutorial I designed and created a Kindle Case for the Kindle I had received for Christmas. When one of my daughters-in-law, Mia, saw that case she mentioned that she would love something like that for her iPad! My thoughts immediately went to the tutorial at Sew, Mama, Sew! and a design for an iPad Case was born...

Mia's favorite color is green, so I found coordinating fabrics in my scrap stash. I followed the instructions in the tutorial at Sew, Mama, Sew! and sewed some strips of fabric together. I then used my rotary cutter to cut across the sewn strips to produce a colorful strip of fabric! 


Those strips, along with some white flannel and earthy muslin, were joined together to make the front of the case...


I absolutely love the white stripe and soft texture of the flannel next to the more course fabric of the muslin. Delicious!


I'm not entirely happy with the dimensions of the case. Next time I would make it a little smaller, but I am very happy with the design...


I used the same fabric for the back and lining. It's called "Pom Pom" and it's from the fabric line "Flourish" from Studio E by Alicia Place Frost. Love it!


Fusible fleece was attached to the front and back pieces and the lining pieces of this item, so the case is well-padded to give some protection to the iPad. If I make another one of these, I will make it slightly smaller and post the specific measurements for the case.


All in all I'm very happy with how it turned out.


iPad Case...

About a month ago I was directed to this fabulous pillow tutorial at the blog Sew, Mama, Sew! I fell in love with the quilting techniques used in making that pillow and knew I wanted to use those techniques at some point in time -- either to make that gorgeous pillow or something else. Shortly after reading that tutorial I designed and created a Kindle Case for the Kindle I had received for Christmas. When one of my daughters-in-law, Mia, saw that case she mentioned that she would love something like that for her iPad! My thoughts immediately went to the tutorial at Sew, Mama, Sew! and a design for an iPad Case was born...

Mia's favorite color is green, so I found coordinating fabrics in my scrap stash. I followed the instructions in the tutorial at Sew, Mama, Sew! and sewed some strips of fabric together. I then used my rotary cutter to cut across the sewn strips to produce a colorful strip of fabric! 


Those strips, along with some white flannel and earthy muslin, were joined together to make the front of the case...


I absolutely love the white stripe and soft texture of the flannel next to the more course fabric of the muslin. Delicious!


I'm not entirely happy with the dimensions of the case. Next time I would make it a little smaller, but I am very happy with the design...


I used the same fabric for the back and lining. It's called "Pom Pom" and it's from the fabric line "Flourish" from Studio E by Alicia Place Frost. Love it!


Fusible fleece was attached to the front and back pieces and the lining pieces of this item, so the case is well-padded to give some protection to the iPad. If I make another one of these, I will make it slightly smaller and post the specific measurements for the case.


All in all I'm very happy with how it turned out.


Linked to:
Saturday Soiree @ A Little Lovely
Friday Fun Finds @ kojo designs
FFAFriday @ Sassy Sites
Show & Share @ Just a Girl
Frugal Friday @ The Shabby Nest
Hookin' Up with HOH
Strut Your Stuff @ Somewhat Simple
Show Off Your Stuff @ Fireflies & Jellybeans
Get Your Craft on Thursday @ Life as Lori
Anything Related @ All Things Related
All Things Domestic @ Crazy Domestic
Get Your Craft On @ Today's Creative Blog
The DIY Project Parade @ DIY Show Off
Craftomaniac Monday @ Craftomaniac

Friday, January 28, 2011

Wednesday, January 26, 2011

Another Application for February's Plaque Attack...


{ Go here for the original "February Plaque Attack" post! }

Last month one of my readers sent me an email letting me know how she used December's Plaque Attack document in an original way! She copied the document onto fabric and made a beautiful pillow. It gave me a great idea! I've used this same technique of copying images onto fabric before using my home printer, so this month I thought I'd show you another application for February's Plaque Attack in this adorable Valentine pillow that I made...


I love a frou frou pillow as much as the next woman, but every so often my heart yearns for a simple paneled pillow. This one fit the bill for me this time. 


I created a tutorial a few months ago about how to print on fabric from your home printer. Go here for that tutorial. It's a deliciously simple procedure! Simply follow the tutorial by printing your "February Plaque Attack" Word document onto a piece of fabric. I used a beautiful earthy, natural-looking muslin. I already had a 16" square pillow form, so I cut my pieces to fit that form. If you'd like to make a 16" pillow too, cut your fabric in the following sizes...


Please remember that this type of printing on fabric is not washable. If you get the ink wet it will bleed, so be aware of the purpose of your project and whether it will "last" under your circumstances!


You'll note that this plaque has red lettering rather than the black lettering that I originally used when I wrote the February Plaque Attack post. (Fonts courtesy of KevinandAmanda.com)

If you would like the red lettering to try a project like this please leave a comment below, then email me again. My email address is on my sidebar under "Contact Information".  

Just put "Red Letter February Plaque Attack" in the subject line of the email and I will shoot you back a document with both the black and red lettering. {Yes. You're right. I should have had both of these in my original document, but I didn't think of this project till later! Wish I could learn to be more organized! Ugh!!!}
 
Important: By requesting this document you agree not to sell copies of this document or sell products with this document on them. You may make as many copies as you would like for personal use or gifts.


Linked to:
Typography Challenge @ CSI
Saturday Soiree @ A Little Lovely
Saturday Nite Special @ Funky Junk Interiors
Friday Fun Finds @ kojo designs
Frugalicious Friday @ Finding Fabulous
Frugal Friday @ The Shabby Nest
Free for All Friday @ Sassy Sites
Hookin' Up with House of Hepworths
Get Your Craft on Thursday @ Life as Lori
Show Off Your Stuff Party @ Fireflies & Jellybeans

Monday, January 24, 2011

February Plaque Attack is here!


  { Important }
I'm changing things up a bit for the
Plaque Attack Club, 
so puleeeze read all the way through
this post before you 
request the 
plaque!

{ I have many questions asked me each month. All will be answered in this post! }

Thank you!


To receive February's Plaque Attack please leave a comment below, then send me an email with the words "February Plaque Attack" in the subject line of the email. My email address is at the top of my sidebar under "Contact Information." If you are requesting more than one month, please let me know which months you would like in the body of the email. Because our Plaque Attack Club is growing by the hundreds monthly, I'm finding difficult to reply to each email that is sent, however, I love your sweet comments and your fabulous ideas about how you have used the plaque document. In your comment below tell us how you have used the document, and please include any links to posts that you've published using the Plaque Attack document. That way all can enjoy your fabulous creativity! If you have a particular question, please don't hesitate to include that in your email. I'd love all to benefit from some of the original ideas that you ladies have shared with me through your emails! Thank you so much! Please remember that you have to check back monthly to request each individual plaque.


February is a month filled with sweet Valentine wishes, chocolate and kisses and February's plaque certainly reflects those sentiments!


Whether you are planning on making the plaque right away or later next month, please request it as soon as possible! On February 8th I will be wending my way to my daughter's home to spend some time with her family, so I will be unavailable to send the plaque wording to you during that time! (Any email requests received for the plaque wording from the 8th  - 11th, will be emailed on February 12th!)


I have to admit that this plaque is my favorite of all that I've made. Did you notice the cute fonts I used? These free fonts can easily be downloaded to your computer by going to {Kevin&Amanda.com}. They have hundreds of fabulous fonts for the taking. So kind of them to share their talents so freely! 


Remember:  If you would like to make this plaque leave a comment below, then email me requesting the document. If you are requesting more than one month, please make sure you specify the month(s) you are requesting in the body of the email. My email address is at the top of my sidebar under "Contact Information". No purchase necessary. After receiving the document all you'll have to do is select a sheet of scrapbook paper, print the document off, and follow the instructions in this tutorial.

Important: By requesting this document you agree not to sell copies of this pattern or sell products with this pattern on them. You may make as many copies as you would like for personal use or gifts.

Update: Some have asked where to find the wooden plaques for these documents.  I buy mine at Hobby Lobby ($1.47), and I imagine most craft stores have these plaques. If you can't find them in your area, you can purchase them online at Hobby Lobby -- go here! If that doesn't work here is another source for a 6 3/4" square plaque for the same price!


Linked to:
Friday Fun Finds @ kojo designs
Transformation Thursdays @ The Shabby Chic Cottage
Get Your Craft on Thursday @ Life with Lori
Hookin' Up with House of Hepworths
Show Off Your Stuff Party @ Fireflies & Jellybeans
Show & Tell @ Blue Cricket Design
Anything Related @ All Thingz Related
Get Your Craft on Tuesday @ Today's Creative Blog
Challenge of the Week @ The CSI Project