Showing posts with label bathroom refinish. Show all posts

Wednesday, June 26, 2013

Bathroom Renovation Completed...

When I published our bathroom redo reveal, I mentioned that I would be using the cool, calm colors of the beach as my inspiration for finishing touches in the room. The bathroom renovation was finished while we vacationed at a beach house in North Carolina, and when we came back those memories of the fun we had were center-most on my mind, so I wanted colors and decorations to reflect that wonderful trip.

We had a photo shoot of the family while we were in the Outer Banks. Here's a photo toward the end of the shoot of our 12 sweet grandchildren all dressed in those beautiful, calm beachy colors. As you can see playing in the ocean was a strong pull for some of them -- so funny!


With 12 grandchildren nine and under, everything is an adventure with this crew! Our photographer was fabulous. I would like to point out just how adorable little baby Taitum is with her head on her cousin Zoey's shoulder. So sweet.  Sigh...

Where was I? Oh yes...our vacation at the Outer Banks became my inspiration for the few decor items I placed in the newly renovated bathroom.

Shower Curtain:
One highlight of our trip was when we chartered a pontoon boat and went dolphin watching on the sound. With a crew of 26 people (our immediate family), it's easy to charter a boat all to ourselves! We were lucky enough to come upon a large pod of dolphins that swam close to our boat and seemed to enjoy the attention we gave them...


To commemorate that experience I chose this fabulous shower curtain...


I realize the shower curtain sports whales, not dolphins. They're both mammals -- it'll do.

Decor:
I think we collected 200 pounds of shells during our one week stay at Whalehead Beach. We brought home a fraction of what we collected, and I put them in this apothecary jar. I asked my friend Sharon (of Vinyl Wall Expressions) to make a custom vinyl sign to go on the jar...


I tucked two little duck decor items in my suitcase when I was at my mother's home helping her downsize a couple of months ago. She'd had them for years, and I loved their color so I planned to use them in the "new" bathroom. What I didn't know is that they would come to mean even more to me as I decorated with the Outer Banks in mind. One of the best treats in the Outer Banks is a donut shop called "Duck Donuts." I cannot say enough about these delicious made-to-order cake donuts. They come to you fresh and warm and are unbelievably delectable, and they are solely responsible for my four pound weight gain within a six day period. {I'm shocked it wasn't more.} We couldn't shove them in our mouths fast enough...


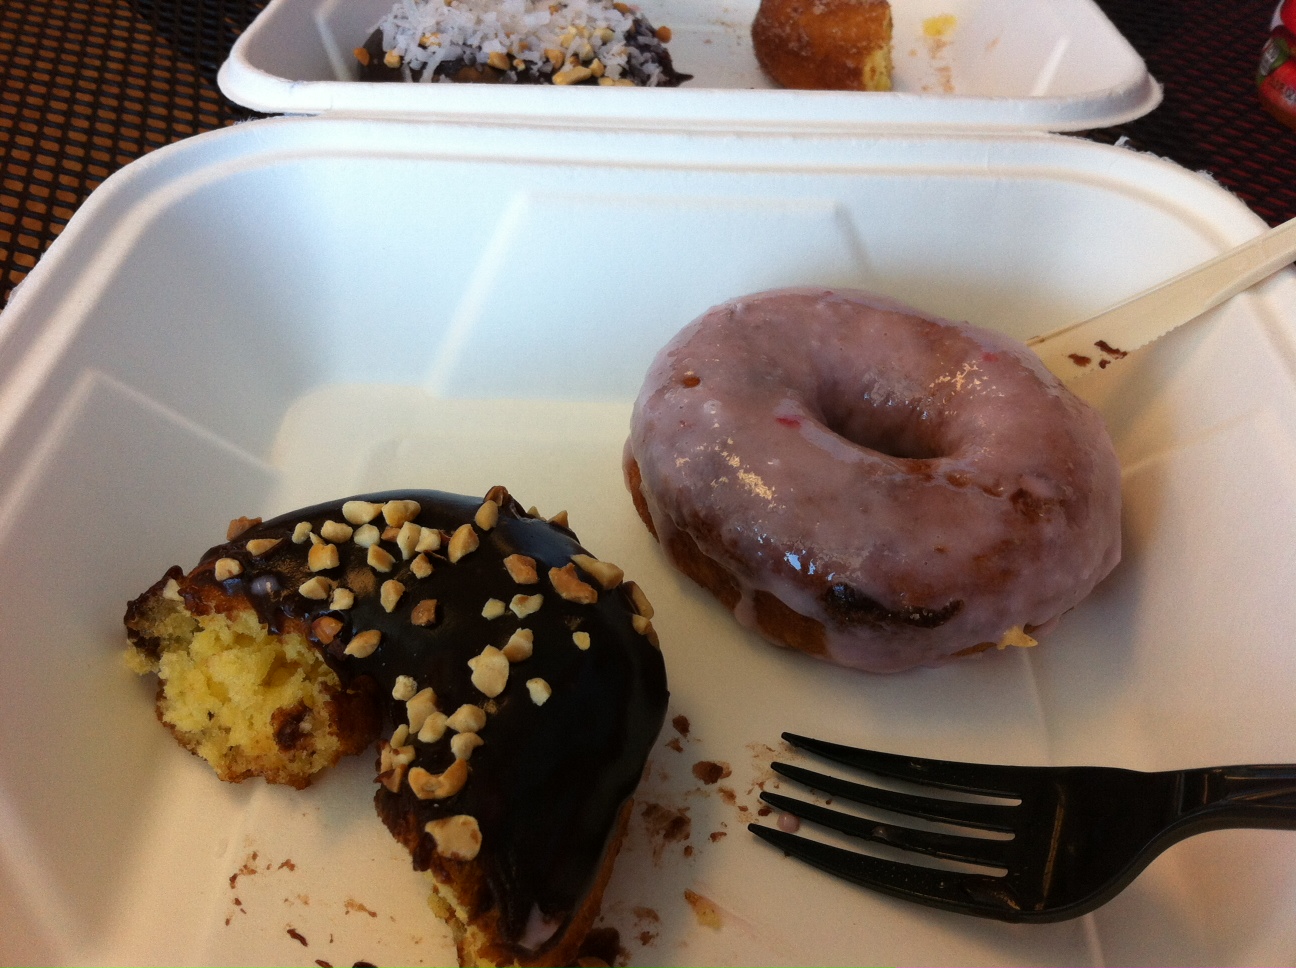
Whenever I look at these little turquoise ducks of my mom's, I'll have a flashback to Duck Donuts...


I found this cute "Sea Salt" Lido Soap at Anthropologie...


During the photo shoot we found a crab that entertained the kids...


I'm going to frame a print of a crab and put it on one of the walls in the bathroom. I'm considering a print from this Etsy artist.


Towels & Bath Mats: 
Towels the color of the ocean...


Bath Mats from Urban Outfitters remind me little of the seagrass on the beach...


Well there you have it. These are the items that helped finish off this bathroom redo. I'm hoping that as our children and grandchildren come home for a visit, they will be reminded of the fun times we've had together as a family at the Outer Banks. 

Tuesday, June 04, 2013

Bathroom Redo Reveal...

We flew back from an eleven day vacation in Virginia and North Carolina on Sunday. For most of that time we stayed in the Outer Banks in Corolla. My daughter took the picture below. It was easy to relax when you had a view like this every day...


All 26 members of our immediate family were there {heaven}, but that's not really what this post is going to be about. During our vacation our handyman was hard at work. He started our basement bathroom redo before we left, but while we were basking on the beach he refurbished our entire bathroom. I'm so grateful. I seriously think a good handyman is worth his weight in gold! Ours is anyway. He took the bathroom down to the studs and started from scratch. Here are some photos to give you an idea of what he was up to...

Before: 
{Don't judge -- I know this redo was about 15 years too late!}


During:


After:


I'm a horrible indoor photographer. Someday I'll read up on how to take a good photo indoors, but suffice it to say it is a huge improvement. I know the rage right now is painted cabinets -- white/black/gray -- but I love these maple cabinets and you should always get what you love. They are a beautiful, rich dark chocolate brown -- they show lighter in the photo than they really are. Fads change yearly, so it's always a safe bet to buy what you love -- not necessarily what's popular that year.

Here's a photo of the solid surface of the countertop we choose...


More photos...
Before:


After:


Now comes the fun part -- decorating with accessories. I prefer a minimalistic approach to decorating in a bathroom. I don't like clutter, but I do love to add color and character to these rooms. Because this room was finished while we vacationed at a beach house, I'm going to add the cool, calm colors of the pool and the ocean to the room. Here are a few photos from our trip that will serve as my inspiration...


The bathroom already has a backdrop of sandy colors, but I'm looking forward to adding the shades of blue and green that are found at a pool and on the beach!

Sunday, April 15, 2012

Thankful Thoughts...

What surprised me this week...

This Friday our last child will graduate from college. I've obviously known this for quite some time, but the reality of it surprised me this week. I'm so grateful that all of our children have had the opportunity to receive a higher education. Each has grown in knowledge, maturity and wisdom during his/her college years. Although our current graduate will be moving on to an advanced degree, it's good to know that he's the last in a long line of siblings that can call themselves "alumni!"

What inspired me this week...

Back in November when my husband and I had our master bath and bedroom remodeled, there was one wall -- above the dresser in our bedroom -- that was obviously bare and in need of a little dressing. Inspiration was slow in coming, however, so the wall remained unadorned. We knew eventually we would come across something that would strike our fancy, but until then we were content to wait until we found a treasure that we could appreciated.


That day came this week. We had admired a painting in a favorite store when we were in Utah last month, but the feasibility of bringing it home with us on a plane was daunting. This week I received a catalog in the mail and realized the painting was being offered at half-price with free shipping. Within moments the cash register went cha-ching, and it arrived two days later...


We're so glad we waited until just the right piece of art came along. It's beautiful and the symbolism in the painting is meaningful to both of us.


This painting is of the Mormon temple in Salt Lake City. If you ask different members of our church what our temples symbolize to them, you'd probably get many different answers. To me they make me think of "family, commitment and covenants with God." These are good things to consider and be reminded of when I awake in the morning and go to sleep at night. That's why this painting inspires me.


Thursday, March 08, 2012

Colors chosen...

A few days ago I asked for some suggestions for an accent color(s) for my new bathroom. I really appreciate the response I received. It love reading what others suggest. It usually takes me out of my comfort zone which expands my horizons a bit. There was one suggestion that really delighted and surprised me. It's not a color that has ever been on my radar when decorating our home, but it's a color that I love.

Eggplant Purple


Fortunately, the color that I love most with eggplant purple is Mossy Green. Last year I reconstructed a wreath as a wall hanging for this bathroom, and although I wasn't set on continuing to use it in the new room, once I chose eggplant as an accent color I knew it would fit well. I hung it on the wall behind the vanity.


Here's the finished product. The little etched recycled glass vase is from Pottery Barn -- so pretty -- with a hint of green. That little "lump" at its base is a birdie.


Just a little touch of both colors -- eggplant and moss -- very botanical! My mantra this year is "d-clutter," so I didn't fill the room with things.


Next week I'll be getting back to sewing. I'm so excited for several projects that I plan on sharing in the next couple of weeks!


Tuesday, March 06, 2012

Suggestions Needed...

I've been preoccupied this last week with a bathroom redo. Our half bath off our main floor living area has gone through a major overhaul.  Here's what it looked like last Monday. "Before photos" are always so revealing and embarrassing, don't you think? {That's a rhetorical question -- no need to answer and wholeheartedly agree.}


Because we loved the results of our master bath redo, we chose much of the same elements to use in this powder room redo.Within a few hours on the first day the room was gutted and it became a blank canvas -- ready to be repainted.


With two new coats of ceiling and wall paint, she was as good as new. I used white for the ceiling and Behr Ultra in "Plateau" for the walls. I love this "Plateau" color for the walls. It's such a great neutral color  -- so warm and inviting. The cabinetry was then installed, so the subflooring could be cut and the tile laid.


The marble tile came next. I chose a "brickwork" pattern for the layout -- so pretty with this particular tile.


Everything else was installed in less than a day...


This is where you come in... 
 I'm trying to decide what accent color(s) I want to bring into the room.
Below are a couple of up-close photos to give you a better idea of colors...


Any suggestions?

Tuesday, February 28, 2012

Master Bath Redo...

The other day we started renovations on the half-bath on the main floor of our home. That's when it occurred to me that I never posted the final images of our master bath redo back in November/December. I imagine the holidays took over my life at that time, which caused me to forget posting the "after" photos of that redo. I thought I'd share some of the "before" and "after" photos now. This was a complete renovation -- nothing was spared but the walls! It was a huge job, but we've been really happy with the results. We can't take credit for the work. I painted walls, but we had a professional do all the tear out and installation. The colors in the pictures below aren't very accurate -- we painted the walls a taupe color, but the photos don't reflect that change very well. In the first photo we had already torn out the carpet and I had "tested" the new paint on the walls...


We have a separate room in our master bath that houses the shower...


It's a wonderful feeling at the end of a project not have any regrets. We wouldn't do one thing differently. I hope when our current redo (1/2 bath on our main floor) is completed we are just as satisfied!


To see where some of the furnishings were purchased for our bed and bath remodel, 

Wednesday, December 14, 2011

Stenciled Walls ::: Yum!


Raindrops on roses, whiskers on kittens, and stenciled walls are a few of my favorite things. At the moment "stenciled walls" tops the list. A couple of weeks ago I offered you a sneak peak of the wall I was stenciling in my bedroom.


I am so excited to introduce you to a fabulous company that specializes in gorgeous stencils -- Cutting Edge Stencils. They have a broad selection of luscious stencils from geometrics to florals to murals to damasks to nursery patterns and more. The stencil I used on my walls is called "Brocade No. 1", and it is definitely #1 in my book! Here is the wall shortly after I finished stenciling...


I decided to use this beautiful chunky damask stencil on a feature wall in my bedroom. The day after I stenciled the wall my contractor came rushing into the room as he readied himself to continue work on the remodeling in the master bath. He didn't know I had stenciled the wall the day before. He took one look at the wall, stopped in his tracks, and his jaw dropped! The wall has the same effect on me. I absolutely love it...


What's more -- my husband loves it. 
That makes me feel really good.

When I decided to stencil my wall, I had a particular look in mind. I wanted the design to be soft and calming, so I chose a paint color just a shade lighter than the wall color for the stencil. Then I chose the stencil...


I love the chunkiness of this particular damask pattern. It's traditional and sophisticated, with a trendy flair. I chose to have the design float -- like bubbles on the wall -- rather than have it spaced out evenly. That's the whimsical in me.


As much as I love the current trend of vinyl stickers {I have a couple on the walls in my home}, they are very one dimensional in nature. With a stencil you can create more of a two dimension feature by making the paint lighter in some areas and darker in others. I love the imperfect nature of a stencil. I like the soft edges and textured feel of the paint on the wall. That's something you just can't get with a vinyl wall decal.


If you've never stenciled and are intimidated by the process, don't be. It's easy to do and just takes a little practice. The best tip I can give is -- don't use too much paint on your roller or sponge! Dip your foam roller, stencil brush or sponge in the paint and then dab the paint off on a paper towel or paper plate until it is almost dry. With just a little paint on your applicator you're ready to stencil! Because I have textured walls, I used a small piece of a sponge instead of a foam roller or stencil brush to stencil the pattern onto my wall. I find that by using a sponge I can control the amount of paint I use more easily. You can always add more paint if you want it darker. Cutting Edge Stencil has this video to illustrate the process...


We've made a lot of wonderful improvements in our Master bed and bath the last couple of months, but my stenciled wall is one of my favorite changes! I would definitely recommend the stencils at Cutting Edge Stencil if you are looking for a quality product and an economical way to make an beautiful change.


Linked to:
 Visit thecsiproject.com