Showing posts with label Wristlet. Show all posts

Monday, June 13, 2011

Bunting Cosmetic Bag Tutorial

After a fabulous vacation with family and a short hiatus, I'm back to creating and posting again. I'm a home-body at heart, so it feels good to have a few projects in the works!

Several weeks ago I celebrated a birthday and for the celebration my daughter made an adorable birthday bunting. I have to admit until I saw that banner I hadn't really understood what all the "bunting fuss" was about. I thought they were cute, but didn't necessarily feel the need to jump on the bunting bandwagon! However, the bunting my daughter made for my birthday changed my mind in a hurry. That's why I decided to produce a little bunting of my own and make a new cosmetic bag! I'm sharing my creation with you in this easy-to-follow tutorial...


Materials Needed:

2 pieces of muslin (or linen) fabric cut 9.5 inches wide x 8 inches tall
2 pieces of cotton fabric for the lining cut 9.5 inches wide x 8 inches tall
2 pieces of fusible fleece cut 9.5 inches wide x 8 inches tall
about 15 bunting triangles cut from a variety of scrap fabrics
thread
9" zipper
scrap of ribbon for zipper end (optional)

{ 1/4" seam allowance unless otherwise specified. }


Assembling the front:

1.) Start by fusing the fleece onto your muslin pieces with your iron. This will give the cosmetic bag more body and allow the bunting to have a little more dimension!


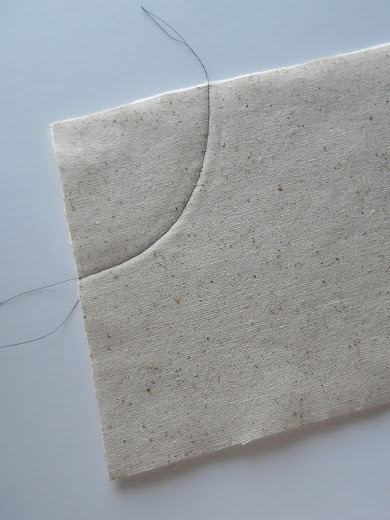
2.) Sew a line across the top of one of the pieces of muslin -- swooping it from the left side of the fabric to the top (see below). This line will work as a guide for your placement of bunting pieces.


3.) Then attach your bunting triangles by putting the tops of the triangles along the line already sewn and sewing across the top of each piece.


4.) Next sew across the top of the pieces a couple more times and along the sides of the pieces a couple of times. Don't worry about being precise while sewing these lines. I purposely made the lines a little catawampus, which added some character to the piece. {At least that's what I'm hoping!}


5.) Time to add more bunting by creating another swooping sewing line starting at the top of the piece and sweeping across the fabric to the right...


    6.) Just like before, go ahead and add your triangular bunting pieces using the sewn line as a guide for placement. Again sew around each triangle and across the top a couple of times!


      Assembling the Pouch:

      7.) Now that you have the front of the cosmetic bag completed, go to Noodlehead and follow Anna's "Scrappy Make-Up Pouch" tutorial, starting with "Assembling the Pouch." There are many different tutorials out there on how to make this pouch, but Anna's instructions and photos are always spot on and so easy to follow. When you have completed it, your bunting cosmetic bag should look like this...


      I love this bag. It's quite possibly my favorite pouch ever. It's so cute and playful with a touch of quirky! I made several of them the other day...


      Each one becomes unique depending on the fabric used for the lining and the scrap fabric used for the bunting...


      Enjoy!


      Linked to:

      DIY Club


      Domestically Speaking Linky Party
      Craft Schooling Sunday @ Creative Jewish Mom
      Show & Tell Saturday @ Be Different Act Normal
      Saturday Night Special @ Funky Junk Interiors
      Friday Fun Finds @ kojo designs
      Friday Fav Party @ Nap Time Crafters
      Frugal Friday @ The Shabby Nest
      Summer Fun @ Sassy Sites
      Hookin' Up with House of Hepworths
      Transformation Thursday @ The Shabby Chic Cottage
      Show Off Your Stuff Party @ Fireflies & Jellybeans
      20 Below @ Christina's Adventures
      Strut Your Stuff @ Somewhat Simple
      Anything Related @ All Things Related
      Get Your Craft On @ Today's Creative Blog
      It's Sew Fun Tuesday @ It's Sew for You
      Craft-O-Maniac Monday @ Craft-0-Maniac
      Running with Glitter Linky Party
      Sisters Sunday Link Party @ Sisters of the Wild West


      Wednesday, October 20, 2010

      Stocking the shelves...

      I've been busy stocking the shelves of my Etsy the last few days. I'd rather be creating in other ways, but occasionally one needs to get down to business. I've had a number of sales lately and my shop has been getting smaller and smaller, so it was time to build up the inventory a bit before the holidays! This week I've been working on wristlets...
      A wristlet is a versatile little clutch that can be carried day or night. It can be used as a purse to carry cash, a debit card, your phone,a license and keys, or it can be used in a purse or luggage to organize accessories (i.e. as a cosmetic bag, sunglasses case, or for personal items).
      The pattern of this wristlet is unique -- I designed it myself. I love the earthy, textured feel of the gathered muslin combined with the patterned fabric. A beautiful fabric flower finishes it off with just the right touch!
      The dimensions of this mini-tote are 8" x 5". It is fully lined and interfaced with fusible fleece to give it plenty of body and support.
      This clutch would be perfect as a gift. You might want to tuck a little crinkle paper and a few items (lipstick, perfume, hand lotion, etc.) inside!
      These wristlets are on the shelves of my Etsy awaiting a new home!

      Wednesday, September 08, 2010

      Gathered Clutch...

      I'm back. I hope you all had a lovely weekend. We had a fabulous time with family in a never-been-to vacation spot. There will be more about that later. This morning I got up at the crack of dawn -- actually before the crack of dawn. It's not even 9 a.m. and I've already read blog posts and made two clutch purses for two little girls who will be celebrating birthdays soon. Meet a couple of my adorable granddaughters. One will be turning five and the other will turn two in the next couple of weeks...


      I love the blog "Noodlehead." Anna is an extremely talented lady, and what's even better she shares her talents generously! For months now I've been wanting to make a clutch she designed, and this morning I finally got to it. Because I was making the clutches for two little girls I tweaked the "Noodlehead pattern" a bit and made them for little hands. Here are the sizes -- in inches -- for the pattern pieces that I used:


       This makes a finished clutch that is about 4 x 7 inches.

      In addition to the pieces that Anna has in her pattern, I included a strap (the 2"x11" piece). The dimensions for this little clutch are slightly different than those on the Noodlehead instructions, but you construct it the same way, so go to Noodlehead for Anna's fabulous tutorial to find out how to build this cute clutch.


      Normally, we try to give gifts for birthday presents for our little grandkiddos, but this year nothing was coming to mind for these little lovelies, so I decided to make these little clutches and put some cold hard cash in them...


      That way they can have their own little shopping spree. Even a two year old can appreciate that. A lot. 


      They take after their grandmother and don't mind a little loose change swooshing around in their purse. Dollar bills are even better. Let's just say the apples don't fall far from the tree and leave it at that...


      Have a nice day! 
      Linked to:
      Featuring you Friday @ Sassy Sites!
      A Crafty Soiree @ Katie's Nesting Spot
      Hookin' Up with HoH @ House of Hepworths
      Show Off Your Stuff @ Fireflies and Jellybeans
      Strut Your Stuff @ Somewhat Simple
      Get Your Craft on Thursday @ Life as Lori

      Thursday, July 15, 2010

      Gift Card Lil' Wristlet

      I have two little friends, Dani & Grace, who happen to be sisters with birthdays in the same week. When I was young I always loved a little change in my pocket, so I thought I'd give them a couple of gift cards for their birthdays, but I wanted to "wrap" the gift cards in something special that they could use over and over again, so I made a small wristlet just big enough to hold the cards. Since we all give gift cards at one time or another, I thought I'd share this pattern that I created for this purpose.

      The finished dimensions of these wristlets are 7 inches wide by 4.5 inches tall with a 5.5 inch long strap. It's smaller than my other wristlets, but still big enough for the essentials for an adult (cash, a debit card, a license and keys), or in this case the valuables of a little girl!

      You will need to cut out pieces of fabric in the following dimensions. (Please see photo below.) Remember all measurements are in inches.
      • Strap - cut one 12 inch x 2 inch piece.
      • Lining - cut two 8 inch x 5 inch pieces.
      • Outside back - cut one 8 inch x 5 inch piece.
      • Zipper "ends" - cut two 3 inch x 1.5 inch pieces.
      • Outside front - cut one 3 inch x 5 inch piece and one 6 inch x 5 inch piece.
      Also, you will need (not shown in photo):
      • One 9 inch zipper & thread.
      • Interfacing - cut two 8 inch x 5 inch pieces of fusible fleece.
      I allow for 1/2" seams. Once you have the fabric cut out, you will need to round the bottom corners of your outside edges. You will only be rounding one side of each of your outside front pieces because you will sew those pieces together. You can do this by taking a small cup, meeting the side and bottom selvages and drawing a line around the cup, like I did on this piece of paper...

      Then, trim the bottom edges around the pen line. This will provide a curved edge at the bottom of the wristlet.

      Pin the 5 inch sides of the outside fronts together and sew with a 1/2 inch seam. (Make sure you are sewing the straight edges together, so the curved bottom edges will be on the outside edge.)


      Now go to Flossie Teacake's fabulous tutorial, follow it, and get 'er done! I add a strap to mine. Just tuck it into the seam before you sew around the outside edges. Then go here to "Emily's Little World" and follow this fabulous tutorial on how to make the flowers! I attach mine with fabric glue. And... you're done! You've got a place to hide some gift cards and the receiver has a wristlet to carry around long after those cards are spent!

      Have a great day!


      Linked to:
      Frugalicious Friday @ Finding Fabulous
      Frugal Friday @ The Shabby Nest
      Friday Fun Finds @ Kojo Designs


      Wednesday, July 07, 2010

      Shhhh... it's a Give-Away

      Last week was a busy week. Not only was I working on our family art gallery, but I had an order of seven wristlets that I needed to fill for a bride to present to her bridesmaids as gifts. Diana contacted me late last month asking if I could fill a "special order" of seven wristlets. I thanked her for the inquiry (which I truly appreciated), but told her that I didn't fill custom orders in my shop.

      After sending off the email to Diana telling her I couldn't help her, I thought that would be the end of it. I underestimated the determination of a bride-to-be. I should have known better.

      She wrote back this email: Suzanne - I don't want to bug you, but I just love your design & I wish you'd reconsider making me the wristlets for my bridesmaids! They are perfect & I honestly can't find anything close to those!

      Danged if that wasn't one of the sweetest little emails I ever read. Ahhh, shoot. My defenses were slipping. I wrote her back telling her I would consider filling a custom order for her, but citing my limitations -- that I couldn't promise them till the end of July -- that I'd have to special order fabric...etc.

      She wrote back: Yippee! This just made my night! The wedding is August 14, and the rehearsal is the 13th, so as long as I have them a few days ahead of time, I'm all set...

      To be honest, I wasn't terribly excited about the pressure I knew this order would bring. Then something happened. I got excited about those seven little wristlets. Diana mentioned in that same email that the wedding colors are fuchsia, pink and orchid. Then she added that the theme of the wedding is "flowers", since they are being married in a flower garden. She also mentioned that I could make the wristlets the same or make each one slightly different, but in keeping with the colors. Hmmm .... I loved the idea of making each one unique. I had her give me an idea of some fabrics she liked, and I went to work filling her order. Today I added the last touch -- the fabric flowers...

      I'm thinking of asking Diana if I can be an honorary bridesmaid just so I can get one of these...


      It's time for a Give-Away!

      For those of you that have read all the way to the bottom of this post, it's time for a little Give-Away. This Give-Away is directed to those who frequent my blog. It's my way of saying "thank you" to those who visit my blog and leave such kind, encouraging comments. It doesn't matter if you've been a long-time follower or if you've just discovered my blog. You are welcome to enter. If you've never left a comment, that's OK, now is the time. No need to advertise this in any way. It's just for you.

      Here are particulars...
      • Scroll down to the photo below. I have each of the seven wristlets numbered. To enter this contest, leave a comment below stating the number of the wristlet you would like to win. I will make the winner of this contest the wristlet of her choice.
      • No anonymous comments, please. I need an email address or accessibility to a public blog. Private bloggers --feel free to enter, but you'll need to leave your email address. If I don't have any way to contact you, your name will not be eligible.
      • This contest will run through midnight Tuesday, July 13th. Wednesday morning, July 14th the winner will be announced.
      Good luck!


      Update: I have received some emails and comments asking about the fabric I used in the above wristlets, and I'm more than happy to detail the fabric line and the designers:

      #1 - Santorini Ambrosia by Lila Tueller
      #2 - Picadilly by Pamela Mostek
      #3 - Soirre by Lila Tueller
      #4 - Santorini Olive Grove by Lila Tueller
      #5 - Farmer's Market by Sandi Henderson
      #6 - Santorini Trellis Floral by Lila Tueller
      #7 - Soirre by Lila Tueller

      More wristlets are available in my Etsy!

      Saturday, June 19, 2010

      Cottage Industry Shops Linky Party...

      Here's a linky party idea that I haven't seen before. Remodelaholic is hosting this fun, informative party, called

      It's aimed at cottage industry shops, and it's a way for people to find what others are selling. I'm looking forward to attending today. Head on over to participate if you're a cottage industry owner, or if you want to see items available for sale!


      Monday, March 22, 2010

      She's back home...

      Can I hear a loud and raucous... "Yeeehawwww!!!"

      Saturday I received a phone call. The news was good. My sewing machine was repaired and ready to come home. I picked her up within a half hour, and today I got busy. Did a little sewing. I sewed the drapes for Bedroom Redo #2 (photos to come later this week). And I finished up the wristlet that had been hastily stored away when she went down...

      It's so good to be back in the saddle and have a willing partner!

      Love this teal and chocolate wristlet. Damask is always a favorite of mine regardless of color. There is just something wonderful about those flowery swirly lines!

      Who doesn't love polka-dots?

      She's taking it easy in my Etsy.


      Thursday, March 18, 2010

      Two more...

      Before my sewing machine went up in smoke (its in the repair shop), I managed to create two more wristlets -- actually one clutch and one wristlet. A wristlet become a clutch when I forget to sew on the strap until it's too late. I'd like you to believe I planned it that way, but I won't put on airs. I'm actually a little conflicted as to which I like better -- the wristlet or the strapless wristlet aka the clutch.

      This first little hang up features a fabric from Lila Tueller's line called "Soirree." Honestly, how could you not love a fabric line called "Soirree?" The name alone makes you fall head over heals! Her collection is like a breath of fresh air...

      I used two "Soirree" fabrics on this clutch -- one on the outside front and back and one for the lining.

      Isn't gathered muslin gorgeous?

      The second wristlet features fabric from Amy Butler's Midwest Modern line. It's Amy Butler -- nuff said...

      I love the flower on this one. It shimmers. Eye candy at its finest.

      These two creations are both relaxing and enjoying the day in my Etsy.