A week ago we returned home from visiting one of my sons and his family. I love visiting my children for obvious reasons -- I love spending time with them -- but another benefit is the inspiration I receive when I visit their homes. I always come back energized and eager to try something new and different in our home. You see, my kids (that includes my in-law-kids) are all very creative. They've done amazing things with paint, wood and crafts in their home that I never would have imagined. One decorating technique that several of the couples have tried is painting horizontal stripes on their walls. I've loved it. There was, however, one reason I'd always shied away from painting stripes on our walls. My children have walls that are not textured, and we have walls that have a rather heavy orange peel texture on them. I wondered if I'd be able to create really straight lines with a textured wall.
He also suggested I use the "Scotch Blue Painter's Tape" that has orange on the packaging. This tape is recommended for freshly painted surfaces (24 hours old). Because I was painting the base coat the day before I wanted to paint the contrasting stripes, this was a very good idea!
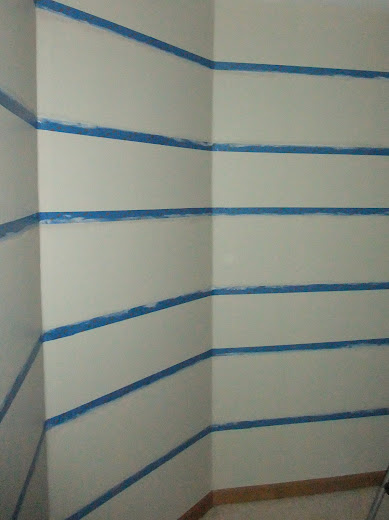
I started by painting the wall with two coats of the base coat. Then I measured my wall from the ceiling down to the top of the baseboard and divided by seven -- an odd number of stripes is always a good idea. The wall I painted is in our basement so the ceilings aren't particularly high. I have seven stripes that are about 12.5 inches high (the bottom stripe was 13" high). If you have tall ceilings then you could easily divide the space into 9 stripes. I prefer stripes that are about 12" in height. For me, it tends to look too busy if they are much shorter than that. (FYI: Make sure the base coat stripes are on the top and bottom of the wall, so you don't have to paint over any detail work next to the ceiling and the baseboard.) I used a yardstick and marked with a pencil tiny marks for tape placement.
After taping -- and making sure the tape is pressed securely to the wall -- run a very thin line of caulking against the line of the tape and smooth it with your finger. You don't want to use too much caulking. The idea is just to seal the line of the tape, not fill in any texture on your wall (see below).
Wait a couple of hours for the caulk to dry and then you can begin to paint your stripes. Put two coats of paint on the stripes.
After the last coat of paint is dry to the touch (about 1 to 2 hours), peel off the tape...
This technique worked beautifully on my textured walls. All the lines are crisp and clean.
I love how these stripes have changed a do-nothing wall into something interesting and fun.
I hope this has inspired you to paint a stripe or two on your walls -- even if they are textured! ;o)


