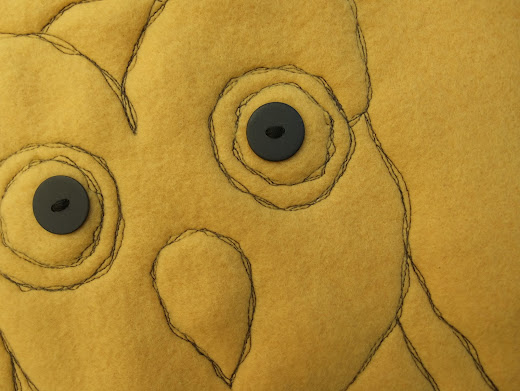
I've seen a lot of posts on blogs, but I've never seen this technique of outlining with a sewing machine addressed in a tutorial. It's a simple skill that can be completed by a novice sewer or the more accomplished seamstress. All you need is a simple outline of something you love and a basic sewing machine with a straight stitch. The first time I used this technique was on my Bunting Cosmetic Bags, when I outlined the appliqued banners with stitches.
Although this technique is cute when stitching appliques onto fabrics, it can be used as a "stand alone" technique as well. For this tutorial I've made a pillow to demonstrate this stand alone outlining technique, but one could use it on a variety of projects.
To begin I found an image similar to the one below on the internet, drew a small version, then enlarged my drawing on my copier. Coloring books are nice resources for outlined images too.
To transfer the design to fabric, simply tape the original drawing to a window or sliding glass door. Choose a window that is directly exposed to sunlight during that time of day, then hang a slightly larger piece of muslin over the original drawing. {Muslin is what I used, but any lightweight cotton fabric would suffice.}
The bright light through the window will help you easily see through the layer of fabric to the original drawing below. I used a permanent marker to lightly trace around the design onto the muslin.
I used a piece of gold-colored fleece for the front piece of my pillow. The thickness of the fleece gave a little "body" to the project. Cut a piece of fabric the size of the muslin for the front of your project...
Lay fabrics wrong side together, then hand-baste around the outside edge of the two fabrics. {Hand basting is sewing two fabrics together with long easily-removable stitches. Basting holds two fabrics stationary while sewing regular stitches, so the fabrics don't slip out of place.} Once you have the two fabrics basted together, place a few pins in and around your design. You're now ready to start stitching...
With a regular straight machine stitch, sew along the outline you have drawn on the muslin. When you have one layer of stitching, turn the fabric over and stitch two more rows close, but not on top of, the original lines of stitching. I didn't back-stitch. Instead I pulled the ends of the thread through to the backside and knotted the threads together {see below}...
With this technique, you are not trying to follow the original line of stitching exactly. I purposefully make the second and third rows of stitches a little catawampus. This wonky way of stitching, in my opinion, adds to the character of the piece...
To finish my project, I made him into a pillow...
I added a string of pom pom fringe inside the seam.
Lately, I have a thing for pom poms.
And owls.
And owls with pom poms.
And owls with pom poms.
The wonky lines of this little owl give this pillow a lot of character.
Can I hear a wHOOT wHOOT?
Linked to:
The Inspiration Board @ Homework
Show Me What Ya Got @ Not Just a Housewife


