Sunday, December 31, 2017

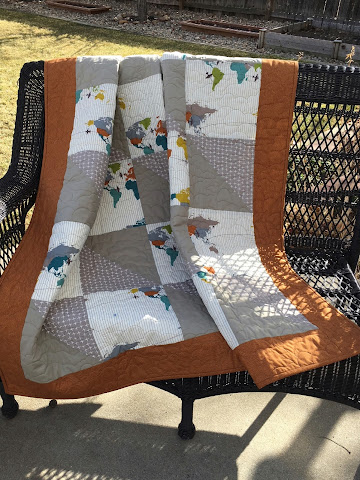
Pattern for adult-sized quilt...


I've been asked a few times about dimensions for my quilts and how large the blocks are. I'll give you a quick sketch here of how much yardage I bought for each adult-sized quilt for this pattern...


I always bought a little more fabric than I needed for the front, so I could use the remainder of that fabric for the strip of fabrics on the back of the quilt...


Finished Measurements: 55" x 65"
Supplies:
A: 1 1/2 yard
B: 1 yard
C: 1 yard
D: 1 yard
E: 1/2 yard
F: 2 yards


Instructions:
A (block): Cut out fifteen 10" squares
B (block): Cut out eight 11" squares 
C (block): Cut out eight 11" squares
D (boarder): Cut out six 4 1/2" x 44" strips 
E (binding): Cut out six 2 1/2" x 44" strips
F (back fabric): See instructions below.

To assemble:

Sew B & C squares together as described in this tutorial from Diary of a Quilter.  After all the half-triangle blocks, trim the blocks down to 10" blocks. Attach the blocks together to make rows; then sew the rows together. Sew on the boarder (D) and you've finished the top of the quilt.

I always had my quilts professionally quilted, so I made the backs of the quilts larger than the front by at least 6" (3" a side) in length and width.


By buying the above yardage for the front of the quilt you will have leftover fabric that you can use on the back of the quilt for the strip of fabrics (G). The finished strip (G) needs to be 20" wide by two yards in length. Unfold your back fabric (F) and measure 15" over from one of the selvages and cut along that line. You will have one piece of fabric 15" x 2 yards and another about 29" x 2 yards. Sew the strip of fabrics (G) to the two pieces of back fabric (F). The back of your quilt is completed. 

Once the quilt has been quilted, you can trim the quilt and add the binding (E). I hope this gives you plenty of information to make one for yourself or a loved one! Thank you for the sweet, encouraging comments you've left me -- both on this blog and on my "Just Another Hang Up" Facebook account.

Saturday, December 30, 2017

Adult Children's Christmas Quilts -- Part 1...


Christmas is over and it was everything I hoped it would be and more. My husband and I went to San Diego to celebrate with three of our children's families. We were able to thaw out in beautiful Southern California since we left Colorado in -7 degree weather on Christmas Eve. It was so fun to be with lots of family on Christmas morning as the little ones opened presents. We also had Facetime calls with the rest of our family members, so we were able to watch them open the quilts I had made for each one. I was pleasantly surprised and touched by how much they seemed to love their gifts. Even the little bitty ones seemed happy to have their own quilts. I've posted about all the grandchildren's quilts, so now I will just do a quick posting of our children's and children-in-law's quilts. I asked all our children and grandchildren before I started the project for their favorite color and an "interest" that they have in their lives. I almost always used their color preferences and tried to find fabric in their interest or that defined them to me.

The first two I'll show are Jillian and Joe's quilts. These two are busy and industrious parents, so the theme of their quilts were busy bees. Often, quite by accident and some by choice, the quilts for a couple were somewhat similar -- in color or theme. The quilting in Jillian's is a flowers and bees design. Here it is...


In August, when I knew I still had a lot of the adult quilts to finish I began using the same pattern on many of them. It's a half square triangle with a plain square between. They worked up quickly and the focus is on the fabric instead of the design of the quilt.

Here's Joe's quilt...


Here's another two that we gave to our son Christopher and his wife Stephanie. Chris is an engineer, so I loved these fabrics of blueprints of airplanes which seemed to have an element of engineering. The quilting is a clouds design...


Stephanie mentioned that she loves light and dark grays and white. I added a pop of color similar to the color in Chris' quilt. I fell in love with this ostrich fabric. Stephanie also speaks French, and the fabric with the writing is in French. The quilting is a leaf design...


More to come in a day or two! 
Happy New Year!

Friday, December 22, 2017

Friday Fabric Finds and a Merry Christmas to you!


I think I might start up a Friday Fabric Finds post this next year and to kick it off, I'll feature these adorable prints. Wouldn't these be darling for a Christmas quilt? We'll start with this inspiration fabric...

Quilting Treasures "Christmas Doors - Ecru"

Kona Cotton "Shadow"
 
Cotton & Steel "Garland Illuminate - Cherry"

Hoffman California International "Grafic Brick Wall - Gray"

Quilting Treasures "Pixie Square Dot - Turquoise"

All together...


Wishing you a very Merry Christmas!

Tuesday, December 19, 2017

Crazy Quilt...


When I created the goal of making the Christmas quilts for family members last February, the thought was to make the quilts from as much of my fabric stash as possible. My best laid plans rarely come to fruition. In 2018, however, I am determined to use as much of my stash as possible when I make quilts. I've always wanted to make a crazy quilt, and I'm especially drawn to 1930's reproduction fabric for this style of quilt, so I went through my stash and found some prints that were along those lines...


It's actually really difficult for me to make a crazy quilt. I like things to coordinate far too much for me to intentionally choose a variety of colors that are, in my mind at least, totally mismatched. A friend gave me some good advice for this type of quilt though. She said to either choose fabrics of the same scale or similar colors. I chose to make the quilt out of similarly scaled fabrics. Also, quite by accident, I chose flowers as a theme.


Today I made this baby quilt. They are little 4" block half triangles. I'm so pleased with how it turned out and excited to get it professionally quilted. Having a longarm quilter work her magic on it will make all the difference!


I can picture in my mind a two-year-old dragging this quilt behind her. I hope it becomes faded and frayed from being well loved!

Monday, December 11, 2017

Quick Trip...


Last week I traveled to Omaha to have fun with four of our grandkids while their parents enjoyed a weekend of fun in New York City. I always get home from watching the grandkids exhausted, but satisfied and happy. I love being able to treat our sons and daughters to a little time alone with his/her spouse, and I also love being able to have time alone with the grands. If you throw a teeny tiny pekepoo puppy into the mix, it's heaven.

Last night after our kids arrived home, we went to the Mormon Trail Center at Historic Winter Quarters. Winter Quarters was a temporary settlement along the Mormon trail where Mormon pioneers waited during the winter of 1846-1847, before they made the trek west to Utah. The Church has erected a visitors' center in Omaha that helps tell the story of those amazing pioneers.

Every Christmas Season the center hosts a gingerbread display. People and organizations from all over the area contribute to this family-fun event. I thought you might like to see some of my favorites.

Some gingerbread displays take on the theme of the visitor's center, namely pioneer life or the trek west...


These were two of my favorites and were more traditional gingerbread houses...


Here are a couple of "larger buildings" that might be representative of places in the city (not sure)...


This was very touching. In loving memory of the Brown Street Church of Christ in Texas and those who were killed there in November someone paid this tribute...


And my favorite was a beautiful gingerbread panorama with the theme, "Anne of Green Gables." Having just been to eastern Canada, it couldn't have been more sweet to me. I should have taken a front view of the "town," but can you see Anne Shirley sitting on the front steps of the thatched-roof school?


Visiting this amazing event made me want to pull out the cookie sheets, turn on the oven, and start assembling. Then I remembered our family's last attempt at making gingerbread houses, and I came to my senses. These are the finished products of a boys against girls gingerbread contest we had in our family one year. I'm sad to say an impartial judge gave first place to the boys -- but it was only because they used power tools and geometry.


First Place

Second Place


Friday, December 01, 2017

Another Quilt...


It's funny, but the one person I can guarantee won't read my blog posts is my husband. He's not exactly a social media butterfly, so I feel confident that I can publish a post about his finished Christmas quilt and he will never know. I love this guy so much. Throughout this crazy 45-quilts-in-a-year project he has encouraged me every step of the way. I'm a lucky girl to have been married to him for 40 years.


In looking for fabric for him I knew I could go several directions, but the most obvious was something to do with planes. He's a private pilot, and he loves to fly. I picked out this beautiful organic cotton fabric for the inspiration fabric of the quilt...

 Trans Pacific Cream - Trans Pacific - Birch Fabrics

I love this fabric because you can put so many different colors with it and it's more "adult" than many of the fabrics with planes. I chose two taupe fabrics and a burnt orange for accent fabrics. 


For the quilting I chose a "cloud" pattern...


Last time I posted I mentioned that I was going to redo one of the quilts I'd made for one of my sons, because the color on one of the fabrics went wonky (purple) on me. I ended up making a new one that day, and I think it's perfect. His quilt is the only quilt I have left to bind. Sooooo happy about that!

Monday, November 20, 2017

Emery's Quilt ...


Here's the latest "Emery" quilt. The first quilt I made for this little two-year-old granddaughter was shipped off to Texas for flood relief efforts in October, so I whipped up another one for the kiddo. I love these adorable Little Red Riding Hood fabrics.


Emery is our two-year-old granddaughter with a ton of personality. She's the one that stands at the edge of the pool, yells "cannonball!" and belly flips into the pool. She needed a quilt full of color and a little sass.


Two colors that I don't put together a lot in "real" life are red and pink, but I have to admit that they have been a favorite color combination for granddaughter quilts this year. Red, pink, and white are so bright and cheerful...


Sunday, November 19, 2017

Banner Display Holder...


I'm not sure this is even blog worthy, but a few months ago I made a little banner holder that I know  will get a lot of use. At the time I made it for a table display for the buffet at a baby shower. This month I used it at a church party for the ladies in our congregation. It's so easy that I thought I'd share.


I like a buffet to have a little height and I love banners, so I made this little banner holder in about 10 minutes. All you need is two 8" {or larger depending on your preference} wood rounds and a couple of wood dowels about 1/2 inch in size. You can find these wood rounds and dowels at most hobby stores and a great online source is Save-On-Crafts... here.


Find the center of the wood round and mark with a pencil. Then drill a hold the size of the dowel. Done. 


You can find banners, pom-poms, and tassels to hang from the banner holder at a myriad of places... Target, Hobby Lobby, Michaels, World Market, party stores, etc. So many fun options out there. I found the two I displayed here at Hobby Lobby.


Here's one little trick to make the dowels stand up perfectly straight. If the dowel is leaning a teeny bit to one side, just slip a natural colored toothpick between the dowel and the wood round and break it off so the end of the toothpick is left between the dowel and the round. The toothpick becomes a shim and forces the dowel to "straighten up." Or you can glue the dowels in place, but I think it's easier to store the holder if the pieces aren't glued together.


A banner display makes for a fun and affordable way to decorate for a party...


Saturday, November 18, 2017

Two More Granddaughter Quilts...


A few months ago I gave away a few quilts I'd made for three of our granddaughters for Christmas to those in need in the aftermath of hurricane Harvey. So... in the last couple of months I made three more to compensate. All of the quilts I've made have been "one of a kind" till these two. I walked into the quilt shop by our home and instantly fell in love with these fabrics and decided to make two from these sweet prints.


I just don't think it gets cuter than this...


I made these identical quilts for Hazel (18 months) and Charlee (8 months). I used the star pattern that I've used on a lot of the baby and toddler quilts. I love the simplicity of it. It works up so fast!


I can hardly believe it, but this Monday I pick up the last four quilts from the quilter. All I have to do is bind those four, and I will have finished the quilts for the hubs, our children, the kids-in-law, and all our grandchildren. Forty-one quilts in all. I feel relieved and pretty accomplished, if I do say so myself. I'm so grateful that my husband fully supported me in this mighty adventure. He was so sweet to encourage me every stitch of the way!