Friday, November 29, 2013

Friday's Fabulous Finds...


I spy with my Etsy eye something... 
golden. 


Clockwise, starting top left:


Wishing you a sparkling weekend. 


Friday, November 22, 2013

Monday, November 11, 2013

Lil' Boy Car Caddy...

The hubs and I are purchasing presents for 31 people this year for Christmas. Not even kidding. That number includes each other, our parents, the kids, the kids-in-law, the girlfriend, and the grandkids. Ordinarily I might feel a little overwhelmed, but I actually feel really good because I'm almost done with my Christmas shopping. Most years I scurry around at the last minute, but I plan on having everything bought and mailed before Thanksgiving.

On Friday I made two Lil' Boy Car Caddies for my two-year-old grandsons. I'd made these a couple of years ago for some of the older grands...


This little caddy (16" x 9") is a case for hot wheel cars. It's the perfect gift to help a little guy keep busy when he's out and about. There's a little "garage" for each car and a road for the cars to travel on...


To make this Car Caddy I followed the instructions at "Homemade by Jill," but I made a few alterations. I used a snap closure instead of Velcro. In addition, I didn't use felt because I wanted it to be washable, and I lined all the pieces (except the "garage" pockets) with fusible fleece to give it more durability. If there's one thing I know after raising five boys, it's that little-boy-toys need to be durable!


To store this caddy, tuck each car in a "garage" (pocket) and fold in half lengthwise...


Then fold the length in thirds and snap shut. I use a closure with a center release snapping buckle. When folded up the caddy is only 4.5" x 5".


Hopefully these Lil' Boy Car Caddies will be miles of fun for our two-year-old grandsons!


FYI: Fabrics used for this project:


Sunday, November 10, 2013

Thankful Thoughts...


 "A grateful heart... comes through expressing gratitude to our Heavenly Father for His blessings
 and to those around us for all that they bring into our lives."   ~Thomas S. Monson


Feeling grateful. 

Friday, November 08, 2013

Tuesday, November 05, 2013

Manfred Tooth Pillow Pattern...


My fourth grandchild lost his first tooth last week. I got a call and picture a few minutes later...


He was very excited, but I noticed a "deer in the headlights" expression on his little face. It's both thrilling and perplexing to have teeth fall out of your mouth. I'd made Brunhilda and Manfred Tooth Pillows for his cousins a couple of years ago, so I figured a "Manfred the Monster" tooth pillow was in order for this soon to be toothless kiddo. Here's the pillow I made for him:


Here's how this tooth pillow works. Before your toothless wonder goes to bed, his "lost" tooth is placed in the pillow (Manfred's mouth) for safe keeping until the tooth fairy visits.


The next morning when he awakens the tooth fairy has visited and left a little something in its place.


Usually that "little something" is cold, hard cash. Which makes little hearts go pitter-patter. If this little 10-inch pillow is reserved and only used when a tooth has been lost, it makes the occasion all the more special!


This pillow is getting shipped off today to my grandson.
Hopefully the little guy won't loose two more teeth before it gets there!

***********

To receive the PDF pattern and instructions for 
"Manfred the Monster" Tooth Pillow,
simply email me with a request for the pattern!

My email address is located on my sidebar under "Contact Information."
In the subject line of your email write "Manfred Tooth Pillow Pattern."
 
 It is free of charge, however, if you request this pattern please be so kind as to leave a comment below. I'd love to hear you!  By requesting this copyrighted document you agree not to sell this document or sell any products using this pattern. It is for personal use or gifts only.

Friday, November 01, 2013

Thursday, October 31, 2013

Happy Halloween!


It's a beautiful day in Colorado. Thinking of the those in the mid part of our country today and hoping you stay safe and sound. {I keep track of the weather a little more earnestly these days since the flood last month in Colorado!} I stepped into our backyard a minute ago and took these photos of our pear and oak trees. They are celebrating Halloween in all their orangy glory! I'm feeling grateful we live in such a beautiful place.


Wishing you a happy and safe Halloween!


Monday, October 28, 2013

Herringbone Accent Wall -- Finished!


Saturday I finished an accent wall that I've been working on most of the week. It started with Plan A -- using a stencil on the wall. That plan was discarded for Plan B  -- which involved using miles and miles of painter's tape and a whole lot of patience.  The painters tape served as the lines between the herringbone pattern. Because this is a shuffled herringbone pattern, I put a little piece of tape on the sections to be painted. Then I covered those areas with white paint to seal the edges of the tape so there would be crisp lines when I added the colored paint...


Before painting I figured out the color pattern I would be using by adding a dash of paint to each block...


By Saturday I had painted the Herringbone pattern on the wall and all I had to do was wait for the paint to dry! Here's a photo after the paint was applied...


The dimensions of the project are easy. For the same pattern place the vertical tape 8 inches apart.  Then mark down every four inches for the diagonal pattern, like this...


I was a little concerned that the colorful paint would seep under the tape because our walls are textured, but when I removed the tape there wasn't much of that at all. Grateful. A teeny bit of touch up was all that was required.


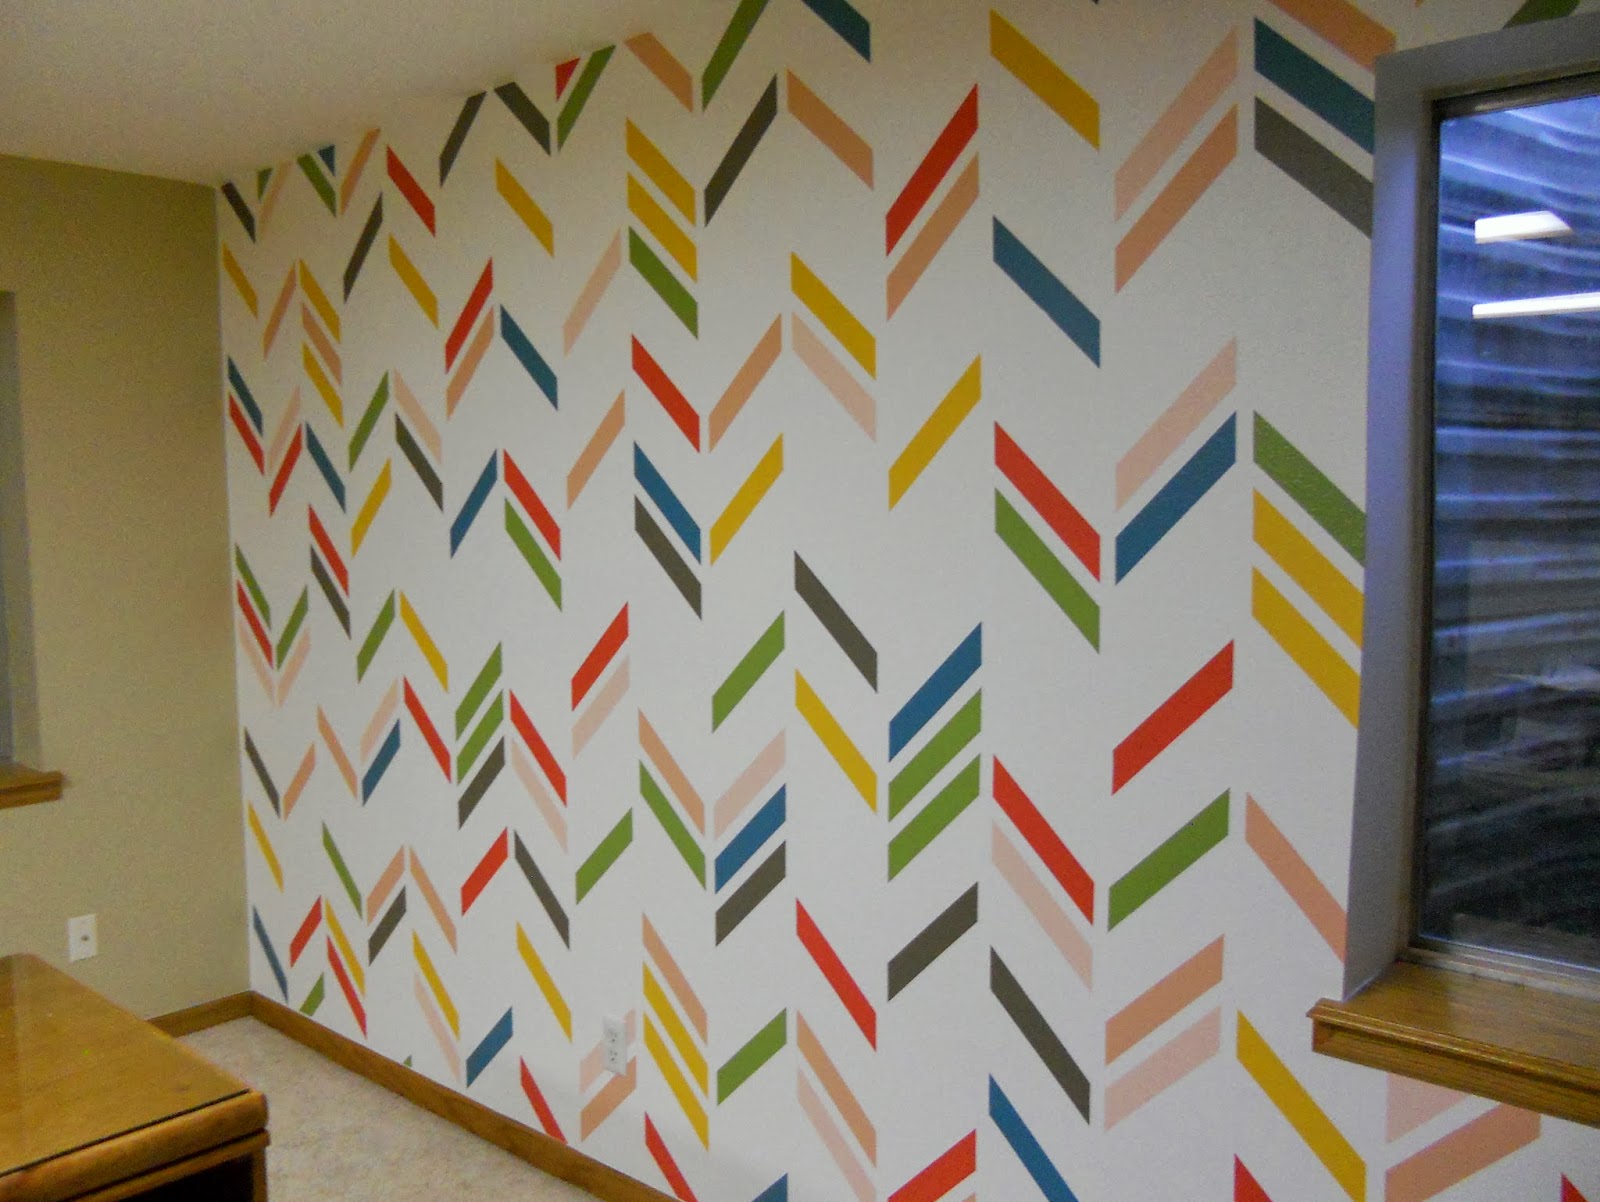
Here's the finished wall...


This project was very time consuming, but I absolutely love it!


It's exactly the playful feel that I wanted for this rec room for the grandkids!


FYI: Here's some information on the paint I used. All the paint was from the Valspar "Eddie Bauer Home" Signature Collection: Island Blue, Dahlia, Taffy, Yogurt, Java, Dark Mango, & Apple Green.


Happy. Happy. Happy.


Linked to:
I Heart Naptime Linky Party
Friday Favs Party @ Naptime Crafter
The CSI Project
Handmade Tuesdays @ Ladybug Blessings 
Show Me What Ya Got @ Not Just a Housewife


Saturday, October 26, 2013

Herringbone Wall...


This week I've been working on an accent wall in our basement rec room. I'm getting there. I have two coats of colored paint on the herringbone pattern already done. I just need to put one more coat on the dark salmon and the yellow to finish it up...


These are not colors that I'm normally drawn to, so I've been a little unsettled about this project. I've committed to the colors though because I want this rec room to be a fun, playful place for the grands. I think these colors play to that.


I'm really hoping the paint hasn't seeped up under the tape. I ran a coat of white paint on the tape to seal the edges before I started with color, but if that didn't work on this textured wall it is going to be one hot mess! Wish me luck. The tape will come off later today after all the paint dries.


Friday, October 25, 2013

On to Plan B...

A couple of days ago I mentioned that I was going to be working on an accent wall in the rec room in our basement. I had bought a beautiful herringbone stencil from Royal Design Studio for the wall.


I started tracing around the stencil lines and it became apparent very quickly that the stencil wasn't going to work on our textured walls. There was only 1/8" of an inch between the blocks, which isn't enough of a space on a fully textured wall. So, I painted over what I'd traced, and I quickly devised a Plan B. {I'll use that beautiful stencil some other way!}

Plan B is comprised of miles and miles of 1" painters tape and a whole lot of patience. I began by making vertical lines 8" apart on the wall. Our long level became my best friend...


Then I created a herringbone pattern, copying the same shuffled herringbone pattern as on the stencil. My pattern is twice as big as the one on the stencil. The painters tape serves as the lines between the herringbone pattern. Because this is a shuffled herringbone pattern, I put a little piece of tape on the sections to be painted. Then I covered those areas with white paint to seal the tape so there would be crisp lines when I added the colored paint...


To say this is a labor intensive project is a gross understatement. I worked on this project for more than 8 hours yesterday and this is as far as I got...


I'm going to finish the taping today, and I might even start adding the colored paint. Can't wait to see the finished project!

UPDATE: Go here for the finals outcome of this fun wall!