Showing posts with label autumn holidays. Show all posts

Tuesday, October 10, 2017

40 Halloween Decorations


Forty Halloween decorating ideas and their links are posted on Shutterfly this morning -- including my "Countdown to Candy!" {If you want to request the "Countdown to Candy" document, do so before October 12th, or you'll have to wait till October 23rd for the document to be sent to you.}


Go here to check out these fun ideas at Shutterfly! 

Wednesday, October 28, 2015

Caramel Apples...


Last week my DIL Meghann and I made caramel apples. She had suggested we make them about a month ago, and, finally, the stars aligned and we were able to get together! I'd made them one time before, and it was a total disaster, so I was looking forward to learning from a pro. It wasn't until we were about ready to start that she told me she'd never made them before. {What?!@*!} However, she simply turned to a YouTube video, and we learned all we needed to know. We ended up making 24 of these beauties!


One thing I learned that would have made my first experience a success, is that you need to wash the apples really well -- scrubbing them a bit to get off all the wax that is applied to the outside of them before they are displayed at the store. If you don't get the wax off, your toppings -- especially your caramel -- will slip right off the apple. {Lesson learned.}


We had a variety of toppings. We dipped them all in caramel, let that harden by refrigerating the apples for a little while, then dipped them in white chocolate or dark chocolate. In the photo above, the apple on the left was dipped in caramel, then white chocolate, and, finally, in a cinnamon and brown sugar mixture. It's called an "Apple Pie Caramel Apple." The one on the right was dipped in caramel, then dark chocolate and pecans.


We also used a drizzle method {see photo above}, where the apples were dipped in caramel, and then drizzled with white chocolate and dark chocolate. Sometimes nuts or tiny chocolate chips were added to the drizzle at the top.


Meghann and I talked about our love of family traditions as we were making these and decided that this would have to be a new traditional fall activity that we would keep!

Wednesday, September 23, 2015

Realistic Stems for Pumpkins...


I should probably name this "Pumpkin Week on Just Another Hang Up" or some such thing. Yes, I have yet another pumpkin post for y'all! I posted a tutorial on Fabric Pumpkins on Monday, and Tuesday I showed how chalk paint can transform store-bought pumpkins. Today I'm going to show how dollar store {aka "cheap"} pumpkins can be transformed into more realistic looking pumpkins.


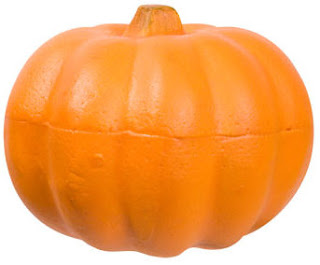
Have you ever noticed that the stem on a fabricated pumpkin is one of the most important things that make an imitation pumpkin look more real? Take the item above as an example. It couldn't look more fake with that orange stubby stem. Well, truth be told, there's a lot wrong with the pumpkin above, but the good new is -- {wait for it} -- it can all be changed with a little paint, sisal rope, cinnamon, glue, and a positive attitude.

The other day I was perusing Pinterest, when I came upon a pin that directed me to this website with a post about how to make realistic looking stems on a fake pumpkin. It made my day!

The next day I followed the blog post at Anderson & Grant and made a sisal rope stem for the pumpkin below. I learned a few things. I felt like this first stem was way too thick for the size of the pumpkin...


So, for the next couple I did something a little different. First I separated the strands of the sisal rope a little more thoroughly, so they were just strands of rope. Then I cut some shorter lengths and hot glued them around the base of the stem.


After that I cut some longer threads of sisal and hot glued them to the shorter strands. I didn't use nearly the same amount of longer threads as the shorter threads. As a result, I had a stem that wasn't as thick as the first, but covered the original stem well. {The gourd below is the same one as above, after the transformation of stem and paint...}


Then I used Mod Podge and cinnamon, like the other blog post recommended, but I didn't put on a second coat of Mod Podge {not necessary}. What I got was gourds that looked like they'd been torn from the field...


Well, not exactly like they'd been harvested from the field because I've never seen a blue pumpkin growing in a field {wouldn't that be cool?}, but you get my drift. Now we have a gorgeous display of more realistic-ish looking pumpkins and gourds.


Honestly, I think we've improved on Mother Nature.


Just sayin'.

Tuesday, September 22, 2015

Chalk Painted Pumpkins...


I have a thing for pumpkins lately. Seriously. It's a bit of an obsession. Yesterday I published a Fabric Pumpkin Tutorial and showed you some photos of some fabric pumpkins I made last week. A few days ago my DIL, Meghann, and I got together to paint some pumpkins. If you follow me on Pinterest, you know that I have my share of painted pumpkin pins.


We started our project by buying some pumpkins from Michael's and Hobby Lobby. Both stores have all their autumn items on sale these days, so they were very reasonable. I like to buy pumpkins and gourds that are oddly shaped, because they look more natural.


Before I started painting I rough them up a bit. Most craft store pumpkins are made of a foam composite, so you can push on them with your finger and make a little dent. They look a little more natural with a few blemishes like real veggies.


I'm not sure I can express adequately how much I love the colors of these pumpkins. We used Waverly Chalk Paint to cover these beauties. I bought the paint at Walmart. Most chalk paint that I found at craft stores were $10 each. The Waverly paints I found at Walmart were only $6 each. (Many people use acrylic craft paints too.)


For this type of a project I would buy the colors you like and add a couple of neutral colors like gray and white. That way you can mix the more colorful paints with neutral colors to make them lighter or darker. This will help you shade and give definition to the pumpkins.


Here is a "before" photo. Frankly, they weren't very inspiring...


Now they are a mix of beautiful soft autumn colors...


This is the first time I'd used chalk paint. I know. I know. I'm way behind the times, but I did love using this medium. Chalk paint gave these pumpkins a matte chalk finish. The paint layered beautifully and was easy to distress.


We used the clear wax and the antique wax to seal the paint. A little buffing after the wax has dried creates a matte finish.


Meghann sent me these pictures of her creations the day after we got together. Seriously, don't these photos look like still life paintings?


Seriously. Gorgeous.


Sneak Peek...
Have you ever noticed that the stem is one of the most important things that make 
an imitation pumpkin look more real? 

In the next couple of days I'll show you how to change a cheap dollar store pumpkin into a 
more expensive looking, realistic pumpkin. 
It's all about the stem...